Blog

  • Userrecon — Find Social Media Accounts

    Now days Social media is getting very popular. Their are lots of social media sites around us, like Twitter, Instagram, Facebook, YouTube, Reddit, Pinterest, Tumblr, Medium etc. Userrecon is a grate tool to discover social media accounts by usernames. Everyone knows that information gathering is a very important in penetration testing, but information collected from one social media is not enough.

    This is very helpful for a security researcher . We can collect many information of a human. We can generate a bigger password list. Userrecon can help to find a username across 75+ social media sites. This tool is very helpful in location tracking and footprinting.

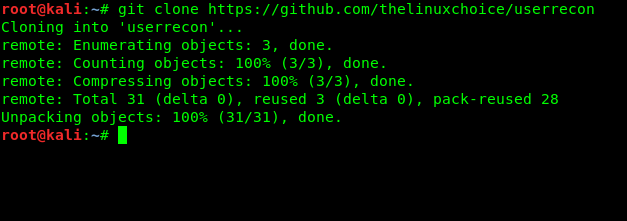
    Userrecon is a shell script, it is very easy to use. To use this tool we need to download/clone it from Github by applying following command :

    git clone https://github.com/jaykali/userrecon

    The screenshot of preceding command is following:

    https://github.com/thelinuxchoice/userrecon

    Then we go to the userrecon folder using cd command :

    cd userrecon

    and then we give the script executable permission by using following command:

    chmod +x userrecon.sh

    The screenshot is following:

    chmod +x userrecon.sh

    Now we can run this this tool by applying following command:

    ./userrecon.sh

    Then the tool userrecon will start, as the following screenshot:

    userrecon main menu

    Here userrecon asks for username of our target. We just need to type the username and press Enter, userrecon will start scanning, like following screenshot:

    userrecon targets

    Userrecon scan over 75 social media website for a given username. After scanning userrecon will save a log in txt file we can check the social media accounts by using those discovered links. Isn’t it easy and super cool ?

     
    For any kind of question ask us in the comment section. We always reply. Also follow us on Medium & Twitter.
  • Ettercap — DNS Spoofing in Kali Linux

    Today we gonna learn DNS spoofing in our Kali Linux system with the help of Ettercap, and How to use ettercap in Kali Linux? Before learning DNS spoofing we need a clear idea about DNS. DNS stands for Domain Name System. Domain Name System or DNS server translate a human-readable domain-name (such as google.com, nytimes.com) into a numerical IP address that is used to route communications between nodes.

    ettercap

    As we know every system have an unique IP address, but it is very difficult to remember IP address of many website for a human. So a domain name attached with the IP address. To reduce the effort and improve the performance DNS saves translate data for a limited time which called cache.

    This means if it receives another request for same translation, it can replay without needing to ask any other servers until the cache expires.

    DNS spoofing is a crucial part of penetration testing. In this method attacker can divert a domain name to a incorrect IP. This results in traffic being diverted to the attacker’s computer or any other system.

    With the help of DNS spoofing attacker can inject poison in victim’s address resolution protocol, and this attack is very hard to detect.

    Here for this tutorial we use Ettercap to spoof DNS. Ettercap is a very popular and easy DNS spoofing tool.

    How to install ettercap on kali linux? You don’t need Ettercap comes pre-installed with Kali Linux, before open it we do some configuration. Open our terminal window and edit etter.conf file in any text editor. The file is located in /etc/ettercap/etter.conf. We use leafpad and the command will be:

    leafpad /etc/ettercap/etter.conf

    The screenshot is following:

    etter.conf

    Now we scroll down for the Linux section. The screenshot is following;

    etter.conf linux

    Here we use IPtables, so we active two commands of IPtable section. We just need to remove those # to active the commands. See the screenshot given below:

    ettre.conf linux iptables

    Then we save and close it. Then we start our apache web server by following command:

    service apache2 start

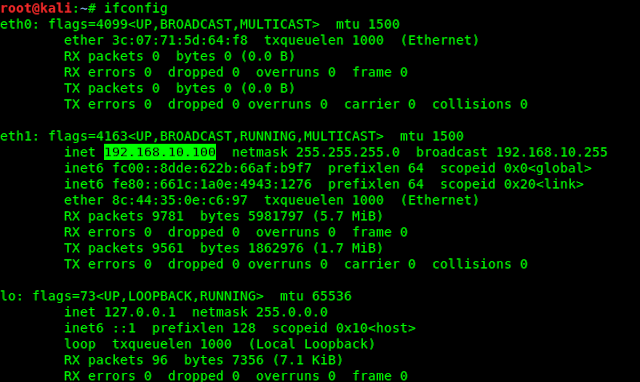
    Then we find our local IP by using following command:

    ifconfig

    The screenshot is following:

    ifconfig

    When we open our localhost, it is the homepage of apache web server. We can put anything in our localhost, like phishing page or any malicious web page. Now we change facebook.com domain with our localhost. Means if someone try to open facebook.com in our local network it will open our localhost page not the Facebook.

    Now we need to configure another ettercap file called etter.dns by using following command :

    leafpad /etc/ettercap/etter.dns

    The screenshot is following:

    etter.dns

    Then we scrool down and set our target. See the following screenshot:

    etter.dns target

    We remove the highlighted link in the screenshot, and put the link we want to redirect, in our case it is facebook.com so we put it, and we also change the next line for sub-domains.
    Then we will change those IP with our local IP. Then we delete the third line. The configuration shown in following screenshot:

    etter.dns setting

    Then we save the file and close it.
    Now we open Ettercap by using following command :

    ettercap -G

    This will open ettercap’s Graphical User Interface(GUI) mode. The screenshot is following;

    ettercap GUI

    Then we click on Sniff and then Unified Sniffing. The screenshot is following:

    Here we need to choose our network interface. Then it will start unified sniffing.
    Now we choose our target. Before choosing target we need to stop unified sniffing. To do that we click on the “Start” menu and click on “Stop Sniffing“.

    Then we go to Target menu and click on Current Target. We can see that we don’t have any target in the following screenshot:

    ettercap targets

    We need to scan for host. So we click on Host menu and click on Scan for Hosts.

    Then we can see the Host List from the Host menu. Here we may see some hosts. We need to choose our default gateway as target 1 and victim as target 2. In our case we are the victim so we added our IP in target.

    Then we go to the MITM(Man In The Middle) menu, then we click on ARP Poisoning and select “Sniff remote connection“, then click on OK. Now the ARP Poisoning is set.

    The next step is we need to go into the Plugins section and then go to Manage the Plugins, and we active the dns-spoof plugin by double clicking on it.
    The screenshot is following:

    dns spoofing

    Now we are all set. We go to the Start menu and click on the Start Sniffing.

    Now we open our browser and try to open facebook.com but we will redirect ti our localhost. Here any web page we can set our localhost. If there was a phishing page then it will be very dangerous. Want to learn host malicious web pages in localhost try this tutorials:

    Weeman Phishing Over Wan

    ShellPhish Easy Phishing

  • SET — The Social Engineering Toolkit

    Social engineering attacks are one of the top techniques used against networks today. Why spend days, weeks, or even months trying to penetrate layers of network security when we can just trick a user into running a file that allows us full access to their machine and bypass antivirus, firewalls, and many intrusion detection systems?

    This is most commonly used in phishing attacks today, craft an e-mail or create a fake website that tricks user into running , malicious file that creates a backdoor into their system. But as a security expert, how could we test this against our network ? Would such attack work, and how could we defend against it ?

    Kali Linux includes one of the popular social engineering attack toolkit available, Devid kennedy’s Social Engineering Toolkit (SET). Devid’s team is very active on SET, there are always new features and attacks being added, More recently several non-social engineering tools have been also added to SET making it a very robust attack tool.

    In this post we will take a look at some of the tools included with SET and two of the attacks options, both powershell based attacks.

    We can start SET from the Kali Linux  main menu :

    Kali Linux > Exploitation Tools > Social Engineering Toolkit
     
    Or we can type following command in a terminal :
    setoolkit
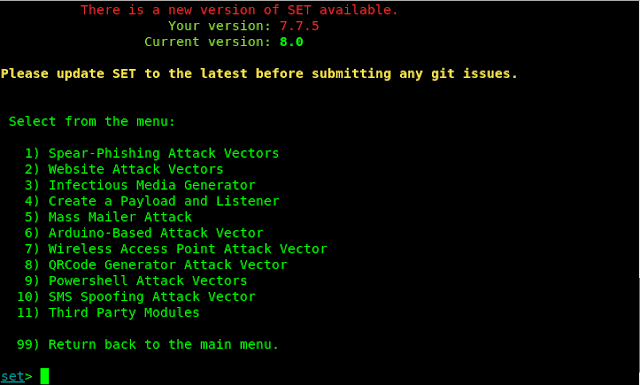
    The Screenshot is following :
    SET menu
    We can see the Social-Engineering Attacks in the top of the menu, so we choose number 1 and hit Enter. Then we will be displayed social engineering options as we can see in the following screenshot:
    Social engineering attacks
    Here we get all type of social engineering options as following :
    1. Spear-Phishing Attack Vectors
    2. Website Attack Vectors
    3. Infectious Media Generator
    4. Create a Payload and Generator
    5. Mass Mailer Attack
    6. Arduino-Based Attack Vector
    7. Wireless Access Point Attack Vector
    8. QRCode Generator Attack Vector
    9. Powershell Attack Vectors
    10. SMS Spoofing Attack Vector
    11. Third Party Modules

    Here in this tutorial we choose options 5. That is Mass Mailer Attack.

     Mass Mailer

    One way a Social Engineer will  attack a network is to send out a flood of e-,ails to company address and see who will respond or run the malicious attachment we sent with it.

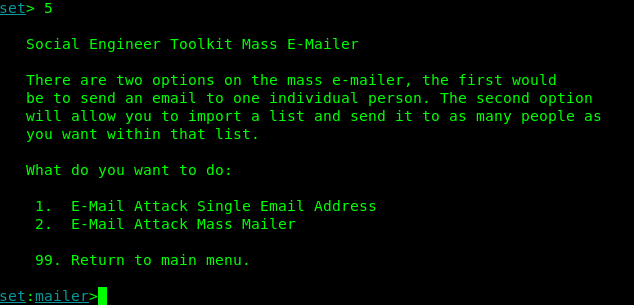
    After entering in option 5 in SET we got two options

    1. E-mail Attack single E-mail Address
    2. E-mail Attack Mass Mailer

    The screenshot is following:

    Mass mailer

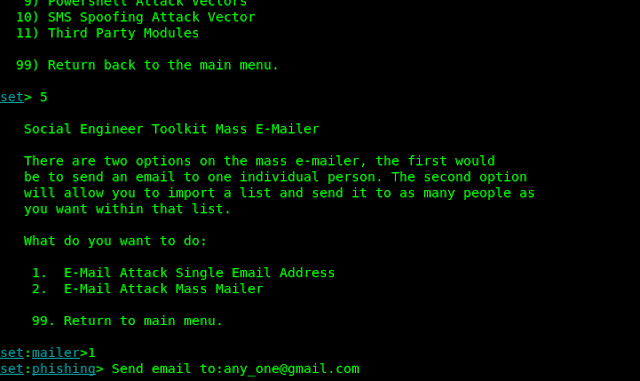
    For this example let’s just send one. We press 1 and hit “Enter”.

    Then we enter a target e-mail address. See the following screenshot :

    fake mail

    For this example, let’s just send one. We press 1 and hit “Enter“.

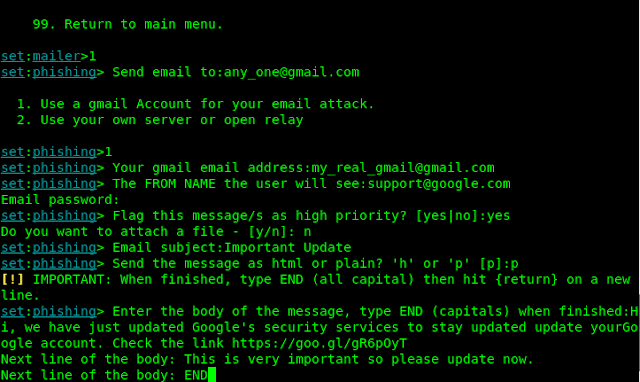
    Now we select option 1 to use a Gmail account or another server. For this tutorial we will use a fake Gmail account. The Gmail address and password must be correct.

    Then we choose a spoofed name to use for the ‘from’ line of the message. Let’s use “supporrt@google.com” so it look that it’s from Google. Pay special attention to this field, as this where the real social engineering takes place.

    Now SET asks for the password of the Gmail account.

    Then we press yes at the prompt “Flag this message/s as high priority ?”

    We don’t want to attach any malicious file so we choose “no” when prompt “Do you want to attach a file ?”

    Next enter an e-mail subject line. What about “Important update”

    fake e-mail

    Enter “p” when prompted to “Send the message as html or plain ?”

    Now type-in a fake message, preferably one that will entice our victim to click on a malicious link included or entice them surf to a malicious web page. In actual defense practice this could just be a test webpage that records the IP address of those who were tricked to surf to the page. That way as a security expert we know who in our organization needs to be better educated on the risks of malicious e-mails.

    When finished we type “END” in the last line. Just like following screenshot.

    Mass mailer attack

     Then press “Enter” and SET will send out the e-mail to victim.

    The message in above screenshot is obviously a silly fake, but something like this (With a much more believable message ) could be used to test employee’s ability to detect, resist and report phishing attempts.

    Java PYInjector Attack

    So far we have just sent a fake e-mail that could redirect someone to a bogus site. But if we could make a fake site that offered up a booby script, and if the user allows the script to create shell with the user.

    The Java PyInjector attack leverages the anti-virus bypassing capabilities of PowerShell based attacks with a Java application. We will use SET to create a fictitious website that will offer up a booby-trapped Java app, and if user allows the app to run, we get a full remote session to the system.

    We will be using a Windows 8 system as the target in the example.

    From the SET menu we choose number 1 for Social-Engineering Attacks. Then we choose 2 for Website Attack Vectors. Now we choose number 1 for Java Applet Attack method.
    This will create a Java app that has a backdoor shell.

    The Metasploit Browser Exploit attacks the client system with Metasploit browser exploits. The Credentials Harvester Attack is pretty slick as it clones an existing website (like Facebook) and then stores any credentials that are entered into it.

    TabNabbing works great if the client has a lot of browser window open, it waits a certain time then switches one of the tabs to a page that SET creates. The Web-Jacking attacks uses iFrame replacements to make a malicious link look legit, and finally the Multi-Attack combines several of the above attacks.

    Next choose 1 for Web-Templates to have SET create a generic webpage to use, or use option 2Site Cloner ” to allow SET to use an existing website as a template for the attack webpage.

    Choose yes/no in NAT/port forwarding. Usually selecting no will be sufficient if using an internal testing lab.

    Enter the IP address of our SET machine. We can open another terminal window and type following command for the IP address:

    ifconfig

    The IP address is in the following screenshot:

    ifconfig

    Now select a template choose 1 Java Reuqired“.
    Then we pick a payload we want delivered, we usually choose 14 ShellCodeExes Alphanum Shellcode” (This is an interesting as it runs from memory, never touching the hard drive, this effectively by-passing some anti-virus programs ) or 15 PYInjector Shellcode“. For now let’s go ahead  and use option 15, “PYInjector Shellcode Injection“default port 443.

    Next choose a payload to inject. let’s pick the first option “Windows Meterpreter Reverse TCP“.

    Now SET is all ready to go and does several things. It creates and encrypts the Powershell injection code, creates website, loads metasploit and starts a service looking for people to connect. When done our screen will look like following screenshot:

    Now we need to trick victim that he clicks on our malicious link. Here we have hosted the site in our local host so the link will be the IP address of our Kali Linux system and victim should be in our same network. Victim’s browser want’s to run our malicious Java applet in popup. If he click on “Run”, our meterpreter session will started and we can do anything on victim’s PC.

    To do this on WAN (on Internet, not only in local network) Read this tutorial Easy Port Forwarding using SSH .

    The Social Engineering Toolkit is truly a robust and feature rich tool for any corporate security testing team.
    Spend some time with SET and check out numerous options it offers for attacking a target system. You can use SET to create malicious CD/DVD and USB media (for creating malicious media and leaving them in corporate parking lots, etc), a slew of arduino based attacks, Microsoft SQL Brute Forcer, Wireless Access Point attack, a Mass Mailer, QR code Attack and a bunch of website social engineering attacks that we did not cover yet. Comment below which tutorial should comes next.

  • Weeman — Phishing With http Server On Internet

    Weeman is a very simple http server python script. Weeman can create powerful phishing pages in localhost or same network. It work like other phishing framework, in simple words it takes username and password from users when they type username and password and the credentials grab by weeman and will show in terminal. In this tutorial we learn how to use weeman and make the phishing page working on internet on only in localhost.
    Weeman is not comes with Kali Linux so, we need to clone this tool in our Kali Linux system from weeman’s Github repository by using following command:

    git clone https://github.com/evait-security/weeman

    The screenshot of the command is following:

    weeman download

    Then we need to go into the directory where weeman is downloaded, To do this we use following command:

    cd weeman

    Now we can run this tool by applying following command:

    python weeman.py

    The screenshot is following :

    weeman home

    We can see that weeman is started successfully. Now we set the port by using the command:

    set port 8080

    Here we create a phishing page of facebook.com. So the command to set phishing page for facebook.com is following:

    set url https://facebook.com

    The screenshot is following:

    setting port and url

    Then we need to run the server using run command:

    run

    The screenshot is following:

    weeman phishing

    In the above screenshot we can see that we can access the phishing page by typing localhost:8080 in browser’s address bar, and we see that Facebook phishing page is ready in localhost. Check the following screenshot:

    Facebook phishing page

    We can type our internal ip address in the place of localhost.

    Done we did it but wait this is for localhost only that means this page is available for same network. Then how to forward this over internet ?

    We will use SSH to forward our port that other network’s devices can access our localhost. But how? Ngrok is not stable specially the free version. We use serveo.net.

    Our previous tutorial is about How to forward localhost on Internet, Read that by clicking here.

    Here in short (not discussing in depth) use following command in another terminal to forward our localhost :

    ssh -R 80:127.0.0.1:8080 serveo.net

    or

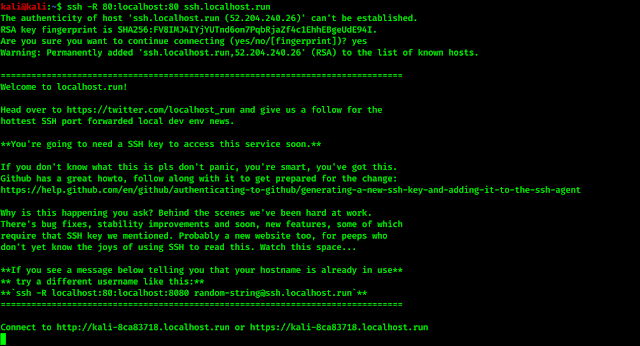
    ssh -R 80:127.0.0.1:8080 localhost.run

    Then we got a unique URL. Using this URL we can forward our localhost phishing page in internet. See the screenshot below:

     Now we can catch victim from anywhere not only in local network. When user tries to log in from our link he will be trapped, and he will be forwarded to real Facebook. The credential will show in weeman’s terminal as following:

    For detailed information about port forwarding using SSH must read this tutorial.

    This this tutorial is for educational
    purpose only. Hacking Facebook account is crime. If anyone do any
    illegal activity then we are not responsible for that.


    Any question or problem ? Better suggestion ? Fell free to comment in the comment section below.

    Like our tutorials ? show the support by shearing our tutorials with friends or recommend them our site.

  • Easy Port Forwarding using SSH

    Sometime we need to run our localhost website or server over internet. To do this we need to forward our port that other device can access our website from anywhere in the world by internet. Usually we can forward our port by configuring settings in router, but if we don’t have router or don’t wanna use our router or not have static ip, then we have a very easy option. We can remotely forward port using SSH.

    SSH port Forward
    Image Copyright:  SRU Computer Science

    To do this we use a free service called serveo.net and localhost.run. This requires no installation and no sign-up. Serveo is a SSH server. Whenever a user connects to this service they got a public URL that URL can be use to connect to their localhost server.

    We are in our Kali Linux system. Here we have a website in php. We can use a html file also.

    ls command in kali linux

    Now we set this in our localhost. For this we check our local ip by using following command:

    ifconfig

    The screenshot of our local ip is following :

    ifconfig in kali linux

    Here we start a basic web server using php by using following command:

    php -S 192.168.10.100:80

    Here the 192.168.10.100 is our local ip and we run this server in port 80. The screenshot of the command is following:

    php server localhost

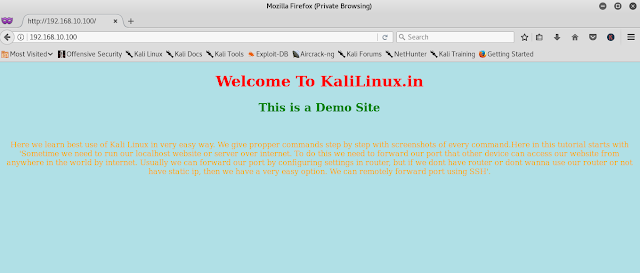
    Here we need to remember that we must run this server in the directory where we saved the php/html file. We have successfully started our website or web server in our local network. Let we check this by typing our local ip and port in browser. The screenshot is following :

    demo localhost website

    We can see in the screenshot that URL is our local ip. That means it is hosted in localhost. Now we want to access our website outside of our network that means from anywhere via internet.

    We minimize the terminal window (Don’t close this terminal, because it’s running our server) and open another new terminal window to run SSH.

    The Serveo Method

    For this we apply following command:

    ssh -R 80:192.168.10.100:80 serveo.net

    Here 80 is our port and we are using ssh using serveo.net service.

    Then we can see that our localhost is forwarding in a unique URL, as following screenshot.

    serveo.net tutorial

    Now we can access our localhost by using this URL. Copy this URL and paste it in the address bar of browser in any devices and see the magic.

    SSH port forwarding tutorial

    It’s done. But wait serveo have some other features.

    We can request serveo to get back our old URL. If it is free then serveo will assign it for us again.

    We have a old serveo connection with lente.servo.net. We try to get it again. So we request for that subdomain by using following command:

    ssh -R lente:80:192.168.10.100:80 serveo.net

    getting old domain

    Here we got that subdomain. Now we can access our localhost with this older URL.

    If we want to forward random port then our first port fiels in command will be 0. like following command:

    ssh -R 0:192.168.10.100:80 serveo.net

    The screenshot of this command is following :

    serveo random port

    We can open our website with serveo.net:our_assigned_port from anywhere.
    In the following screenshot we have opened this link in our mobile device.

    port forward from mobile

    Using Localhost.run Method

    Well it is almost similar to serveo.net then why we adding this? Because these free services sometimes goes down during overload on the server. If one service is not working then we can try another. So we can use it by applying following command:

    ssh -R 80:192.168.10.100:80 ssh.localhost.run

    If it prompt for RSA fingerprint we type yes and press enter.

    port forwarding using SSH localhost.run method

    We got the shareable link in the last line, we can use this link to connect ssh.

    That’s it. Using this method we can forward port without VPN or router. This is so easy to configure it and the connection is stable unlike ngrok, ngrok is not much stable in free version.

    Liked our works ? Show support by sharing and encourage us by commenting in the comment section. Follow our blog for more tutorials like this and for quick updates follow us on Twitter and Medium.

  • Set Up Honeypot in Kali Linux | Trap For Hackers

    In the cyber security field a question always comes that how to catch a hacker if he tries to hack our system ? So the basic answer is we can set a trap for hackers these type of traps is called honeypot.

    honeypot
    Image (c): Susan A Dunmore 2015

    Even most of big companies use smart honeypots, like Google, Facebook, Microsoft to monitor their users and the activities if they found any illegal or malicious activity the honeypot can block the IP.

    Honeypots are categorized in two ways basis of deployment and basis of design

    Basis of deployment

    • Production Honeypot
    • Research Honeypot

    Basis of design

    • Pure Honeypot
    • High-interaction Honeypot
    • Low-interaction Honeypot

    Setting up Honeypot in Kali Linux

    To set up honeypot in our Kali Linux system we need to download a tool from github it called Pentbox. This tool is written in ruby language. To download this we use the following command:

    git clone https://www.github.com/technicaldada/pentbox

    The screenshot of this command is following:

    downloading honeypot

    Then we need to go into the pentbox folder by using cd command as following:

    cd pentbox

    Here we have a compressed file named pentbox.tar.xz and to extract itwe apply following command:

    tar -xzvf pentbox.tar.gz

    Then we can see a new folder in this directory by using ls command:

    ls

    The screenshot of this command is following:

    pentbox

    Now we go to the pentbox-1.8 directory and check the files using following command:

    cd pentbox-1.8 && ls

    The screenshot is follwoing:

    Then we run this ruby tool by using simple command as following:

    ./pentbox.rb

    Then this tool will open and screenshot will be look like following :

    Here we need to go to the Network tools option so type 2 and hit Enter.

    The screenshot is following :

    honeypot

    Yes, now we can see the Honeypot option so we go for it by choosing option 3.

    The screenshot is following:

    honeypot options

    Here we can choose 1 for auto configuration this will be fast or we can choose 2 for manual configuration. Manual configuration contains more options but it is for advanced users. For learning we choose the option 1 and hit Enter.

    honeypot started

    Now we can see that we have successfully run honeypot in our localhost on port 80. To check how it works we can go to browser and check our localhost that is 127.0.0.1:80 and then check in the terminal where we started honeypot it will shows the information about him/her who have opened our localhost. like the following screenshot:

    In the advanced option we can insert massages to show up for them who tries to open this link and we also can save the log files. Advanced option also have beep sound alert whenever someone trapped in honeypot we will hear a beep sound.

    So we have learned how to set up honeypot in our Kali Linux system, Which is really awesome in pentest field isn’t it?

  • Wifite — Easy Automated Wireless Auditing

    Wifite2 is complete rewrite of previous popular tool wifite by derv82. It’s designed to automate the process of a wireless auditing. To run properly it needs Aircrack suit, Reaver, Pyrit and some more to be installed. This tool and the additional tools to run it comes pre-installed with Kali Linux.

    wifite

    With the help of wifite we can audit WEP, WPA, WPS encrypted network by by multiple attacks. Before using this powerful tool we gonna check it’s features:

    • It can shorts targets by signal strength that means we can crack the good signal or the closest access points first.

    • It can automatically deauthenticate clients of hidden networks and then reveal their SSID’s.

    • “anonymous” features, wifite can generate a random MAC address before attacking and after attack it comes back to original MAC. We have did this manually in our Changing MAC Address tutorial.

    • We can skip an attack by Ctrl+C and it will start the next attack.

    • Wifite saves all cracked  passwords in cracked.txt file.

    So, we see that we have lots of features now we cover the basics of this tool.
    Open the terminal window in our Kali Linux system and type following command:-

    sudo wifite

    In the following screenshot we can see that after opening this tool it shows up a list of available networks.

    wifite scan

    Now we can select the number from the list or select all. So we just select the number  and press Enter. The screenshot is following:

    wifite kali linux

    Now sit back and relax wifite will try to crack selected networks using multiple attacks, and it will display the password when it is successfully cracked.

    To use more features we can see the help of this tool by using following command :

    sudo wifite -h

    then the help of this tool will come, like the following:

    wifite help

    Now we can use these features like if we need to use anonymous MAC address while attacking then we can start wifite in our Kali Linux system using following command:

    sudo wifite --mac

    and many more features are included with this tool.

    Is not it an easy tool? We can use it with one command. Wifite aims to be “set it and forgot it”.

    wifite-gif

    Isn’t is cool? comment below.

  • AirCrack — Crack Wi-Fi Networks

    Aircrack is software suit for networks, Aircrack can perform network detection, packet sniffing and cracking WEP/WPA2.

    aircrack tutorial
    Image Source – Wikipedia

    Aircrack is open source and build for 802.11 wireless LANs.

    Aircrack consists of many tools, such as aircrack-ng, airdecap-ng, airplay-ng, packetforge-ng, airodump and many others to crack the passwords of Wi-Fi networks around us.
    Here we need to have a Wi-Fi hardware that supports packet injection and monitor mode. List of  some Wi-Fi we can use

    • Alfa card by Alfa Networks
    • TP-Link TL-WN821N
    • Edimax EW-7811 UTC AC600

    and so on.

    In this tutorial we are going to use Alfa cards, usually Alfa cards doesn’t need to install drivers on Kali Linux distro. Just plug and play.

    Lets start by checking whether our card has been detected by Kali Linux. To do that type following command in terminal window:

    airmon-ng

    The screenshot of the command is following:

    aircrack-ng+kali-linux

    Next, we need to set our Wi-Fi adapter (Alfa card in our case) to the monitor mode by applying following command:

    airmon-ng start wlan0mon

    The screenshot of the above command is following:

    airmon-ng start wlan0mon

    Now we will check for Wi-Fi networks around us by using this command:

    airodump-ng wlan0mon

    The screenshot of preceding command is following:

    airodump-ng wlan0mon

    Then, we note the BSSID of the network we want to crack and the channel number. ESSId (name of Wi-Fi networks) will help us to do that.
     In our case we choose the BSSID B8:C1:A2:07:BC:F1 and the channel number is 9.
    Then we stop the process by pressing Ctrl+C and leave the terminal window open.

    Then we open another terminal window and capture the packets with -w switch to write these packets in a file by using following command:

    airodump-ng -w packets -c 9 --bssid B8:C1:A2:07:BC:F1 wlan0mon

    The screenshot is following:

    airodump-ng

    Now we need to watch becons and data column, those numbers start from 0 and increase as the packets are passed between router and other connected devices. We need minimum 20,000 to crack the WEP (Wired Equivalent Privacy) password.

    To become fast, we open another terminal window and run following command to perform a fake authentication:

    airpaly-ng -1 0 -e MGMNT -a BB:C1:A2:07:BC:F1 -h 00:c0:ca:57:cd:fc wlan0mon

    After -e we nned to type the AP ESSID and after -a we put AP MAC and after -h we have typed our MAC in above command.

    The screenshot is following:

    Now we need to do the ARP packet replay using the following command:

    airpaly-ng -3 -b BSSID wlan0mon

    The following screenshot is showing an example of the applied command:

    airplay-ng

    Once we have enough packets saved in a cap file, we start aircrack-ng and give it the file name where we saved the packets(.cap file):

    aircrack-ng filename.cap

    The following screenshot shows output of the preceding command:

    AirCrack

    After cracked, we can see the password on the screen.

    key found

    We need to capture as many packets as possible. Each data packets have an Initialization Vector (IV), which is 3 bytes in size, so we need to simply capture as many IV’s we can and then use Aircrack on them to crack the Password.

  • MAC Changer — Change MAC Address

    MAC address is stands for Media Access Control Address. MAC address is an unique identifier assigned to a network interface controller (NIC).

    Basically it’s a hardware id when we are connecting an Ethernet and Wi-fi.
    As we know that MAC address is unique that means every device have a MAC address that doesn’t match with any other devices. We can’t change it permanently, but we are able to spoof it. MACchanger will help us to do that.

    Why we need to change MAC address

    For the normal purpose we don’t need to change our MAC but in the penetration testing we have many benefits. Suppose some wireless system has blocked our original mac address then we can bypass it easily, or we can spoof our original MAC address before perform penetration test activity on wireless networks so if the admin of network can’t see or ban our original MAC address. Then the admin can see or block/ban our spoofed MAC address.

    How to Change MAC address

    Spoofing MAC address is very very easy in Kali Linux. To do that we need to open the terminal window in our Kali Linux system. At first we check all the adapters using ifconfig command :

    ifconfig

    The screenshot of the command is following:

    The highlighted MAC address in the above screenshot is the MAC address of our eth0 Ethernet interface.

    We need to turn off our network interface. We are going to change MAC address of our eth0 so we type following command :

    ifconfig eth0 down

    The screenshot is following:

    Then we can change our MAC address by using following command:

    macchanger -r eth0

    -r will change our MAC address in a random MAC address in eth0 network interface. The screenshot is following:

    We can see in the screenshot that we have successfully spoofed our mac address.

    Then we need to turn on our network interface again. To do this we use following command:

    ifconfig eth0 up

    The screenshot is following:

    Now we will check our MAC address by using ifconfig command again:

    ifconfig

    The screenshot is following :

    Check the highlighted area of MAC address it’s changed.

    If we learned something new together or got any error discuss it in the comment section.

  • Shellphish — Simple Phishing Toolkit | Phishing Page Creator

    Shellphish is an easy and automated phishing toolkit or phishing page creator written in bash language. This tool is made by thelinuxchoice. Original GitHub repository of shellphish was deleted then we recreated this repository.

    There is Advanced Modified version of Shellphish is available in 2020. Click Here to know more about Zphisher.

     Shellphish can perform phishing in WAN (Wide Area Network). Shellphish can create phishing page of most popular social networking sites like,

    Shellphish also have an option that we can create custom phishing page. This tool is very easy to setup and use.

    To install shellphish we need to open our terminal window and apply the following command :

    git clone https://github.com/jaykali/shellphish

    This command will clone this tool from Github repository. After cloning is complete, we need to go in the folder/directory of shellphish by using cd command and check the files using ls command as following:

    cd shellphish && ls

    The screenshot is following:

    Now we need to give access permission to the main bash script called shellphish.sh . We are going to use the following command to do this :

    chmod +x shellphish.sh

    Then we can run shellphish by using following command:

    ./shellphish.sh

    The main menu will appear after running this tool. Screenshot of the command is following:

    Here we need to choose a website for phishing by using number, we choose number 2 that is Facebook.
    The screenshot is following:

    Then we need to choose the port forwarding option. This tool recommend to choose option 1 the SSH tunneling method by Servo.net. We gonna use Servo, so we choose 1.
    The screenshot is following:

    Then we need to choose the port by default it’s 3333, we are going to use the default configuration so we gonna leave this field blank and type enter.
    The screenshot is following:

    Shellphish will do the rest, it will start the server and make a SSH tunnel. At last shellphish give us the phishing link.
    One url will be direct and long url and other will be short url. We recommend to use the direct link because sometimes url shortener banned shorted phishing urls.

    Okey now we can send this to victims using some social engineering.
    The social engineering part is very crucial for phishing. we need little bit information about about victim. For an example if we know that victim is PUBG lover then we can send this link as a message

    Claim your free 80000 UC in PUBG by login your Facebook from this link  https://www.bit.ly/3rcG6

    This is is just an example of easy social engineering, and we need to wait for the credentials without closing the terminal.
    The advantage of this tool that is this is very very easy to setup.
    Now the question comes how to be safe from this kind of attacks ?
    First we should not click urls from 3rd party, and we need to active two factor authentication. This tool can’t bypass 2FA.
    But some advanced phishing tool really can bypass two factor authentication. Read our post Bypass Two Factor Authentication.