Blog

  • How to Configure Static IP address in Kali Linux

    There are mainly two types of IP address local IP address and External IP address. Local IP address in our system is assigned by the router. The assigned IP address is not static means, the router may change the IP address for our system. In many networking jobs like port forwarding, web server, FTP, SSH we need the IP address of our system. A static IP is much more beneficial than a dynamic one. An IoT based project must need a static IP.

    static ip in kali linux

    Kali Linux users need to do penetration testing jobs and networking always took a big space in penetration testing syllabus. A static IP address will always help us. We don’t need to check for our IP address again and again, and our networking structure will be stable.

    There are many ways to configure a static IP address:

    1. Configure static IP in router settings.

    2. Configure static IP in the Network Manager in our Kali Linux.

    3. Configure static IP in command line.

    4. Configure an External static IP.


    Configure static IP in router settings

    We can bind a fixed/static IP address with our mac address (unique & fixed hardware address for every device) in our router’s setting.

    The process may vary in different models of the router, but the technique will be the same. Usually these function is located

    LAN Settings (Local Network) > DHCP Server > List of assigned IP addresses bypassing DHCP.

    Static IP address in routersettings

    The specific steps for binding the MAC address to the IP address in the router settings depend on the router model. Therefore, if we have any trouble or we can not find the desired setting in our router, then we should check its manuals.

    If we configured static IP router settings, then the actions do not depend on the device to which we want to assign a static IP address, since all the configuration is performed in the router. Also, if we reset all the settings on our device the IP address remains static.

    For example if we reinstall our Operating System on our computer or hard reset our phone , then our router will assign the same static IP to our that device, because we have binded the IP address  with the MAC address (which is always static).

    Note:
    This method is not applicable for virtual machines, even if a network connection of the Bridge type is used. (But why ? Guess the simple reason and answer us in the comment section).


    Configuring Static IP Address in Network Manager

    In Linux with Graphical User Interface (GUI) we can configure a static IP in the Wired Settings.

    Here we can configure a static IP for our wired connection and also for wireless connection. For example we set a static IP address for one of our wireless networks. Process for configuring the wired will be the same.

    First we open the network manager from the application menu Settings -> Advanced Network Manager or we can search for it. Shown in the screenshot:

    Advanced Network Manager

    After opening the Network Manager we got a window like following:

    our internet connections

    Here we need to choose our WiFi router which one we want to fix our IP address. So we choose our home network by double clicking over it.

    Now we got a new window like following:

    editing the network connection

    Here we need to navigate to the IPV4 Settings tab and we got this:

    IPV4 Settings

    Here we need to change the method to manual. Then on “Additional static addresses” field we click on Add to add a static IP address.

    manual method selecting

    Here we need to enter the desired static IP in the ‘Addresses’ field. Note that it should match our network, for example, if the router (default gateway) has the address 192.168.0.1, then the selected address should be 192.168.0.*. So we need to check our router’s IP address; this is also called default gateway. To check this we need to run following command in our terminal :

    ip r

    In the above screenshot we can see that our router’s IP address is 192.168.225.1 so we choose 192.168.225.100. We think it is easy to remember for us.

    Note: We can’t choose 192.168.225.001 because 192.168.225.1 and 192.168.225.001 will be the same in the case of IPV4.

    After choosing the address we need to choose the netmask. We should type here 255.255.255.0 because this netmask will be suitable for most of the tasks.

    In the Default gateway field we need to enter our router’s IP address in our case this is 192.168.225.1.

    setting a static IP address in Kali Linux

    We are almost done. Click on apply to save it. Then we must restart our network manager to see the effect otherwise it will be activated from the next boot up of the computer. We simply apply the following command in our terminal to restart our network manager.

    sudo systemctl restart NetworkManager

    Now we check whether our static IP address is configured or not ? We just check for our IP by using following command:

    ip addr

    Here we can see that our IP address is changed. This is the process to configure a static IP address in Kali Linux in Network Manager settings. If we need, we can also set the DNS server settings, but this is not mandatory.


    Configuring Static IP in command line

    We also can configure a static IP address in the command line interface from our terminal. First we need to configure a file “/etc/network/interfaces”. Let we open this file in our favorite text editor by using following command:

    sudo nano /etc/network/interfaces

    Then we add the following lines at the end of the file:

    #Static IP address
    auto wlan0
    iface eth0 inet static
    address 192.168.225.100
    netmask 255.255.255.0
    gateway 192.168.225.1

    Here wlan0 is our wireless interface. We can check our interfaces using ip addr command.

    The address is our desired static IP address and netmask is 255.255.255.0 will be suitable for most of the tasks, gateway is the IP address of our router. Router’s IP address may vary by its manufacturer.

    Then we save and close it by CTRL+X then Y then ‘Enter’ as we save our changes in nano editor.

    For the changes to take effect, reboot our system by using following command:

    sudo reboot

    After reboot we check for the IP address using ip addr command, the screenshot of the command is following:

    static IP adress

    As we can see in the above screenshot, the network interface is really assigned to required IP and now it will be saved after each reboot.

    This is how we can set a local static IP in Kali Linux or any other Debian based Linux distro.


    Configure an External static IP

    Those things are for static IP address in our local network. But what if we want to fix our dynamic external IP, What if we need a static external IP ?

    Well, this isn’t controlled from our side. It totally depends on our Internet Service Provider (ISP). We can ask them for a static external IP address (May they took  some extra charge for this).

    There is another way to convert our dynamic IP to a static IP, the service called NO-IP. This service provides a hostname for us and we also need to install a client software in our system. The client will check for external IP provided by ISP. Whenever the IP changes it updates it with the hostname and we can use the hostname as our static IP address. We can follow this tutorial to install No-IP.

    Liked our genuine and tested tutorials ? Then make sure to visit our website regularly. For any help comment down we always replay. Don’t forget to follow us on Twitter and Medium, we update small news and our new articles there.

  • Top 5 Cricket Betting Applications in 2020

    Advancement
    in technology has engulfed each and every industry, business, sports,
    and entertainment as well. Cricket is one such game that comprises
    all the 4 mentioned sectors. It is an entertaining sport that has
    turned into a huge industry and a business in itself. Betting has
    added extra glamour to cricket game.
    A
    celebrated sport of all times, several cricket tournaments take place
    in each calendar year. Cricket betting is an art that needs sheer
    diligence, mindfulness and luck determine betting success. If you are
    wondering which cricket sites are the best? What to look for in a
    cricket-betting platform? Listed below are a few of the
    top rated IPL betting apps.
    Top 5 Cricket Betting Applications

    Most
    secure and popular Cricket Betting Sites 

    Betway
    Regulated
    by the Gambling Commission of Great Britain and the Malta Gaming
    Authority for residing and foreign customers respectively. Betway is
    the best cricket-betting app at the moment and has exciting
    promotional offers. It offers a plethora of withdrawal and deposit
    schemes and excellent customer service via phone, email and real-time
    chat. The remarkable range of features and the bookmaker come with
    live match-screening availability. The safety and security of your
    personal funds and identification details is ensured. The Betway app
    offers access to the biggest markets, a tap away, allowing you to
    make quick and easy money.
    10Cric 
    10cric
    is an online bookmaker offering great bonuses and promotions. This
    online betting app is accessible to both old and new customers alike.
    Every new joiner gets up to Rs 10000 along with some 20 free spins as
    a welcome bonus. For the Indian audience, this app is a viable
    option, undoubtedly. You are open to top cricket betting markets and
    deposits are simple via bank transfer alone. The neat user interface
    and attractive charts provide users with concise and quality
    information. Statistics of each league and team are within your
    reach.
    Bet365

    Bet365
    is unique for a few key reasons. The user-friendly interface covers
    an array of betting options of markets, tournaments, and events. Live
    streaming service offered (geographical restrictions prevail) gives
    us an option to watch straight from our mobile devices or desktop.
    The strengthening brand image of
    Bet365
    simply requires you to have a funded account to enjoy its features.
    The much-needed responsible gambling section does not come with
    promotional schemes pertaining to cricket specifically. This British
    online gambling company, Bet365 has over 45 million customers
    globally.
    Royal
    Panda
    Licensed
    and regulated by the Malta Gaming Authority, Royal panda offers a
    comprehensive gaming platform. The welcome offer is amazing with a
    100% bonus on the first deposit up to Rs 10000. Bookmakers pre-match
    and in-play offerings include Total Runs, Total runs odd/even and
    match-winner among the other options. The app has various exciting
    offers with respect to the game of cricket. A section displays the
    live scoreboard but there is no such live streaming option for
    cricket matches. Competitive odds and active cricket betting markets
    are guaranteed with the Royal Panda app. The host of deposit and
    withdrawal options and round the clock customer service makes it a
    popular cricket-betting site.
    22Bet
    India
    Residents
    of India who often face poor connectivity can rely on the 22Bet app.
    The simple design and lightweight memory usage makes it smooth for
    early generation connectivity. The app is trusted with its security
    features and offers good and timely payouts. Deposit and withdrawal
    of funds is made comprehensive. Their incredibly large sports section
    entails 50 varied sports. Live betting is available throughout the
    day on multiple different sporting events. Cricket betting fans in
    India will definitely find 22Bet an appealing platform.

    Choice
    of a good cricket-betting site made easy 

    You
    now have a crisp list of the best cricket betting sites to choose
    from. All betting sites listed above have their own sets of pros and
    cons. Choose a site best suited to meet your needs. You are at the
    stadium and wish to put your stakes in the second half? All you need
    to do is simply access your mobile handset, hit the bookmaker and
    place your bets. You can do this while chilling in a local bar or at
    a friend’s place. Take full advantage of your bookmaker to make
    profits. Today, if a sportsbook did not come with a well-designed
    cricket betting application people would reconsider twice before
    using it. Mobile gambling is taking over traditional betting
    mechanisms. Cricket betting has always been in the news yet, it has a
    bright future for bettors.
  • Installing Windows on Kali Linux

    In our life, we have installed Linux over Windows virtually using VMWare or VirtualBox but in this tutorial we are gonna virtually install Windows over Linux.

    To do this we are going to use KVM (Kernel-based Virtual Machine) on our Kali Linux system, or any other Debian based Linux distribution. Using KVM, we can run multiple virtual machines running unmodified Linux or Windows images. That means we can run not only Windows, we can also run Ubuntu, Mint or any other Operating System on our Kali Linux system.
    Each virtual machine has private virtualized hardware: a network card, disk, graphics adapter, etc. It uses hypervisor technology.
    KVM is open source software. The kernel component of KVM is included in mainline Linux, as of 2.6.20. The userspace component of KVM is included in mainline QEMU, as of 1.3.
    installing Windows 10 on Kali Linux

    One funny thing is that we even can use Windows and run Kali Linux on VMWare and in Kali we use KVM to run Windows under Kali Linux is our system resources is powerful enough to capable this. But here we are using Kali Linux primary installation and installing Windows 10 under it using Kernel Virtual Machine.

    Let’s start without wasting time.
    First we need to update and upgrade our Kali Linux system by using following command:
    sudo apt-get update && sudo apt-get updrade -y
    After updating and upgrading our machine we need to install KVM in our Kali Linux machine.
    To install KVM we need to apply following command:
    sudo apt-get install qemu-kvm libvirt0 virt-manager libguestfs-tools
    Now this will take some time we are going for a coffee 🍵.  Also this requires a reboot to finish the installation. If this installation process got any error for dependencies then we need to install dependencies manually or our comment box is opened for solutions.
    Now we can run the KVM manager by using following command:
    virt-manager
    After running this command our virtual machine manager box will opened as the following screenshot:
    KVM main menu
    Then we need to click on the ➕ icon to create a new virtual machine.
    After this we got another window as following screenshot.
    creating virtual machine using KVM
    We can use ISO images of OS or CDROM even we can network install also we can use use disk images.
    Here we are using an ISO image of Windows 10 in our Desktop so we can go with the first option and forward it.
    Windows 10 ISO image on our machine
    After forwarding we got this box.
    Selecting the OS image
    Then we need to browse in our local directory to import our ISO image. We need to choose it and click on forward.
    Now we allocate the RAM and CPU. We can increase these for a batter performance but default is also good. We are going with default, so without any changing we click on forward.
    choosing the RAM and CPU

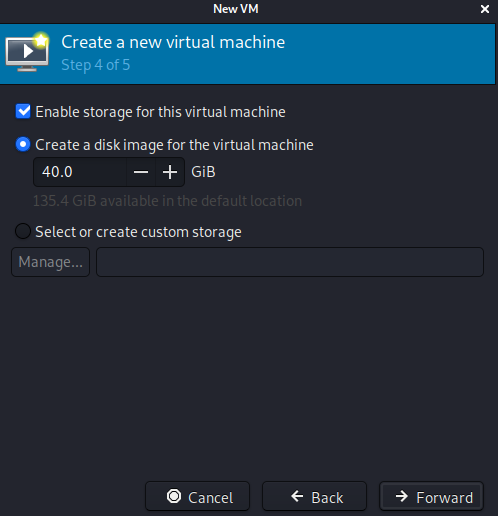
    Here we need to give some disk space to our virtual machine. We give it as per our need.

    allocating disk space for virtual machine
    After this we are ready to install it. Here we can give a name to our virtual machine.
    Finishing the precess
    Now we click on “Finish”.
    Then it will start the installation process of the Operating System, as w can see i the following screenshot.
    Installing Windows on Kali Linux using KVM
    Now nothing to guide. We can install this easily by following instructions and choosing the right options.
    After installing and configuring the host OS we can see this as the following screenshot:
    Windows 10 is running under Kali Linux
    Windows 10 is running under Kali Linux
    Here we got Windows 10 here inside of Kali Linux. So in this tutorial we have learned how we can install other Operating Systems under our Linux machine using KVM Kernel Virtual Machine.
    Got any trouble to do this? Have any question on mind ? The comment box is open for everyone. We always reply. To get updates about our tutorials follow our blog, one more thing we are also available in Twitter and Medium.
  • Funny Linux Commands to Try

    Is there any Linux user who didn’t use the terminal for a single time?

    Terminals is very powerful and makes our life easier. The command line is really cool.

    Life isn’t beautiful without terminal commands. There are some funny commands in Linux terminal. These commands will make us smile and keep away our stress at work.

    1. sl

    No, it is not ls (list) command. The command is really sl. We use the ls command on a daily basis. Many times we mistype ls to sl. We don’t know about you guys but it happens lots of times with us.

    sudo apt-get install sl

    sl stands for Steam Locomotive. After installing we typed sl. A steam locomotive engine passes through our terminal.

    sl Steram Locomotive on linux termianl command

    It could be a good punishment for mistyping the ls command.

    2. Star Wars in Terminal

    Yes, we can watch star wars in our terminal by using a simple command. First we need telnet in our system, if it is installed then fine otherwise we download it by using sudo apt-get install telnet command then we try following command to watch Star Wars in our terminal.

    telnet towel.blinkenlights.nl


    3. Cmatrix

    Love the terminal shows in the matrix movie ? Then cmatrix is the best command to run. First we install cmatrix in our system by applying command:

    sudo apt-get install cmatrix

    Then we run cmatrix to start the matrix effect on our terminal. Isn’t it cool? We can make this more cooler by give it rainbow effect:

    cmatrix -r -u 10

    We can control the speed of text flying by using -u flag from the value 1 to 10.

    cmatrix matrix terminal in rainbow color


    4. Morse code in terminal

    We can play morse code in our terminal by using the morse command. First we install morse by using following command:

    sudo apt-get install morse

    Then we run the following command for the morse code of our given texts.

    morse ilove kalilinux

    Let’s look at what happened.


    5. Rev

    Reverse any text in the terminal window. To do it we just install rev.

    sudo apt-get install rev

    then run command:

    rev

    Now whatever we type and press enter it will be reversed.

    rev reversed text


    6. Tom & Jerry

    Now this one is our favorite on this list. The program will show a cat on display that chases our mouse cursor. This is real fun and must try.

    sudo apt-get install oneko

    After installing we just start it by using oneko command. That’s all.
    Let’s have fun by moving the mouse cursor.

    oneko funny cat

    In case we love dogs more then cat than we should try following command:

    oneko -dog

    Let’s spice up the dog with colors:

    oneko -dog -fg red -bg green 
    oneko custom colored funny dog in linux terminal

    There are a few more types of cats available in oneko. We can get all the information by using oneko –help command.

    Note: When we close the terminal where oneko was running, pets will disappear, it will not start at start-up. We need to add the application to start up and continue enjoying it.


    7. Cowsay and Xcowsay

     Now we bring a cow to our terminal. It will say and think in our terminal. We install these three program by using following command:

    sudo apt-get install cowsay xcowsay
    cowsay "I love linux" 
    xcowsay "I'm not a cow, I am a jaguar."
    xcowsay funny texts

    Not only cows, Cowsay can call a dragon in our terminal. Try following:

    cowsay -f dragon Hello, can i eat you?
    dragon in cowsay

    What about a ghost:

    cowsay -f ghostbusters You have a massage from Casper.


    8. Toilet

    Toilet is a command that transforms texts to large ASCII banners. We can install it on our linux system by applying following command:

    sudo apt-get install toilet

    After installing we can run this by applying:

    toilet www.kalilinux.in

    Let’s add more design to this banner.

    toilet -f smblock --filter border:metal "www.kalilinux.in" 
    toilet banners fun command in linux

    9. Fire on Computer

    Want to set fire on the Computer? Well, don’t panic we are kidding. It’s just a funny command and the output is like fire using characters. We install the package by using command:

    sudo apt-get install libaa-bin

    Then we run following command to fire up:

    aafire
    funny fire on linux terminal

     10. Fortune

    The Fortune program will display quotes, funny predictions, jokes, or even poetry in the terminal. Something like Fortune cookies.

    Let’s install Fortune by entering the apt-get install command in our terminal:

    sudo apt-get install fortune
    After installing fortune we simply type fortune in the command line to test luck.
    fortune teller in linux command line terminal

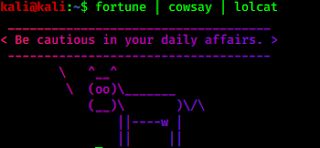
    Even we can run fortune with cowsay. To see the cow is telling our fortune.

    fortune | cowsay
    cow telling fortune

     11. espeak

    Using espeak we can convert text to audio. It will read what we have written. We can install it by using following command:

    sudo apt-get install espeak

    Then we run espeak and enter our text to hear it from our speaker.

    espeak "This is a Linux command" 

    It has a GUI version called gespeaker.


    12. You are under watch

    Xeyes is always looking for mouse cursor. It is not only for fun, it is also a utility tool when we have a bigger display and small cursor. Xeyes comes with the x11-apps package. To install it we need to run following command:

     sudo apt-get install x11-apps

    After installing we just need to run xeyes command to activate it.

    xeyes
    xeyes linux watching you

    13. lolcat

    Lolcat is a terminal utility which gives a rainbow effect on our terminal texts.
    It can be used with other utilities. Lets install it by using following command:

    sudo apt-get install lolcat
    Now we can run lolcat with tolls like fortune,cowsay etc.

    fortune | lolcat
    fortune | cowsay | lolcat
    colored cow telling fortune

    14. moo

    Woo, who doesn’t love ester eggs ? Moo doesn’t need to install.

    apt-get moo

    Haha. It also can be used with aptitude

    sudo apt-get install aptitude 

    Then run it with moo

    aptitude moo
    aptitude -v moo
    aptitude -vv moo
    aptitude -vvv moo
    moo funny linux command

    “Moo is lying, it must have an Easter egg, we have read in www.kalilinux.in.” We are going to add more v to see what’s inside it….

    We have included only funny commands. Did we miss any more funny commands ? There are some interesting utility and useful commands in Linux. Should we write an article on this ? Show supports in the comment section. Also comment which one is the best in this list.

    For more interesting tutorials visit our site regularly and follow us on Twitter and Medium.

  • How to Hide a Phishing Link

    Nowadays people are smart enough. They don’t get trapped under phishing. Because the link does not look like the original website. For an example a phishing link may be like, https://ngrok.io/xxabcd but it opens pages like Gmail Login. People got the trap and a user with minimum tech knowledge will not put the credentials(Username & Password). So it becomes tough to phish anyone.

    Then what to do ? The answer is Social engineering. An attacker needs to be skilled enough in social engineering. What is Social Engineering ? In short,social engineering is “bugs in human hardware”. An attacker plays with victim’s mind and trick it.

    Hiding phishing links in normal looking trust-able links is a bigger part of social engineering. By using this method the attacker owns the trust of the victim, and the victim treats the phishing link as a normal link. Because the top-level domain (like Google, YouTube, New York Times, etc) is considered clean.

    how to hide phishing URL

    To make things easier we’re gonna use a tool that will convert a phishing link to a normal web link like Google or YouTube.

    It is a small & simple tool written in bash, named “MaskPhish“. This tool is made by us and exclusively available on our GitHub repository. We can clone this from our GitHub repository by using following command:

    git clone https://github.com/jaykali/maskphish

    After this command this tool will be downloaded on our system, as shown in the following screenshot:

    maskphish clonning from github

    Now we just need to navigate in to maskphish directory by simply using cd command:

    cd maskphish

    We can run this by using following command:

    bash maskphish.sh

    Then MaskPhish will open the main menu in front of us just like the screenshot:

    maskphish main menu
    Now we need to put our phishing URL here whatever it is(with http:// or https://).
    putting phishing URL
    Then We need to put a trusted URL, whatever can phish victim’s mind like https://google.com or https://youtube.com or http://anything.com. As we did in the following screenshot:
    putting trusted domain
    Here we we need to use some social engineering words separated with “-” for an example if the victim is a football fan then we can use something like best-footaball-skills mind that here we don’t use any space.
    Then we just enter it and we got our MaskPhish link. We got our URL started with facebook.com and the URL doesn’t have ngrok in URL directly.
    we got our masked phishing link
    Let’s open this trusted looking URL(also contains special juicy words for target) on our browser are we reached to our destination ngrok (example phishing url).

    Oh crap, we got a “Warning!“.

    browser warning
    The warning comes from browser’s security functions. Every method have own limitations. But in mobile browsers it did not show this warning, it works like magic.
     
    Anyway after click on “Yes” we reached to our phishing website.
    redirected to phishing page
    This is an example Phishing link, for educational purpose
    It is a fact that attackers can gain victim’s trust by this kind of URL and many people don’t check the warnings and click on “Yes”.
     
    When our target is on a Android mobile then the Warning will not come.

    In our opinion this is a really good thing for Social Engineering Attacks. Using this attacker’s success rate will increase, and the attacker earns the trust of the victim by showing off the URL.

    There are some other ways to hide our phishing URL. Suppose the attacker sending phishing links via email then there is already a classic way to hide a URL. For another example we are assuming our website URL kalilinux.in as destination. Now the example :

    Log in on: https://www.facebook.com/

    Kool, Now try to go on Facebook by using the link above !!!

    This is easy,  just HTML. Got the trick 😎? Describe it in the comment section.

    Another technique is Google search’s redirect method.
    This is also super easy the attacker can redirect any URL on Google search as following:

    https://www[dot]google[dot]com/url?q=https://www.phishingurl.link

    Replace the [dot]s with . and try on browser.

    These are the clever ways to used by attackers in phishing attack. But there are more methods (like homograph) to mask a phishing URL on the Internet. To be safe from these we should not click on any 3rd party link even it looks like trusted.

    This tutorial is for educational and research purposes
    only. Hacking or Phishing is a serious crime. If anyone does any
    illegal activity then we are not responsible for that.

    Liked our tutorial then don’t forget to follow us on Twitter and Medium, we post short news and update about our articles there. For any questions please leave a comment, we always reply.
  • OnionShare — Send and Receive Files Anonymously & Securely using Tor

    A normal Internet user send files on internet through mails, messaging applications, Google Drive, DropBox, WeTransfer etc. But as security researcher we knows that these ways are not secure. Our accounts might be terminated by attackers or government and keeps en extra eye on everyone.

    Sending sensitive data through normal shearing platform is not safe. Even Twitter got compromised. In today’s article we are going to learn a secure and anonymous way to send and receive our files on the internet.

    OnionShare -- Send and Receive Files Anonymously & Securely

    To do this we are going to use OnionShare tool. It is a is an open source and cross-platform tool for securely and anonymously sending and receiving files (any size, any type) using Tor onion services. It works by starting a web server directly on your computer and making it accessible as an un-guessable Tor web address that others can load in Tor Browser to download files from you, or upload files to you. It doesn’t require setting up a separate server, using a third party file-sharing service, or even logging into an account.

    First we install and use OnionShare in our Computer, then we talk something more about this tool.

    Installing OnionShare

    OnionShare is a cross-platform software that means we can use this on various Operating systems like Linux, MacOS, Windows etc.

    Windows users download the exe file from here & Mac users please download OnionShare here, or use this command: brew cask install onionshare

    Linux users follow us, we are using Debian-based Kali Linux system and we just need to run following command in our terminal window.

    sudo apt install -y onionshare

    For Fedora users the command will be sudo dnf install onionshare. Getting trouble on installation follow this.

    Now after installing OnionShare we can launch this tool. Now this tool have two modes One is Command line another is Graphical User Interface.

    To open the CLI version we need to use onionshare command but we are going to use the GUI version here so we can search onionshare on app menu

    Searching onionshare on app menu
    Searching onionshare on app menu

     Otherwise we can use following command to start OnionShare:

    onionshare-gui

    After starting it will establish the connection with TOR network, as we can see in the following screenshot.

    OnionShare creating connection to TOR

    After completing the connection building with TOR network we can see it’s main interface as shown in the following screenshot.

    OnionShare in Linux

    Send files using OnionShare

    Now we can send or receive files (any type and any size) securely and anonymously using OnionShare. To send files we can use the add option or simply drag & drop our files.

    Then we just need to click on “Start sharing”.

    adding files to share in onionshare

    After clicking on “Start sharing” OnionShare will start sharing our files and gives us an onion sharing link.

    shering started via Onionshare

    Now we can copy this onion link and share to anyone we want to share our file. When our friend opens this link in Tor Browser and can download the file we have shared, until we “Stop sharing”.

    Receive Files using OnionShare

    To receive files using Onion share we need to go to the “Receive Files” tab and click on the “Start Receive Mode”.

    Receive files mode on OnionShare

    After starting receive files mode we got another .onion link.

    reciving files using OnionShare

    Our friends can open this link on Tor browser and share the files with us.

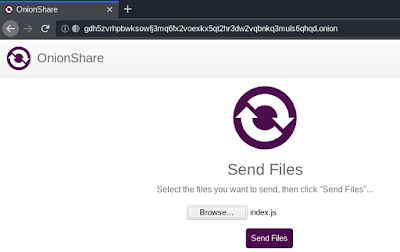
    If our friend opens our shared link on Tor browser it would be like following screenshot:

    OnionShare receive via Tor Browser

    Now our friend can upload files here that they can upload files on directly our computer. The uploaded files will be saved on ~/OnionShare directory.

    We also got notified that someone opens our link and we received a file

    Notification received

    We also can host a website to share our files. We have a very old article about opening Own Onion Website manually, but here things are automated. This is also very simple we just need to got to the “Publish website” section and share our files and create an website.

    These is the simple and easy ways to send and receive files anonymously and securely using tor services.

    In the settings section of OnionShare we got various useful options like Public mode, Persistence address and many more.

    Onionshare settings

    Who should use OnionShare ?

    • Journalists specially who wrights against the Gov.
    • Who wants to share some secret data.
    • Privacy concern people.
    • Who want to be anonymous.
    • Who have fear of cyber attackers (These days they are dangerous even Twitter and Elon Musk got compromised).

    Why OnionShare is So Good?

    1. All data sent and received through OnionShare is end to end encrypted using Tor’s V3 onion protocol.
    2. Non guessable onion links.
    3. OnionShare addresses are ephemeral (by default), and intended for one-time use. (For example, if someone sends us an OnionShare address in a Twitter DM, and a few minutes later we load it and download the files, that address won’t exist anymore in the future. If anyone ever gains access to our Twitter DM history, that OnionShare address will no longer work.)
    4. Files are sends and received directly peer to peer with an encrypted connection using Tor network.

    Security Concerns

    For a better security we should not send the links directly to our friend. Steganography can be very useful here. One hears that some people have been pulling FBI’s nose (or… some other body part?) by sending strongly encrypted information steganographically hidden inside normal looking images. To know more about this click here.

    Better yet, there are two levels in the steganography: the less hidden message contains a pointed insult to any agent who is hip to the scheme and manages to find and decrypt the less hidden message. The real message is more deeply hidden.

    Another thing is the “Receive Files”, We need to be very careful with it, and make sure to take the prominent warning to heart. Some files can potentially take control of our computer if we open or execute them. We should only open things from people we trust, or if we know what we are doing.

    That’s it. Liked our tutorial ? Then make sure to follow our website. We are also available in Twitter and Medium. For any inquiry or issue please feel free to comment down. We always reply.

  • Easy Penetration Testing Lab Setup on Our Computer

    “Practice makes Perfect”.

    Practicing of an activity or skill is the best way to become pro in it. It is applicable on any field. This is also applicable for cybersecurity and bug bounty. But here we got a problem.

    We can not test our penetration testing skills anywhere, because attacking any system or website without proper permission is illegal. The solution is we can host our own website/server on our localhost system and practice there. Means we need to create our own penetration lab and practice there.

    We can practice our skills and try to find bugs on our localhost web application. Many web applications are available in the market with bugs. They put bugs intentionally so that we can practice our skills. We have already discussed these on our DVWA and bWAPP tutorial. Not only two there are more buggy web applications available.

    Easy Penetration Testing Lab Setup on Our Kali Linux

    For better practice we need to use them but installing and configuring different vulnerable web applications on our system is a lengthy and boring process.

    In this tutorial we are going to learn how we can easily manage these web applications on our localhost system and make a better penetration testing lab.

    We use a GitHub tool called “pentestlab“. This bash script is used to install and manage those buggy web applications automatically on our localhost system.

    Let’s open the terminal in our Kali Linux system and clone pentestlab from it’s GitHub repository by using following command:

    git clone https://github.com/eystsen/pentestlab

    The screenshot of the command is following:

    clonning pentestlab on our system

    After it cloned in our machine we need to navigate to it’s directory by using cd command:

    cd pentestlab

    Then we need to install docker in our system.

    Now what is docker and how it works? We have a detailed article on it for beginners, check it out now. We are not going in depth in this article.

    We use the following command to install docker in our system:

    sudo apt install docker.io -y

    This command will install docker in our system.

    Now after this installation we are ready to use this pentestlab in our system.
    Let’s start by using the list of vulnerable web apps we are getting with this tool.

    For this we use following command:

    ./pentestlab.sh list

    The screenshot is following:

    list of web application

    We can see in the screenshot that we are getting lots of vulnerable webapps. The list is following:

    1. bwapp — bWAPP
    2. webgoat7 — WebGoat 7.1
    3. webgoat8 — WebGoat 8.0
    4. dvwa — Damn Vulnerable Web App
    5. mutillidae — Mutillidae II
    6. juiceshop — OWASP Juice Shop
    7. vulnerablewordpress — WPScan Vulnerable WordPress
    8. securityninjas — OpenDNS Security Ninjas
    9. altoro –Altoro Mutual

    Now we can start any of the above web application on our system. For an example we start bwapp on our machine. To start bwapp on our machine we use following command:

    ./pentestlab.sh start bwapp

    For the first run it will download the bwapp docker image and store in our machine and then start it. It will take a minute depending on our internet speed.

    After downloading it will start bwapp on our machine.

    We already downloaded bwapp and running for second time so we don’t need to wait, we can see that bwaap is started on our docker in the following screenshot.

    started bwapp in docker using pentestlab

    Now in the following screenshot we can see that we have started bwapp on our system using this time saving way without any error. It also shows us the default credentials of bwapp. Also pentestlab tool set a host name in our /etc/hosts configuration, also given instruction that we need to go to http://bwapp/install.php for first time one click installation. To do this manually we need to go through a lengthy process. To check that process go to our bwapp installation tutorial.

    bwapp on Kali Linux
    We just need a click to install it

    Now for another example we start OWASP WebGoat 8.0 on our system. To do this we apply following command in our terminal:

    ./pentestlab.sh start webgoat8

    In the following screenshot we can see that our pentestlab tool is downloading webgoat8 on our system.

    downloading webgoat8 docker image on local machine

    After the download complete it will start webgoat8 on our system as we can see in the following screenshot.

    webgoat8 install with one command
    Webgoat8 download and started in one command

    We can see that it mapped webgoat8 docker in 127.7.0.1 or we can simply open http://webgoat8 on our browser.

    We are starting a lab using start command and when we need to stop it we can use stop command. If we want to stop webgoat8 then we need run following command:

    ./pentestlab.sh stop webgoat8

    After this command WebGoat8 will stop and the host name is removed from /etc/hosts file, as we can see it on following screenshot.

    webgoat8 stopping

    This way we can easily host our vulnerable web server on our system by using docker. This is a very efficient way to set up our penetration testing laboratory and practice more. Practicing more will improve our skills also visiting our website regularly will show the way of improvement 😎.

    Also don’t forget to follow us on Medium and Twitter we post updates about our articles there. Got trouble to set own penetration testing lab ? Comment below we always happy to help everyone.

  • BeEF — Control Any Browser Remotely

    The Browser Exploitation Framework (BeEF) is a penetration testing tool focused on client-side attacks executed within a browser. Oh, Yes it includes lots of exploits.

    BeEF Kali Linux

    Previously BeEF comes pre-installed with Kali Linux, but now it doesn’t comes pre-installed. But it is available in Kali Linux repository. We can install it on Kali Linux or other similar Linux distribution by applying following command:

    sudo apt-get install beef-xss

    The following screenshot shows the output of the preceding command:

    installing beef on Kali Linux

    It may consume our time depending on our internet speed and processing speed.

    BeEF can be opened from the terminal using beef-xss command:

    sudo beef-xss

    If we are opening for the first time we need to set a new password to log in BeEF control panel.

    setting up a new password for beef

    After setting up a new password for default user beef the tool will be started as we can see in the following screenshot:

    Now we can access the web based user interface (Web UI) in our browser. We don’t know why but BeEF tries to open our browser automatically but failed (Hey BeEF, don’t worry we can open it manually). We need to open our browser and navigate to http://127.0.0.1:3000/ui/panel and we are in the BeEF’s login page.

    BeEF log in page

    Now here we type beef as default user and our chosen password and press login.

    We are logged in in our BeEF control panel.

    BeEF Dashboard

    Now we need to “hook” a browser.

    BeEF is providing us a basic demo page and a advanced page to hook a browser as we can see in the above screenshot.

    Let’s check it by clicking on the advanced version.

    beef advanced hooking page

    We can see in the above picture this is the advanced page to hook browser. Which browser opens this will be hooked  (even own browsers also) and we got control of the browser.

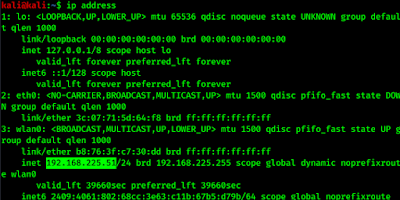
    But this runs on localhost to send it another person in our local network we need to use 192.168.XX.XXX (Local IP address) in the place of 127.0.0.1. Local IP address can be found by typing ip address command in terminal.

    ip address
    local ip address

    Now we need to send this to anyone in our local network with some juicy social engineering techniques. Whenever our target opens this link with a browser the browser will be hooked.

    We have send our this hooking url http://192.168.225.51:3000/demos/butcher/index.html to our another PC and open this link their.

    In our attacker machine we got one online hooked browser.

    hooked browser

    We need to click over the hooked browser’s ip address.

    clicking over hooked browser

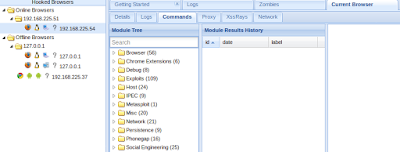
    Now we are on current browser section. Here we can see all the details about our browser and we can run exploits.

    To run exploit commands we need to navigate on the commands tab.

    run command on hoked browsers on commands section

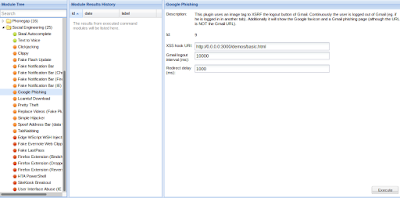
    For an example in this tutorial we run a basic exploit command on our hooked browser. We go social engineering menu and select the Google phishing and click on execute.

    execute exploits on BeEF

    After clicking on execute in our target PC the following page is automatically comes.

    beef on attack

    Now if we enter credentials on targeted PC we got them on our attacker machine.

    Not only creating phishing page crating BeEF have lots of advanced exploits. It can take snaps from webcam, it is dangerous when attacker integrated BeEF with metasploit.

    Browser Exploitation Framework hooks the browser by a JavaScript inside a normal HTML page, it exposes restful API that allow BeEF to be scripted through HTTP/JSON requests.

    To use BeEF over internet we need to use our external ip in the place of our internal ip address. We also need to forward default 3000 port.

    You rule!

    Liked our tutorials ? Then follow us on Medium and Twitter to get notification about our recent articles. For any query or problem please feel free to comment down, we always replay.

  • HaxRat — Take Total Control on Android Remotely

    HaxRat is a cloud based remote android management suite in simple word it is a Android RAT, powered by NodeJS. It works in Linux and Termux (Android).

    haxrat github tool made by hax4us control android remotely

    Previously we have featured an article on L3MON, HaxRat is based on L3MON but much more powerful then L3MON. It have some extra features like screenshot, screen recording, front and rear camera recording. This is developed by Hax4us (Lokesh Pandey). The Key features of HaxRat are following:

    Key Features of HaxRat

    • Screenshot Capture.
    • Screen Recorder.
    • Rear Camera Recorder.
    • Front Camera Recorder.
    • Lock Device.
    • GPS Logging.
    • Microphone Recording.
    • View Contacts.
    • SMS Logs.
    • Send SMS.
    • Call Logs.
    • View Installed Apps.
    • View Stub Permissions.
    • Live Clipboard Logging.
    • Live Notification Logging.
    • View WiFi Networks (logs previously seen).
    • File Explorer & Downloader.
    • Command Queuing.
    • Built In APK Builder.

    We can easily install this suite on Linux , we also can install it on our Android phone by using Termux.


    Installing HaxRat on Kali Linux

    The installation process is the same as we did in our L3MON tutorial. We have detailed discussion on our that post So we are not going to explain the commands.

    First we install JRE in Kali by using following command:

    sudo apt-get install openjdk-8-jre

    Then we download NodeJs in our system by applying following command:

    curl -sL https://deb.nodesource.com/setup_13.x | sudo bash -

    Now we install NodeJs by preceding following command:

    sudo apt-get install -y nodejs

    Now we need pm2 process manager to install this we use following command:

    sudo npm install pm2 -g

    Now we clone haxRat from it’s GitHub repository by using following command:

    git clone https://github.com/Hax4us/haxRat

    Then we navigate to server directory under haxRat by using cd command:

    cd /haxRat/server

    Then we need to install dependencies by using following command:

    npm install

    Then we start the server by using following command:

    node index.js

    Now we can see our server in our browser http://localhost:22533 there will be a login page as following screenshot:

    haxrat login panel

    Now we stop this server by using CTRL+C command. Now what to do ? Login ? But where are the credentials?  We have talked before how to create a custom credential on our older L3MON tutorial. Otherwise check the haxRat GitHub repository for default credentials.


    After login we can see the main page as shown in the following screenshot:

    haxrat dashboard termux


    Now we go to the APK Builder page and give our local IP address and click on build.


    If got  error like “Wrong java Version installed…..” this when building APK then try following command:

    sudo update-alternatives --config java

    Then Then we type 2 and enter.

    Then we stop our running haxRat server by CTRL+C and start it again this problem will be solved.


    Now we can build Spy APK and send it to victim, whenever victim install it and grant the permission. Or if we got victim’s phone in hand then we can implement this.


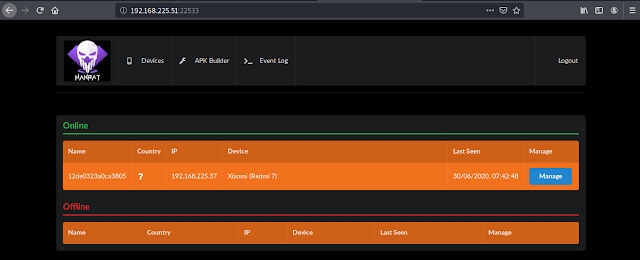
    We got the victim in our haxRat dashboard like following screenshot:


    haxrat dashboard

    Now in the manage section we can manage the Android device totally. Magics will start from here.

    Installed Android Apps
    File Manager
    Recording from front Camera

    Installing HaxRat on Android (using Termux)


    This is easy to installed in Termux. We try following commands one after another to install and configure haxRat.

    apt install nodejs
    git clone https://github.com/hax4us/haxRat.git
    cd haxRat/server
    npm install
    mkdir ~/haxrat
    
    haxrat
    node index.js

    In our browser we navigate to http://<Local IP>:22533 and we will be the login screen of haxRat.


    This video by the developer is described how to install haxRat in Termux / Android:

    This is how we can start the haxrat server and take control of any android device on our local network. We also can run this on wide network or internet by using PortMap service.

    Disclaimer

    Provides
    no warranty with this software and will not be responsible for any
    direct or indirect damage caused due to the usage of this tool or this
    tutorial.
    HaxRat is built and our article is documented for both Educational and Internal use ONLY
    .

    Getting any problem during installing or configuring HaxRat ? Feel free
    to contact us by commenting with error details on below comment section or on the YouTube video this video is uploaded by the developer himself.
    For more tutorials like this subscribe our newsletter to get updated.
    Also we post updates on our Twitter and Medium make sure to follow us there.

  • Sherlock — Hunt Usernames on Social Media Platforms

    Sherlock is an information gathering tool that can find usernames from across 300 social media sites. Previously it need to install from GitHub but after Kali Linux 2020.1update Sherlock comes in the repository of Kali Linux.
    sherlock kali linux find username of social media

    Usually users register on sites and social media with the same username. Suppose we need to find someone by the username, we need to check every social media websites but Sherlock will help to reduce our effort. It will be effective to create an unique username for a new profile, we can check that in which social media it is already used.

    Basically Sherlock is python tool that checks our given usernames across 300 social media websites (list of social media sites) and give us the profile links of the users.

    To install Sherlock in Kali Linux we need to use apt install command in our terminal:

    sudo apt-get install sherlock

    This will install Sherlock in our Kali Linux system as we can see in the following screenshot:

    sherlock kali linux

    Now we can find username over 300 social media websites by using following single command:

    sherlock UserName007

    Then it will start to find the targeted username in various websites as we can see in the following screenshot:

    This is how we can find someone’s all social media handles just using a small command.

    To show only founded profiles in Sherlock and hide all the not found messages we can use following command:

    sherlock UserName007 --print-found

    This command will show us the founded pages in social media sites and ignores not found, as we can see in the following screenshot:

    sherlock found usernames from social media sites

    Yes we can check for more usernames at a same time by using following command:

    sherlock UserName007 user2 user3

    We can even use tor with Sherlock scanning 🔎.  We can also save the output on txt json and csv file format.

    We can check Sherlock’s help to know more by using following command:

    sherlock -h

    Even we can add new sites on Sherlock, to know more check this. We also can use Sherlock in docker, the documentation is here.

    Do you know what is docker ?  We have a detailed article on docker.

    To get regular detailed tutorial on Kali Linux visit our blog or subscribe email notification. We regularly update news and other stuffs in our social media Twitter and Medium. Don’t forget to follow us there.