Category: Password Attacks

  • Ncrack — Crack Network Credentials in Minutes

    Ncrack is a high-speed network authentication cracking tool. It was built to help companies secure their networks by proactively testing all their hosts and networking devices for poor passwords. Security professionals also rely on Ncrack when auditing their clients. Ncrack comes pre-installed with Kali Linux.

    NCrack Kali Linux

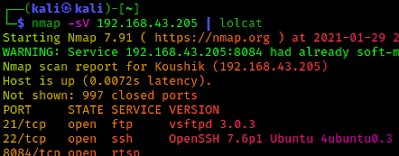
    During penetration testing sometimes we got sometimes we got some port opened on some web application. Ports are open for using services. Services like SSH, FTP, HTTP, SMTP etc. We usually use nmap to scan a network.

    nmap scan result

    We can see in the above nmap scan result, this network’s SSH and FTP ports are opened (port 21 and 22). If we can login through SSH then we got the terminal of the system and if we login through FTP then we got the file manager of the system.

    We can try various tools to crack them like Hydra. But in this article we are going to learn about Ncrack.

    Firstly we run following command to check the helps of Ncrack. Ncrack uses brute force attacks to crack network credentials. We have found lots of network admins using default or easy password, we can crack them using Ncrack in minutes.

    ncrack --help

    We can see a very big list of options in the help section as we can see in the following screenshot:

    ncrack help options

    Without going much deeper let’s check an basic example of Ncrack brute force attack.

    To use Ncrack against a service we can use following command:

    ncrack -U path/of/usernamelist -P path/of/passwordlist <ip address or domain name>:port -v

    So, if we want to attack on our localhost target using real username and password list, then our command will be following:

    ncrack -U /usr/share/seclists/Usernames/top-usernames-shortlist.txt -P /usr/share/seclists/Passwords/Common-Credentials/top-20-common-SSH-passwords.txt 192.168.43.205:21 -v

    Here we have used infamous SecLists, which comes preinstalled with Kali Linux. The output we can see in the following screenshot:

    Ncrack cracked the username and password

    In the above screenshot we can see that Ncrack successfully cracked the credentials. The credentials are username:admin, password:password. Not only our target, there are lots of users around the world still using default or easy passwords.

    Ncrack also comes with a default (small) username and password list to attack. To use it we can use following command:

    ncrack 192.168.225.51:21 -v

    This command will use the default password list comes with Ncrack. It has some default username and password lists. The screenshot is following:

    ncrack ftp default password list

    If we need to run Ncrack’s brute force attack against ssh (port 22) then we can use following command:

    ncrack whatsapp5.com:22 -v

    We can find other Ncrack commands using ncrack –help command.

    This is the way we can find low security usernames and passwords of FTP, SSH,  web server or web application. 

    In this article we learn how we can use Ncrack on Kali Linux.

    Disclaimer:- Use of Ncrack against a network without proper permission is illegal & serious crime. We can test our own system for low security password. If anyone do any illegal activity then we are not responsible for that.

    Liked our article? Then make sure to follow our Twitter and GitHub we post new article updates there. To connect directly with us please join our Telegram group.

    For any problem or question please comment down in the comment section.

  • MaskProcessor — Advanced Password-List for Bruteforce

    We all know that cracking passwords are very important in cybersecurity field. Then ever we thinks for password cracking we either need to do dictionary attack or brute-force. But, if the password didn’t in our password list dictionary attack will not work and brute-force takes too much time to crack a password (sometimes even more than a decade).

    Maskprocessor on Kali LInux

    Trying to solve this problem of brute-force password generator a tool is there by the makers of HashCat (well known password cracking tool). This tool named as MaskProcessor. Now what MaskProcessor do? It is a high-performance word generator with a per-position configurable charset, which tries all combinations from a given keyspace just like in Brute-Force attack, but more specific. Then how it is different from brute-force attack?

    MaskProcessor is Faster Than Brute-Force

    The reason for doing this and not to stick to the traditional Brute-Force is that we want to reduce the password candidate keyspace to a more efficient one.

    Here is a single example. We want to crack the password: Julia1984

    In traditional Brute-Force attack we require a charset that contains all upper-case letters, all lower-case letters and all digits (aka “mixalpha-numeric”). The Password length is 9, so we have to iterate through 62^9 (13,537,086,546,263,552) combinations. Lets suppose we crack with a rate of 100M/s, this requires more than 4 years to complete.

    In Mask attack we know about humans and how they design passwords. The above password matches a simple but common pattern. A name and year appended to it. We can also configure the attack to try the upper-case letters only on the first position. It is very uncommon to see an upper-case letter only in the second or the third position. To make it short, with Mask attack we can reduce the keyspace to 522626262610101010 (237,627,520,000) combinations. With the same cracking rate of 100M/s, this requires just 40 minutes to complete.

    We can see the difference that how MaskProcessor can reduce our efforts. It just guessing the pattern of password and make a very shorter list for a quick job. There are some disadvantages are there also.

    Disadvantage of MaskProcessor Compared to Brute-Force

    There is none. We can argue that the above example is very specific but this does not matter. Even in mask attack we can configure our mask to use exactly the same keyspace as the Brute-Force attack does. The thing is just that this cannot work vice versa.

    What are the Masks

    For each position of the generated password candidates we need to configure a placeholder. If a password we want to crack has the length 8, our mask must consist of 8 placeholders.

    1. A mask is a simple string that configures the keyspace of the password candidate engine using placeholders.
    2. A placeholder can be either a custom charset variable, a built-in charset variable or a static letter.
    3. A variable is indicated by the ? letter followed by one of the built-in
      charset (l, u, d, s, a) or one of the custom charset variable names (1,
      2, 3, 4).
    4. A static letter is not indicated by a letter. An exception is if we want
      the static letter ? itself, which must be written as ??.

    Built-in character encoding

    In MaskProcessor there are some built-in charsets. They are following:

    • ?l = abcdefghijklmnopqrstuvwxyz
    • ?u = ABCDEFGHIJKLMNOPQRSTUVWXYZ
    • ?d = 0123456789
    • ?a = ?l?u?d?s
    • ?b = 0x00 – 0xff

    Not only these as we told in above that we can set custom charset in MaskProcessor.

    Custom Charsets

    There are four command-line-parameters to configure four custom charsets.

    • –custom-charset1=CS
    • –custom-charset2=CS
    • –custom-charset3=CS
    • –custom-charset4=CS

    These command-line-parameters have four analogue shortcuts called -1, -2, -3 and -4. You can specify the chars directly on the command line.

    Password Length Increment

    A Mask attack is always specific to a password length. For example, if we use the mask ”?l?l?l?l?l?l?l?l” we can only crack a password of the length 8. But if the password we try to crack has the length 7 we will not find it. That’s why we have to repeat the attack several times, each time with one placeholder added to the mask. This is transparently automated by using the –increment flag.

    • ?l
    • ?l?l
    • ?l?l?l
    • ?l?l?l?l
    • ?l?l?l?l?l
    • ?l?l?l?l?l?l
    • ?l?l?l?l?l?l?l
    • ?l?l?l?l?l?l?l?l

    Installing MaskProcessor on Kali Linux

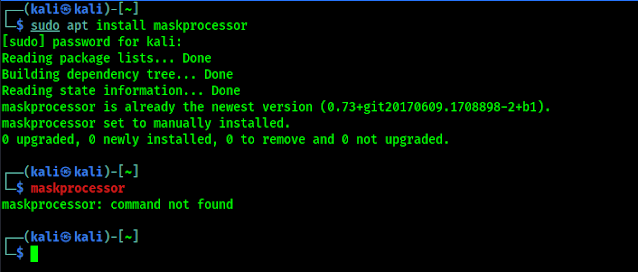
    We can install a minimum version of MaskProcessor on our Kali Linux by using sudo apt install maskprocessor command. But there are some issue with this Kali Linux repository version. Like we had installed it but it is also saying ‘command not found’, as we can see in the following screenshot.

    maskprocessor is installed but not working
    MaskProcessor is installed but “command not found”

    In this case we are going to uninstall this by using sudo apt remove maskprocessor command, and install it from scratch.

    First we download it from it’s GitHub repository by using following command:

    git clone https://github.com/hashcat/maskprocessor

    Now MaskProcessor will be cloned on our system as we can see in the following screenshot:

    maskprocessor git cloned

    Now we need to navigate into the maskprocessor/src directory by using following command:

    cd maskprocessor/src

    Here we build the program files by using the make command:

    make

    In the following screenshot we can see the output of the used command:

    building program files of maskprocessor

    Now we move the mp64.bin file to /usr/bin directory and name it maskprocessor that it can be used as default tools. We can easily do it by using following command:

    sudo mv ./mp64.bin /usr/bin/maskprocessor

    Now our installation is complete. We can use MaskProcessor on our Kali Linux system. We can now use maskprocessor command to run it on our terminal.

    Using MaskProcessor on Kali Linux

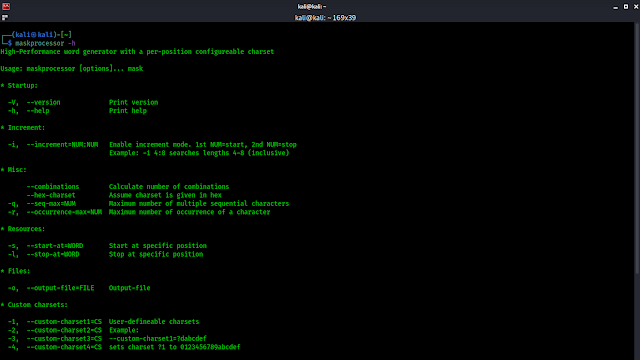
    As we do always lets check MaskProcessor’s help options by applying following command on our terminal window:

    maskprocessor -h

    In the following screenshot we can see what we can do using MaskProcessor:

    Maskprocessor help

    Now we learn how we can generate a specific wordlist in MaskProcessor. Here we need to know about the default charset as we told about in previous section, again mentioning here.

    ?l = abcdefghijklmnopqrstuvwxyz
    ?u = ABCDEFGHIJKLMNOPQRSTUVWXYZ
    ?d = 0123456789
    ?s =  !”#$%&'()*+,-./:;<=>?@[]^_`{|}~
    ?a = ?l?u?d?s
    ?b = 0x00 – 0xff

    All characters, except for those that stand for the set (?l, ?u, ?d, etc.), are included in the password unchanged. If we want to compose a dictionary that contains six-digit passwords we need to use maskprocessor ?d?d?d?d?d?d command but we also save the directory using -o flag. So our command will be as following:

    maskprocessor ?d?d?d?d?d?d -o directory.txt

    This will create a password directory named “directory.txt” which can break a six-digit password by brute-forcing attack.

    Not only this. Almost every password-list creator tool can do this but MaskProcessor can do something better. Now we come into this point.

    What if we know someone using a password which starts with voro followed by 4 numbers and then two capital letters. In this case we can easily create a password-list using MaskProcessor. We need to use following command:

    maskprocessor voro?d?d?d?d?u?u -o passlist.txt

    In the above command we have used voro then four ?d for four digits then two ?u for two capital letters, and bang it will create our required very special password list, as we can see in the following screenshot:

    passlist created in MaskProcessor

    Bang!! Here is our special password list for cracking the specific password.

    Now we can use MaskProcessor for creating special type of password lists. We can easily use MaskProcessor on our Kali Linux system.

    HashCat vs MaskProcessor

    Although, in general, MaskProcessor & Hashcat both are interchangeable to generate passwords, we need to remember that the -a 3 option must be specified to select the brute-force/mask attack mode (since Hashcat supports various attack modes, not only mask). We also need to use the –stdout option, which means to show the password candidates (without cracking the hash).

    Hashcat (Mask attack) doesn’t allow us to set the maximum number of identical repeated characters, the maximum number of occurrences of one character, start or end at a specific position. But such a result can be obtained using a Rule-based attack.

    Running Hashcat on Linux systems can be problematic due to the need to have proprietary drivers.

    Love our article? Make sure to follow us on Twitter and GitHub, we post article updates there. To join our KaliLinuxIn family, join our Telegram Group & Whatsapp Channel. We are striving to build a community for Linux and cybersecurity. For anything we always happy to help everyone on the comment section. As we know our comment section is always open to everyone. We read each and every comment and we always reply.

  • Passhunt on Kali Linux — Exposes the Nightmare of Default Passwords

    Hope you are all doing awesome. As always, today we’re agin going to learn something from the basics of cybersecurity world, where a seemingly harmless string of characters can become our nightmare. Yes, you guessed it—we’re talking about default passwords. Not only that We also learn how we can use a tool called Passhunt on our Kali Linux system and find loopholes on various devices.

    Why Default Passwords Are So Dangerous?

    Now, imagine we’re working on our own home or office. We’ve got all these trusty devices—like routers, webcams, printers—keeping our connection the world and running our work smoothly. But here’s the catch: many of these devices come with default usernames and passwords straight out of the box.

    At first glance, default passwords might seem like a easy shortcut. After all, who wants to spend time to set up a new password when we can just use the one that’s already there, right? Wrong! Default passwords are like leaving the front door of our system wide open for bad characters. Devices with default credentials aren’t just in danger—they are the danger. Anybody can enter the system without knocking the door.

    meme on devices with default credentials

    Let we have a look how default passwords can lead to some serious cyber attacks on us.

    • Network Nets: Imagine that—we’ve got our brand new router up and running, blissfully unaware that it’s still using the default password. Along comes a crafty bad attacker who sniffs out our router’s vulnerability faster than we can type “password123.” With access to our router, the attacker can wreak havoc on our entire network—slowing down our internet, eavesdropping on our data, or even launching full-blown cyber attacks. It’s like handing over the keys to our system on a silver platter!
    • Web Woes: Next up, we’ve got webcams. These little things might seem innocent enough, but with default passwords, they’re serious trouble makers. Imagine a attacker gaining access to our webcam without we even knowing it. They could spy on our every move, invade our privacy, or even use the footage for blackmail. It’s like having an unwanted guest lurking in the shadows of our home, and nobody wants that!
    • Printer Predicaments: Last but not least, let’s talk about printers. Yes, even these humble machines aren’t safe from the perils of default passwords. With access to our printer, a attacker could intercept sensitive documents, manipulate print jobs, or even launch a good old-fashioned printer hack (yes, that’s a thing!), gaining unauthorized access to sensitive documents stored on the printer’s memory. It’s like turning your trusty printer into a cyber tool, ready to strike at a moment’s notice.

    So, what’s the moral of the story? It’s simple: always, always, always change default passwords. Whether it’s for our router, our webcam, our printer, or any other device in our supervision, we shouldn’t take shortcuts when it comes to security. Humans are the most weakest point in any security system. Humans are normally stupid, not really, a better word would ignorant, they don’t aware how stuff works. We just want that our router runs perfectly for Netflix and chill.

    Hunting down default passwords using Passhunt

    Enough talking about layman’s who ever reading this considers as a cyber security expert and we cyber security experts didn’t came here to learn those above things. We wanna test these kind of vulnerabilities due to human errors. Passhunt is a Python script which is going to help us on this matter.

    This Passhunt tool originally created by Viral Maniar which can search through 523 vendors and their 2084 default passwords. It works like a database. Passhunt was giving some issues on newer Python and Kali Linux version. We have updated this script and removed some unwanted lines to run it on our Kali Linux system.

    Let’s fire up our Kali Linux Terminal and type following command to clone Passhunt from Github:

    git clone https://github.com/jaykali/Passhunt

    After pressing Enter ↲ button on our keyboard Passhunt will be downloaded on our system as we can see in the following screenshot.

    Passhunt clonning from Github

    Now we are going to use cd command to go to the Passhunt directory. The command will be following:

    cd Passhunt

    Now we need to install required dependencies to run Passhunt and the command will be following:

    pip3 install -r requirements.txt

    It may take some seconds depending on our internet speed and system configuration. In the following screenshot we can see the output of above commands.

    preparing Passhunt on Kali Linux

    Now we are going to run Passhunt by using following command:

    python passhunt.py

    Now our password hunter Passhunt is ready and running as we can see in the following screenshot.

    Passhunt running on Kali Linux

    In the above screenshot we can see that there are 3 options only on the main menu.

    1. List supported vendors: By pressing 1 and Enter we can see all the supported vendors (brands) names list.
    2. Search Default Password: We can Hit 2 and Enter to search for a Vendor’s default credentials.
    3. Exit: To quit this tool we just need to type 3 and hit Enter.

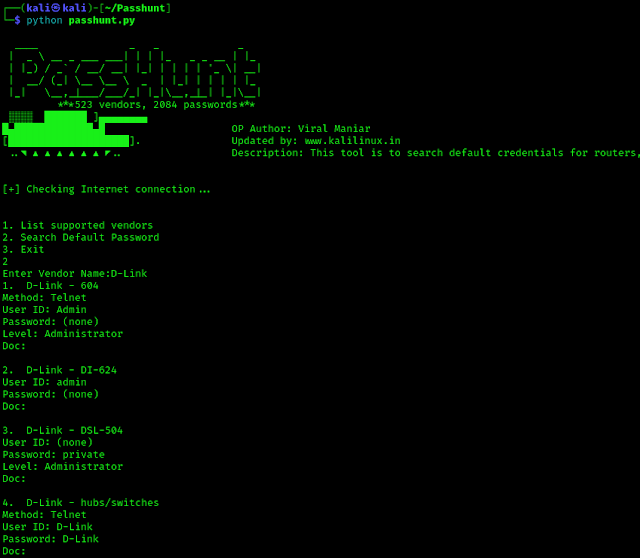
    Now assume we have encountered with a D-Link device, and we are thinking to try default passwords login on this then we can search for it on Passhunt by pressing 2 and hit Enter ⤶.

    Then it will prompt for vendor’s name we can use D-Link in our case. After that we are able to see the list of D-Link devices and their default credentials. Here we can choose our target device as we can see in the following screenshot:

    passhunt is hunting for default credentials

    This is how we can search for default password database using Passhunt on our Kali Linux system. Nowadays default password devices are rare every device have it’s own default password written on somewhere in the packets. But there are some web services which are old and not updated for a while even offices, universities, households use very old model routers for saving some bucks. Humans are 

    Humans are ignorant they really don’t care about these online security. They uses same passwords on internet banking, social media even in shopping sites also. They don’t change the default passwords of devices. Those things are really scary.

    One more thing, If our target device is a router and it have a WPS button (ultra modern routers usually don’t have WPS button, others may have) then we can also try Pixie Dust Attack to crack it.

    That is it for today. We already knows that default passwords are very risky and learn something new i.e using Passhunt on our Kali Linux system and search for default passwords and credentials.

    Love our article? Make sure to follow us on Twitter and GitHub, we post article updates there. To join our KaliLinuxIn family, join our Telegram Group & Whatsapp Channel We are trying to build a community for Linux and Cybersecurity. For anything we always happy to help everyone on the comment section. As we know our comment section is always open to everyone. We read each and every comment and we always reply.

  • Rainbow Tables & Rainbowcrack Cracking Passwords on Kali Linux

    In today’s detailed article we are going to discuss about how we can use ‘Rainbow Table‘ to crack password hashes easily on our Kali Linux system. We also learn the use of RainbowCrack tool. RainbowCrack is really faster like Barry Allen.

    rainbow tables and rainbowcrack on kali linux

    What is Rainbow Table?

    Rainbow table is a pre-computed table for caching the output of cryptographic hash functions, mainly for cracking password hashes. Rainbow table was invented by Philippe Oechslin.

    We know that our passwords are stored on a website or WiFi. There is isn’t stored as a plain text. The stored passwords are hashed in various methods like LM, NTLM, MD5, SHA1 etc. This type of encryption is one-way encryption, that means we can encrypt it from a plaintext but we can’t decrypt it in a plaintext from it’s hash.

    Then how brute-force attack works?

    Well, as we know brute-force uses a list of passwords. In the brute-force it creates a hash of a password and match it hash with the target hash (if they are same or not). It did same process for the all passwords one by one in the list. That’s why this attack is very time consuming and computer resource consuming also, but brute-force didn’t uses much storage as compared to rainbow tables.

    Rainbow table works on the principle of time-memory trade-off, using less computer processing time and more storage than a brute-force attack. Rainbow crack is much faster then brute-force. For more about rainbow table works we can check this. For the computer with low processing power rainbow table is batter is than brute-force.

    We can create a rainbow table at once and use it, or we can download rainbow tables from internet. There are some types of rainbow tables depending on type of hashes, characters and length of password.

    For an example a rainbow table is for SHA1 and uses all lowercase (a,b,c…z) and for password length 1 to 7, will be different from a rainbow table for SHA1, lowercase password with length of 1 to 9.

    We can see or download (free and paid) rainbow tables on this website.

    Rainbow Tables for Download

    Here rainbow tables are divided by hashing algorithms (LM, NTLM, MD5, SHA1), charset (numeric, lowercase etc), length of the password (in plaintext). We can download rainbow tables from this website or we can create our own rainbow tables as per our own requirements. Here we should keep in mind that rainbow tables are large (from 20GB — more than TB).

    Creating own Rainbow Table using RainbowCrack

    We can create our own rainbow table by using ‘RainbowCrack’ tool. This tool comes pre-installed on our Kali Linux system.

    Creation of rainbow table takes much time and storage space on system, but after creating a table we are able to use it to crack passwords faster every time.

    For an example we are going to create a rainbow table to crack a MD5 password which have plaintext length 4 and using only lowercase alphabets.

    To do this we need to open our Kali Linux terminal window and use rtgen command. rtgen stands for rainbow table generation.

    First we run it with -h to see the options as following:

    rtgen -h

    Then the help menu of rtgen will open in front of us, as we can see in the following screenshot:

    rainbow crack rtgen help options

    On the above screenshot we can see how to use rtgen with some example.

    To generate a rainbow table for a MD5 hash of a 4 plaintext length (containing only alphabets) we use following command:

    sudo rtgen md5 loweralpha 1 4 0 1000 1000 0

    In the above command rtgen md5 is for generating rainbow table for MD5 hash, we have set it for lowercase alphabets only by using loweralpha. Then 1 is for minimum length of plaintext password and 4 is for maximum. Then we use left everything default. 0 for table index, chain length & chain number set to 1000, part index is 0.

    Then our rainbow table will be generated as we can see in the following screenshot:

    rainbow table generated
    This is a small rainbow table so generated in seconds

    We can see the used character set, plaintext count and plaintext length on the above screenshot.

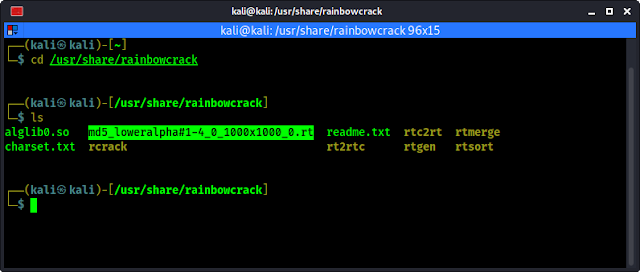
    This rainbow table will be stored in /usr/share/rainbowcrack directory.

    rainbow table generataion location

    Cracking Hashes using RainbowCrack

    Now we can use this rainbow table to crack four (4) characters password’s MD5 hash.

    Here we have a md5 hash which have 4 characters plaintext length in lowercase.

    d6ca3fd0c3a3b462ff2b83436dda495e

    We are going to crack it using our created rainbow table. Before that we need to sort our rainbow table by using the following command:

    sudo rtsort .

    Then the rainbow table will be sorted as we can see in the following screenshot:

    rainbow tables are now sorted

    Now we can use RainbowCrack tool to crack the password hash. to crack it we use following command:

    rcrack . -h d6ca3fd0c3a3b462ff2b83436dda495e

    Here we call rcrack aka RainbowCrack to crack the hash, then use used -h flag for hash, then we use the password hash to crack.

    Then it will crack the password in seconds as we can see it on the following screenshot:

    rainbow crack cracked the file

    We also can use a hash list stored in a txt file. Here we have a hash.txt file on our Desktop.

    list of hashes on Desktop

    To crack all hashes inside it, we use -l flag for list, as shown in following command:

    rcrack . -l /home/kali/Desktop/hash.txt

    Then RainbowCrack will crack the the hashes in seconds as we can see in the following:

    RainbowCracked hash cracked on files

    This is about rainbow tables and how to crack passwords using RainbowCrack on our Kali Linux system.

    This is not ends here. We are giving a practice task.

    Create a md5 rainbow table for 6 characters plaintext password (lowercase only) and crack hashes of this file.

    Share the screenshot of the practice on Twitter and mention us @kali_tutorials or comment down in the comment section.

    Love our article? Make sure to follow us on Twitter and GitHub, we post article updates there. To join our KaliLinuxIn family, join our Telegram Group & Whatsapp Channel We are trying to build a community for Linux and Cybersecurity. For anything we always happy to help everyone on the comment section. As we know our comment section is always open to everyone. We read each and every comment and we always reply.

  • Easily Crack ZIP File Passwords using Zydra

    Zydra is a password recovery tool that can recover passwords from files and Linux shadow files using brute-force or dictionary attack. That means, it can crack passwords of ZIP, RAR and PDF files. Also it can recover passwords of Linux systems using the shadow file (shadow file stores user passwords in Linux system).

    In this detailed article we will learn how we can use Zydra on our Kali Linux system.

    Key Features of Zydra 

    Zydra’s main features are following:

    • The most important features of Zydra is the multiprocessing feature that speeds up the program. For example if we have 8 CPU cores, Zydra will use all of them for processing at the same time.
    • It can be use against Legacy ZIP files, RAR files, PDF files and shadow files.
    • Cracking files password using two methods dictionary method and brute force method.
    • In the brute force method, we can specify the min length and max length of the passwords, also we can specify the type of characters that may be used in the password.
    • A percent progress bar showing how much of the process has been performed.
    • Error handling.

    Installing Zydra on Kali Linux

    We can found Zydra on it’s GitHub repository but before that we will install some dependencies to work Zydra perfectly.

    First of all we update our system by using following command:

    sudo apt-get update

    Then we download some dependencies by using following command:

    sudo apt-get install qpdf unrar

    The above command will install qpdf and unrar on our system as we can see in the following screenshot:

    installing qpdf and unrar

    Then we need to install some Python3 modules using pip.

    pip3 install rarfile pyfiglet py-term

    These will be installed on our system after using above command as we can see it.

    python3 modules for zydra

    Now we just need to download figlet font “epic” for Zydra by using following command:

    sudo wget http://www.figlet.org/fonts/epic.flf -O /usr/share/figlet/epic.flf

    Now it’s time to download the Zydra from GitHub. Either we can clone the whole repository or we can just download the Python script. Let we download just the Python script by using following command:

    wget -O zydra.py https://raw.githubusercontent.com/hamedA2/Zydra/master/Zydra.py

    The python script will be saved our current working directory by the name of zydra.py.

    zydra python script download

    Now we can run the script. First of all we check the help option by applying following command:

    python3 zydra.py --help

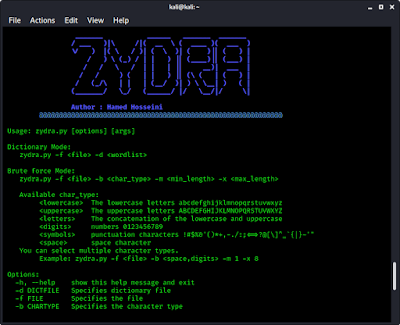
    We can see the help menu of Zydra in the following screenshot:

    zydra help

    Either we can read the boring help section of Zydra or continue reading out guide to know the important uses of this tool.

    How to Crack ZIP files password on Kali Linux

    Here we have a ZIP file on our Desktop which is protected by a password. We can see that it prompt for password on the following screenshot:

    zip file protected with password

    Now we try to brake the password with dictionary attack. To perform this we need a password list. We will use the 10k-most-common.txt (password list). It comes with our Kali Linux (/usr/share/seclists/Passwords/Common-Credentials/10k-most-common.txt), which contains 10,000 most commonly used passwords.

    So we open our terminal and our command will be following:

    python3 zydra.py -f /home/kali/Desktop/images.zip -d /usr/share/seclists/Passwords/Common-Credentials/10k-most-common.txt

    Here we have used the -f flag to specify the location of the ZIP file (in our case which is /home/kali/Desktop/images.zip) and using the -d flag we have specify the location of the dictionary (password list). Output shown in the following screenshot:

    Cracked ZIP file password using zydra

    On the above screenshot we can see that we have successfully cracked the password of the ZIP file using Zydra.

    This is how we can use the dictionary attack we also can try without password list. In that case we need to use brute-force attack and we need to specify the type of characters that may be used in the password.

    python3 zydra.py -f /home/kali/Desktop/images.zip -b digits,symbols -m 4 -x 6

    Here we have choose -b flag for brute force attack and specified our password (mixing digits and symbols), then we use -m flag for minimum length of our password (we choose 4) and -x for maximum length of our password (we choose 6).

    ZIP file brute forcing using Zydra

    On the above screenshot we can see that Zydra has created a count of possible password list which is very big (5622834672 passwords). Which will take a lot of time. Also may gives error (but the scan continues).

    Note: Zydra can recover legacy ZIP files password (The standard one). We have created a ZIP file on Linux system (using Archive Manager) Zydra can’t break it. But ZIP files created from Windows and internet works perfectly.

    How to crack RAR files password using Zydra

    Cracking a RAR file’s password is very similar to cracking ZIP file’s password on Zydra. To do it we need to run following command on our terminal:

    python3 zydra.py -f /home/kali/Desktop/images.rar -d /usr/share/seclists/Passwords/Common-Credentials/10k-most-common.txt

    Then Zydra will start scanning the process. Here we have again choose 10k-most-common.txt password list inside our /usr/share/seclists/Passwords directory which is specified by -d flag and our target RAR file is specified by -f flag located on our Desktop.

    After waiting very few moments we got our password, as we can see in the screenshot:

    Zydra cracked RAR file

    Now we can see on the above screenshot that we have successfully recovered the password of the RAR file.

    We also can use bruteforce attack to recover the password. To do that we need to use -b flag in the place of -d flag and we should specify the type of password and length as we did on ZIP files section, an example command is following:

    python3 zydra.py -f /home/kali/Downloads/file.rar -b digits,symbols -m 4 -x 6

    This is how we can Crack RAR file’s password on our Kali Linux system.

    How to Break or Crack Password of PDF file

    Cracking PDF file’s password is also very similar as ZIP and RAR. We just need to use Zydra and tell Zydra the location of PDF file and the location of password list.

    Here we have an example PDF file on our Desktop, which is locked. As we can see in the following screenshot:

    Locked PDF file on Desktop
    Locked PDF file on Desktop

    Now we run Zydra and try to break the password of this PDF file by using following command:

    python3 zydra.py -f /home/kali/Desktop/test.pdf -d /usr/share/seclists/Passwords/Common-Credentials/10k-most-common.txt

    Here we have used -f flag to specify our PDF file location and we used -d to specify location of our passsword list. The output of the command shows in the following screenshot:

    pdf file password recovered using zydra

    We can see that Zydra just not cracked the password it is also create a decrypted PDF file for us.

    This is how we can crack the password of a PDF file using Zydra on our Kali Linux system.

    Recover Linux passwords from shadow file

    Linux’s users password stored (encrypted) on the shadow file,located on /etc/shadow. Using Zydra we also able to crack shadow file’s passwords. Zydra will crack the passwords one by one for every user on the system.

    Either we can copy the shadow file from a system or we can run Zydra on the target system. Here for an example we run copied all the texts from shadow file from another system and saved it on our system (Desktop) in a file called shadow without file extension and try recover the password.

    To do so we can apply following command on our terminal:

    python3 zydra.py -f /home/kali/Desktop/shadow -d /usr/share/seclists/Passwords/Common-Credentials/10k-most-common.txt

    The screenshot shows that Zydra cracked one user and trying for the other

    Zydra recovered linux users password

    If we need to crack our own system’s password then we need to use our root account (also may need to install rarfile pyfiglet py-term there). The command will be following(we need to log in as root, sudo command from non-root user may show error here):

    python3 zydra.py -f /etc/shadow -d /usr/share/seclists/Passwords/Common-Credentials/10k-most-common.txt

    Conclusion

    This is how to crack password protected ZIP, RAR, PDF files using Zydra on Kali Linux or other debian based Linux system. We also can recover password of Linux users using Zydra.

    This is created for educational perpose only we also can use it to recover forgotten password of files. But using Zydra against other’s protected file will be considered crime as per law. So please do not use it to others without proper permission. We will not be responsible if anyone did this.

    Love our articles? Stay updated with our articles by following us on Twitter and GitHub. Be a part of the KaliLinuxIn community by joining our Telegram Group, where we focus on Linux and Cybersecurity. We’re always available to help in the comment section and read every comment, ensuring a prompt reply.

  • Hashcat — Crack Passwords in Minutes

    Hashcat is an advanced free (License: MIT) multi-threaded password recovery tool and it is world’s fastest password cracker and recovery utility, which supports multiple unique attack modes of attacks for more than 200 highly optimized hashing algorithms. Hashcat currently supports CPUs and GPUs and other hardware accelerators on Linux, Windows, and OSX, and has facilities to help enable distributed password cracking.

    hashcat on Kali Linux

    Hashcat comes pre-installed on our Kali Linux system, So we don’t need to install it, but if installation is required we can use sudo apt install hashcat command.

    Features of Hashcat

    • World’s fastest password cracker.
    • World’s first and only in-kernel rule engine.
    • Free and open source.
    • Multi-OS (Linux, Windows and macOS).
    • Multi-Platform (CPU, GPU, APU, etc., everything that comes with an OpenCL runtime).
    • Multi-Hash (Cracking multiple hashes at the same time).
    • Multi-Devices (Utilizing multiple devices in same system).
    • Multi-Device-Types (Utilizing mixed device types in same system).
    • Supports password candidate brain functionality.
    • Supports distributed cracking networks (using overlay).
    • Supports interactive pause / resume.
    • Supports sessions.
    • Supports restore.
    • Supports reading password candidates from file and stdin.
    • Supports hex-salt and hex-charset.
    • Supports automatic performance tuning.
    • Supports automatic keyspace ordering markov-chains.
    • Built-in benchmarking system.
    • Integrated thermal watchdog.
    • 350+ Hash-types implemented with performance in mind.
    • … and much more.

    Hashcat offers multiple unique attack modes for cracking passwords. Those are following: 

    • Brute-Force attack
    • Combinator attack
    • Dictionary attack
    • Fingerprint attack
    • Hybrid attack
    • Mask attack
    • Permutation attack
    • Rule-based attack
    • Table-Lookup attack
    • Toggle-Case attack
    • PRINCE attack

    Now without wasting any more time lets dive into Hashcat.

    Hashcat on Kali Linux

    As we told Hashcat comes pre-installed with a Kali Linux and it is multi-threaded so first let we benchmark our system by using following command:

    hashcat -b

    In the following screenshot we can see the benchmark of our system and get an idea how it can perform while cracking various types of hashes.

    benchmark of hashcat

    Here we can get an idea about the performance of our system. Let’s run this tool to crack some hashes. Here we have collected some hashed on a text file. For educational purposes we just generated these hashed not collected from any website’s database.

    hashes list on our system

    Now we can crack these using Hashcat, and store the output in a craced.txt file by applying following command:

    hashcat -m 0 -a 0 -o cracked.txt hashes.txt /usr/share/seclists/Passwords/Common-Credentials/10k-most-common.txt

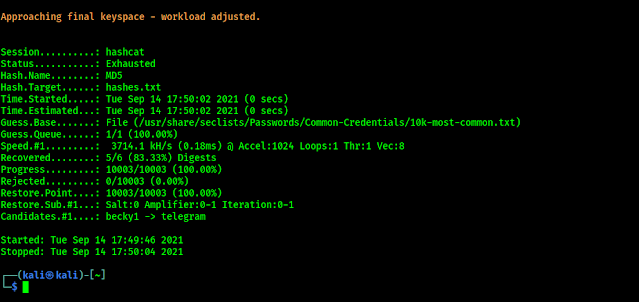
    Let’s discuss about the above command, in this command we have used -m flag to specify the hash type, -a for attack mode and -o for output file, here we named our output file ‘cracked.txt’, then we give the target hash file to crack named ‘hashes.txt’, at last we specify the wordlist file to be used. In the following screenshot we can see that hashcat finishes the cracking job.

    hashcat finishes cracking passwords

    Let’s see our output file (cracked.txt).

    hashcat password recovered

    In the above screenshot we can see that hashcat cracked the hashes. Here for the new readers, in this attack mode we can crack those password hashes if the plaintext of the hashes is available in the wordlist file. Using bigger wordlist file will increase the chance to crack hashes.

    Hashcat & Type of Hashes & Attacks

    In the above we saw that we need to specify our attack modes and type of hashes we want to crack. These attack modes and hashes are refereed by numbers. Here we are giving hashcat supported all numbers that referees to the attack modes and the type of hashes (as Sep 2021, update of Hashcat tool may include some new things).

    Attack Types of Hashcat

      0 | Straight
      1 | Combination
      3 | Brute-force
      6 | Hybrid Wordlist + Mask
      7 | Hybrid Mask + Wordlist

    Hash types in Hashcat

    Hashcat supports so much types of hashes if we include all them here then this article will very lengthy. We encourage to use hashcat – h command on our Kali Linux system to get all the numbers corresponding to the hash type (Uff.. It’s really large 😫).

    types of hashes on hashcat

    Whenever we are trying to crack a hash we have to know the type of the hash. We can use hash-id tool to know the type of hash. Then we need to choose our attack type and wordlist. That’s all it’s not hard.

    This is all about Hashcat, and how we can use Hashcat to crack passwords on our Kali Linux. Hashcat (#🐈) is really a very widely used tool for cracking passwords.

    Love our articles? Make sure to follow us on Twitter and GitHub, we post article updates there. To join our KaliLinuxIn family, join our Telegram Group. We are trying to build a community for Linux and Cybersecurity. For anything we always happy to help everyone on the comment section. As we know our comment section is always open to everyone. We read each and every comment and we always reply.

  • How to Manage Big Passwordlists

    In the penetration testing journey we must learn how to brute force attack. But the success of brute force attack depends on our password list. We need a bigger and specialized password list to be successful in dictionary attack or brute force attack. We can find over 20GB password lists on the internet easily.
    Managing a bigger sized password list is always a headache for everyone. Ever tried to edit an <10GB wordlist text file on a mid-range laptop? After trying this anyone will know what is real pain!
    But sometimes we need to create a custom wordlist and we also want to use the big sized common password list. Sometimes we also need to delete some passwords from the list or add some passwords to the list. In this situation we have two ways to do it.

    how to manage big passwordlists

    First is we may use a famous tool called Dymerge. This tool might be famous but we think it sucks. Then we should follow the second one. Wait a bit first we are going to learn about Dymerge tool then we learn about the second method.

    Dymerge in Kali Linux

    Dymerge is a python tool that we can use our password lists. It is a simple command line tool that help us to marge wordlists or add/remove specific keywords from a wordlist.

    Let’s use Dymerge in our Kali Linux system. First we need to copy it from it’s GitHub repository by using following git clone command:
    git clone https://github.com/k4m4/dymerge
    The screenshot of the command is following:

    cloning Dymerge in Kali Linux

    Then we need to navigate inside the dymerge directory by using following command:

    cd dymerge

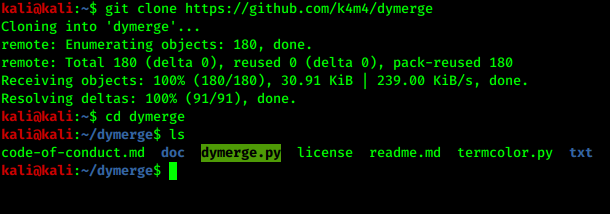
    We can see following files in dymerge directory by using ls command:

    ls

    In the following screenshot we can see the dymerge.py the python script we need.

    dymerge python tool

    To see Dymerge’s help option we can use following command:

    python dymerge.py --help

    Dymerge will open the help menu after the above command as the following screenshot:

    dymerge help option

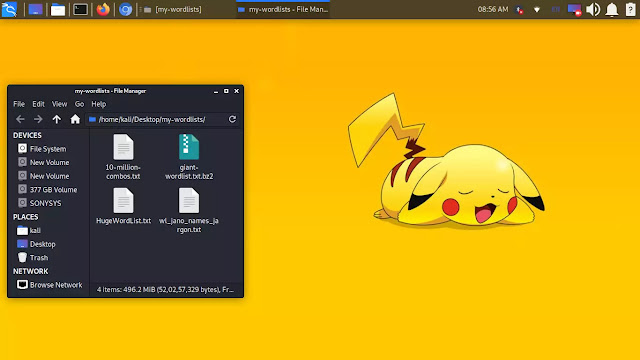
    Here we can see that we can marge two wordlists using this tool. For example we gathered some wordlist files on our Desktop.

    wordlist text files on our desktop

    Now we will marge all these wordlists into a giant wordlist and we want the output in compressed format. Here we compress all the wordlists on the directory, for that we just need to specify the directory only.
    If we want to merge individual wordlists then we have to specify the file names also. -o flag is used for the output location & format. We also want to insert one more password “KaliLinuxIn” into our giant wordlist, so use need to use -i flag.
    We can remove the duplicate passwords and keep the unique passwords only by just using the -u flag. We also can reverse the passwords by using -r flag but we are not using that on our this example.
    So we apply the following command in our terminal.

    python dymerge.py /home/kali/Desktop/my-wordlists -u -f -o /home/kali/Desktop/my-wordlistsgiantwordlist.txt -i KaliLinuxIn -z bz2
    Here we have run the command and the output is following:

    dymerge is running

    In the above screenshot we can see Dymerge is started its job. We just need wait some seconds (It’s depends on our wordlist’s size and our machine’s processing power). After finish the work it looks like the following screenshot:

    dymerge is finished it's job

    We had choose the same directory for the giant wordlist’s output as zip. After complete the process we got the giant wordlist on our required directory or folder, as we can see in the following screenshot.

    our giant wordlist is created
    We got the giant zipped wordlist. Don’t follow our wallpaper it changes automatically in minutes

    That is how Dymerge works. But this can be replaced by some simple bash commands that is the second method. Bash can easily replace all it’s functions, so why we need this? That why we told that Dymerge sucks.

    DyMerge Vs Bash

    When Bash commands can replace Dymerge then why we need to carry an extra python script on our machine. We don’t need to download and run an extra tool to do it.
    Moreover, Dymerge doesn’t work well with too large files. This is because it loads every word from each dictionary into an array, causing the computer system’s memory to overload and possibly even crash.
    Here is some Dymerge uses and Bash commands that can replace those:
    Dymerge command:

    python dymerge.py /usr/share/wordlists/rockyou.txt /lists/cewl.txt -s -u

    Bash command to replace this

    sort -u /usr/share/wordlists/rockyou.txt /lists/cewl.txt > output.txt

    Dymerge command:

    python dymerge.py /lists/cewl.txt /lists/awlg.txt -s -u -i Passw0rd,inpuT

    Bash command to replace this

    sort -u /lists/cewl.txt /lists/awlg.txt <(echo 'Passw0rdninpuT') > output.txt

    Dymerge command:

    python dymerge.py ~/fsocity.dic -s -u -r -o ~/clean.txt

    Bash command to replace this

    sort -r <~/fsocity.dic | uniq> clean.txt

    Dymerge command:

    python dymerge.py /dicts/crunch.txt /dicts/john.txt -s -u -f -z bz2

    Bash command to replace this

    sort -u /dicts/crunch.txt /dicts/john.txt | bzip2 > output.bz2

    Even though all of DyMerge’s main features can be fulfilled with classic bash, the tool has actually gained publicity.  — Nikolaos Kamarinakis (Creator of DyMerge)

    So, this all for this tutorial hope everyone liked this. In this tutorial we have learned how to manage bigg wordlists on our system.

    Love our articles? Make sure to follow us to
    get all our articles directly on inbox. We are also available on Twitter and GitHub, we post article updates there. To join our family, join our Telegram Group. We are trying to build a community for Linux and Cybersecurity. For anything we always happy to help everyone on the comment section. As we know our comment section is always open to everyone. We read each and every comment and we always reply.
  • Fern — The WiFi Cracker

    Fern WiFi cracker, The name says about it. It’s a GUI based WiFi security auditing tool that written on Python. Fern WiFi cracker can crack and recover WEP/WPA/WPS keys and also run other network based attacks on wireless or Ethernet based networks. Fern created by Saviour Emmanuel Ekiko.

    Fern wifi cracker Kali Linux

    In today’s tutorial we learn how we can run security auditing on a WiFi network from our Kali Linux system using Fern WiFi cracker tool.

    Key-Features of Fern WiFi Cracker:

    • WEP Cracking with Fragmentation,Chop-Chop, Caffe-Latte, Hirte, ARP Request Replay or WPS attack.
    • WPA/WPA2 Cracking with Dictionary or WPS based attacks.
    • Automatic saving of key in database on successful crack.
    • Automatic Access Point Attack System.
    • Session Hijacking (Passive and Ethernet Modes).
    • Access Point MAC Address Geo Location Tracking.
    • Internal MITM Engine.
    • Bruteforce Attacks (HTTP,HTTPS,TELNET,FTP).
    • Update support.

    Using Fern in Kali Linux

    Fern WiFi cracker comes pre-installed with Kali Linux latest full version. We can run it from the Kali Linux application menu Wireless Attacks > fern wifi cracker.

    Fren wifi cracker in application menu
    Kali application menu

    Or we can run following command on our terminal to open Fern.

    pkexec fern-wifi-cracker

    It will ask us the sudo password to run because fern needs superuser access to do it’s work. After providing it will run and we got it’s main menu like following screenshot:

    fern asks for updates

    Every time we open fern it will check for update and if we have a updated version of Kali then it will ask us to use it’s professional version. It is available for purchase in http://www.fern-pro.com. We are not going to buy it so we choose “No” and the main menu of Fern opens like the following screenshot:

    fern main page

    Here we need to choose the network interface. Here one thing, to play with WiFi security we must need a special external WiFi adapter that supports monitor mode and packet injection.

    Now we select the network interface. Usually our devices internal WiFi is the wlan0 interface and to use monitor modes from our external WiFi adapter we need to select wlan1 interface, as we did in the following screenshot:

    fern selecting wireless interface

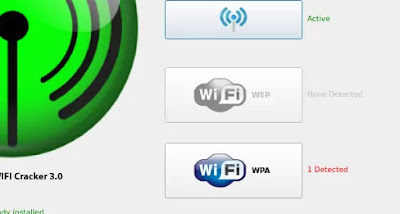
    Now we need to click on the “Scan for Access Point” button then it will scan for nearby WiFi networks (WEP and WAP type of wireless protocols).

    Here in our following screenshot we can see that we found a single WiFi network (because we are testing this on a remote area in our own system). On the cities we can found lots of WiFi networks. 

    fern wifi scanning

    In the above screenshot we click on the on the 1 detected WiFi WPA button and we got the attack interface as following screenshot:

    Fern attack panel

    Now here we need to choose options to perform attack. We choose the attack type to “Regular attack”. Then we choose the dictionary file to crack the WiFi password. 

    Here we need a dictionary file. A dictionary file/wordlist is a text file that contains lots of passwords. Our attack will follow the brute-force method first it capture the handshake file from the WiFi network then it try to crack the handshake file by brute-force method from our given password file. We will discuss about how it works later.

    A bigger dictionary file or wordlist file provides us higher success rate but it may consume time. We can find a good dictionary file or wordlist file from the internet.

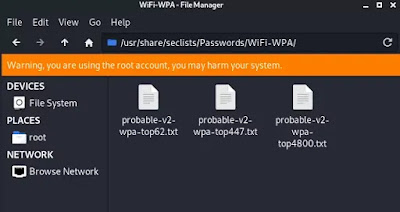
    Our Kali Linux comes with some WiFi password lists. We can find them on /usr/share/seclists/Passwords/WiFi-WPA/ location on our system.

    Passwordlist in Kali Linux
    Passwordlist in Kali Linux

    For our this example tutorial we are going to use one of these password lists.

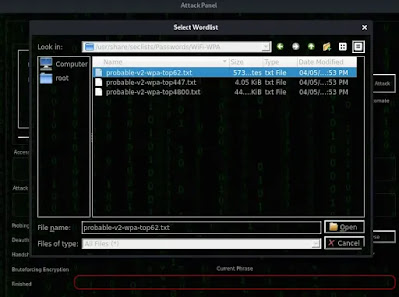
    So in the attack pane we choose one wordlist from this directory and click on open to select it.

    Choosing Password list on fern

    Now we just need to click on the attack button. Rest everything will be done automatically.

    After some time we got our targeted networks WiFi password.

    fern wifi cracker

    Yes, we did it. We can see the password in red bold line on above screenshot.

    Sometime after using this tool our network manager might down. To solve this we can do a restart or use following command:

    sudo service network-manager restart

    The above command might not work in VMware installation Kali Linux. If we are using a Virtual install then we should follow this method.

    How Does it Work?

    Here we discuss on the basics without diving deeper technological terms. We know that when we connect our device to a new protected WiFI we need the password. But from the second time we don’t need the the password, Why? Because the password stored in our device for that WiFi network. It stores the hash value of password (not the plain text).

    When we try to connect for second time the device sends the password in hash format to the WiFi router and asks to connect (handshake). The router checks everything is correct and allow it to connect.

    This tool sends de-authentication packets to the router using our special WiFi adapter.(That’s why we need a WiFi router that supports packet injection). For the de-authentication packets all the connected devices with the router got disconnected and as we know after this those disconnected devices again try to connect with the target router.

    Whenever the devices try to connect with the router our fern tool will catch the handshake file with the password hashes.

    Now these passwords are encrypted and we need a list of password and our tool with match this hash one by one from our given passwordlist (wordlist or dictionary file). This is brute-force attack. If the password will be in our list then we can get it easily. Bigger size of wordlists can increase provide us higher success rate. Come on almost everyone uses common passwords, because these kind of passwords are easy to remember.

    When we click on the “Attack” button it starts sending de-authentication packets to the Wi-Fi network. Then “Fern WiFi cracker” starts to crack the password from our given wordlist. 

    The total process requires at least one active WiFi user on the network otherwise we don’t get the handshake file. 

    Fern WiFi cracker spoofs our Mac address so attacker’s devices original identity will be hidden. To know more about Mac spoofing read our this article.

    Disclaimer: This tutorial is for educational propose. Attacking others
    devices considered as criminal offense. We don’t support that. This is for
    spreading awareness that we should choose a very strong password for us.
    We have used this against our own network.

    Love our articles? Make sure to follow us on Twitter and GitHub, we post article updates there. To join our KaliLinuxIn family, join our Telegram Group. We are trying to build a community for Linux and Cybersecurity. For anything we always happy to help everyone on the comment section. As we know our comment section is always open to everyone. We read each and every comment and we always reply.

  • Name That Hash — Know The Hash

    Password cracking is very essential for penetration testers. Suppose we got a hash from a database and we need to crack it. Before that we need to know what kind of encryption used to crate the hash, in simple words which kind of hash we got.

    namethathash know password hashes on kali linux

    We wrote an article very early on identifying password hashes. But that is becomes very old (works smoothly anyways). With the latest update of Kali Linux (2021.4), the developers added a new tool called “Name That Hash”(nth) on the repository.

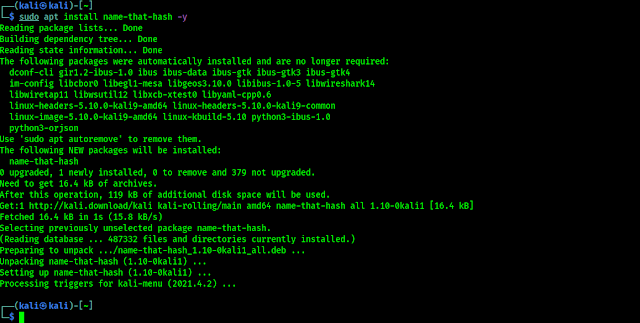
    In today’s articles we will learn how to know know the hash by using ‘Name That Hash’ on our Kali Linux system. We can install this by execute following command:

    sudo apt install name-that-hash

    We can see the output of the above command in the following screenshot:

    installing name that hash on kali linux

    We can see the above screenshot that our tool is installed. Now we can use it. Before that we will see it’s help options by running following command:

    name-that-hash --help

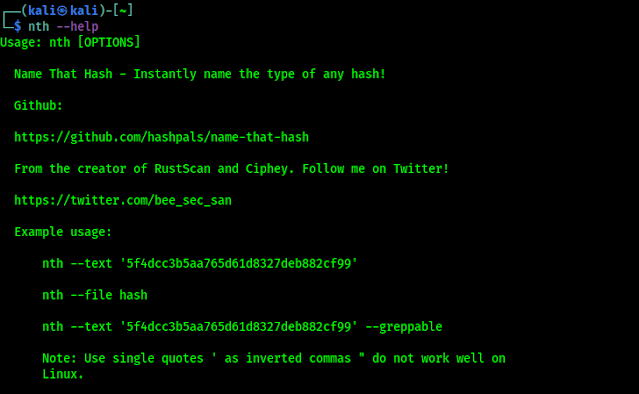
    This command seems large to type, come on we are soo lazy. So we can use nth instead of name-that-hash. The following commands works same as the previous one, we can see the help option on the following screenshot.

    name-that-hash help menu

    As we can see in the above help menu we can run nth –text ‘hash’ to know the type of hash. Here we have an hash ‘00d06796e489999226fb5bb27fe1b3b2‘. Let we know what kind of hash it is. We need to run following command identify this:

    nth --text '00d06796e489999226fb5bb27fe1b3b2'

    We are not showing here the output screenshot. Let get the answer. Which kind of hash it is? Then crack the hash, and let us know the answer in the comment section.

    Love our articles? Make sure to follow us on Twitter and GitHub, we post article updates there. To join our KaliLinuxIn family, join our Telegram Group. We are trying to build a community for Linux and Cybersecurity. For anything we always happy to help everyone on the comment section. As we know our comment section is always open to everyone. We read each and every comment and we always reply.

  • Twofi — Create Custom Wordlist From Twitter

    Previously, we had talked about some custom wordlists tools like Crunch & Cewl. But today we are going to discuss about a tool called twofi (Twitter words of interest), it can use to grab the contents of the user’s or company’s twitter feed. We can create decent wordlist from a user or brand who use Twitter heavily, then we can use our created custom wordlist for cracking passwords.

    Twofi Create Custom wordlist from Twitter on Kali Linux

    Twofi is created by Robin Wood at DigNinja, it is written in Rubi. Twofi comes preinstalled with Kali Linux, if we are using some kind of light version of Kali Linux then we can install it by using simple sudo apt install twofi command. Also we can get it directly from it’s GitHub repository.

    Without wasting more time let we check the help section of twofi by using following command:

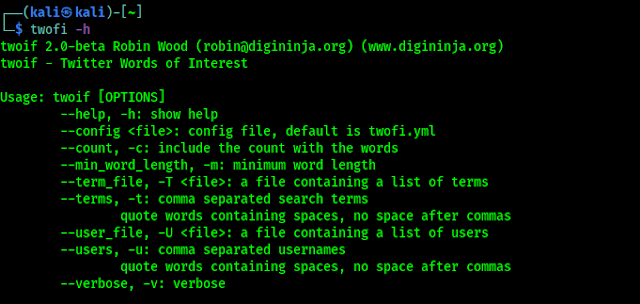
    twofi -h

    In the following screenshot we can see the help menu of twofi,

    twofi help on Kali Linux

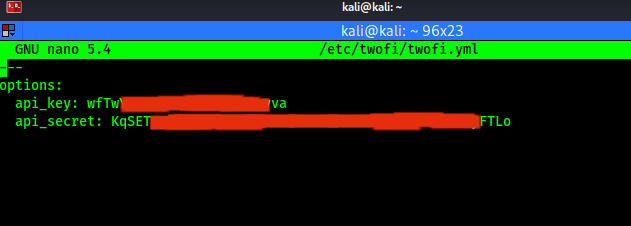
    First thing to use this tool we need to configure the config file. Which is located on /etc/twofi/twofi.yml we open this for edit by using following command on our terminal.

    sudo nano /etc/twofi/twofi.yml

    In the following screenshot we can see the output of the above command:

    twofi config file default

    Here we can see that we need to put our API key and API secret key. Now where to get Twitter’s API ?

    Well, we need a Twitter developer account for this. To get a Twitter developer account we need to apply for it on Twitter Developer Platform. There after applying they will ask us some questions on mail related to how we are going to use this developer account and API keys. If they were satisfied on our answers then we can easily get our developer account along with API keys. We got it.

    Now we filled our API key and secret key on the twofi config file as we can see in the following screenshot:

    twofi config api keys
    We don’t want to show our API keys for security reasons

    After that we need to save and close our nano editor (CTRL+X, Enter ↲). Now we are ready to use twofi.

    Let’s run twofi and create an custom wordlist against our Twitter account (Please follow us), here we need to use our Twitter username (that is @KaliLinux_in). For our password list we are targeting words having minimum length 6. So our command will be following:

    sudo twofi -m 6 -u @KaliLinux_in > Twtterwordlist.txt

    In the above command we had selected -m flag to specify our minimum password length for wordlist i.e 6 (we can choose whatever we want), we have also specified the user using -u flag, if we want to select multiple users in one wordlist then we need to use -U flag with the list of users. Then we generate the output in a txt file named Twitterwordlist.txt we can choose a name as we want.

    In the following screenshot we can see that our command is complete.

    twofi task completed on Kali Linux

    Now our wordlist is generated, it will be saved on our working directory (in our case it is our home directory). We can see the wordlist by using cat filename command. So in our case we use following command:

    cat Twitterwordlist.txt

    We can see our generated wordlist now, as the following screenshot:

    twofi wordlist is ready

    We can see our generated wordlist on the above screenshot.

    These type of wordlist will be beneficial against individuals (Did someone say Twitter addicts), because humans are generally ignorant. They don’t care much about security risks.

    Warning:- This tutorial is for educational purpose only. Attacking others is a serious crime. If anyone do any illegal activity then we are not responsible for that. Use the tools to gain knowledge only and use them with responsibility.

    This is how we can create a wordlist based on anyone’s Twitter profile using twofi on our Kali Linux system.

    Love our articles? Make sure to follow us on Twitter and GitHub, we post article updates there. To join our KaliLinuxIn family, join our Telegram Group. We are trying to build a community for Linux and Cybersecurity. For anything we always happy to help everyone on the comment section. As we know our comment section is always open to everyone. We read each and every comment and we always reply.