Category: Information Gathering Tools

  • SSLyze — Find Mis-Configuration on SSL

    SSLyze — Find Mis-Configuration on SSL

    Information gathering is a very crucial part of cybersecurity. If our target is a web server then we need to know a lot of things about it. We use various tools to do this jobs easily.

    SSLyze is a fast and powerful python tool that can be used to analyze the SSL configuration of a server by connecting to it. SSLyze comes pre-installed with Kali Linux.

    SSLyze on Kali Linux

    It allows us to analyze the SSL/TLS configuration of a server by connecting to it, in order to detect various issues (bad certificate, weak cipher suites, Heartbleed, ROBOT, TLS 1.3 support, etc).

    SSLyze can either be used as command line tool or as a Python library.

    Key-Features of SSLyze

    • Multi-processed and multi-threaded scanning (it’s really fast).
    • SSL 2.0/3.0 and TLS 1.0/1.1/1.2 compatibility.
    • Fully documented Python API, in order to run scans and process the results directly from Python.
    • Support for TLS 1.3 and early data (0-RTT) testing.
    • Scans are automatically dispatched among multiple workers, making them very fast.
    • Performance testing: session resumption and TLS tickets support.
    • Security testing: weak cipher suites, supported curves, ROBOT, Heartbleed and more.
    • Server certificate validation and revocation checking through OCSP stapling.
    • Support for StartTLS handshakes on SMTP, XMPP, LDAP, POP, IMAP, RDP, PostGres and FTP.
    • Scan results can be written to a JSON file for further processing.

     Let’s get started without wasting time. We know it comes with Kali Linux pre-installed but if not installed in some installation we can install it by using following command:

    sudo apt-get install sslyze

    By applying above command we can install/upgrade SSLyze on our Kali Linux system. Then we can check the help of this tool by using following command:

    sslyze -h

    The screenshot of the command is following:

    sslyze help menu

    Now we can read all the options we can use. This is easy to understand we just need to read carefully the help menu and use right flag for what we are trying to get from the server.

    In our this article we are going to run a regular scan on a website, by using following command:

    sslyze --regular www.google.com

    Here we have choose a well known website for just an example. We can choose any website or server in the world. We also can put IP address here.

    We got the results in the following screenshot:

    sslyze regular scan

    We can scroll down to see the total result of the scan.

    Even not a regular scan we can use many flags to know what we want. We can all the flags (options) on the help menu.

    For another example if we need to check for OpenSSL HeartBleed on the server we can use following command:

    sslyze --heartbleed www.google.com

    We know that targeted host Google is not vulnerable to OpenSSL HeartBleed vulnerability. But other domains may be vulnerable.

    This is how we can test web server’s using SSLyze on our Kali Linux system. This is very helpful for organizations and testers identify mis-configurations affecting their SSL servers.

    Do you enjoy reading our articles? Be sure to follow us on Twitter and GitHub for regular updates on new articles. If you want to join our KaliLinuxIn family and be part of a community focused on Linux and Cybersecurity, feel free to join our Telegram Group.

    We value building a strong community and are always here to help. Feel free to leave your comments in the comment section, as we read and reply to each one. We appreciate your engagement and look forward to connecting with you.

  • AutoRecon — Best Tool for Bug Bounty & CTF

    AutoRecon — Best Tool for Bug Bounty & CTF

    So, we all have searched for hacking tools that can magically find vulnerabilities in a website or server. Almost every beginner in cybersecurity wants to find a tool that automates the entire process, so they can sit back and watch the results. After finishing this tutorial, we will have a clear idea of AutoRecon, an amazing automated reconnaissance tool. Not just for bug bounty hunters, this tool is useful for penetration testers, ethical hackers, and even those who are just curious about how reconnaissance works. This tool helped a lot everyone in OSCP and in the HackTheBox.

    Find vulnerabilities using Autorecon on Kali Linux

    The Truth About Automated Recon

    First of all, let’s be clear—there’s no “one-click hacking tool” that will instantly find and exploit vulnerabilities like in movies. But when we search for automated recon tools, we see a flood of scripts and frameworks claiming to do everything. If we believe in those “magic hack” tools, congratulations—we’ve unlocked a higher level of foolishness.

    AutoRecon is not a hacking tool that will instantly pop a shell on a target. It is a powerful reconnaissance tool that helps ethical hackers gather information efficiently. If we know how to use it correctly, it will make our job easier, but it won’t do everything for us. In this detailed article we are going to install AutoRecon on our Kali Linux system and we will se some use of it.

    Installing AutoRecon on Kali Linux

    Installing AutoRecon on Kali Linux is very easy, cause it comes with Kali Linux repository. So we just need to apply following command for a hassle-free installation:

    sudo apt install autorecon -y

    The following screenshot shows the output of applied command.

    Installing AutoRecon on Kali Linux

    In our case it prompt for some libraries to restart. Here we just need to press the TAB button and Enter Key (If doesn’t work then re-logging or restarting the system is an option).

    Autorecon wants some libraries to restart

    Now we are ready to use the AutoRecon on our Kali Linux system.

    Using AutoRecon on Kali Linux

    Now the last thing to do. We just need to run AutoRecon against a target. For just an example we are running it on to our localhost server. Here our target address is 1227.10.0.1 (on real life based target this thing could be like something.com). We just need to apply simple command as following:

    sudo autorecon 127.10.0.1

    It will start the process automatically as we can see in the following screenshot:

    autocon working on Kali Linux

    After giving it a decent amount of time it completes it’s scanning process. Then we have to find the search results. Autorecon automatically creates a directory called “results” where in which directory it was running. So after the scanning process is done we need to go to the results directory by command line (or by using mouse clicks on file manager). in the results directory we can find another directory (named after our target’s URL) where all the scan results are stored. On the following screenshot we just showed the CVE’s we found on our target, but there are lot of good stuffs are out there. We are not going to spoonfeed everything. Try them out. We are just showing that we found some vulnerabilities on our target as we can see in the following screenshot:

    autorecon finds vulnerabilities

    This is how we can easily found various information even vulnerabilities on our targeted website using AutoRecon on our Kali Linux system. AutoRecon is very useful tool for bug bounty hunters, cybersecurity researchers and OSCP students.

    Enjoy our articles? Make sure to follow us on Twitter and GitHub, we post article updates there. To join our KaliLinuxIn family, join our Telegram Group & Whatsapp Channel. We are striving to build a community for Linux and cybersecurity. For anything we always happy to help everyone on the comment section and on Telegram Group. As we know our comment section is always open to everyone. We read each and every comment and we always reply.

  • Findomain — All Information of Domain

    Findomain — All Information of Domain

    As penetration tester we encounter with web-servers a lot. Before doing any attacks we first study how it is? and gather various information on it which is called “information gathering” sometime it called “reconnaissance” or “recon” in short in cyber security term.

    To do recon we need various tools and websites. We go there and put our target domain or IP and try to gather info about it. But on our this article we are going to learn how we can easily gather information from one tool. This tool is called Findomain. Now this tool will use services we need by it’s own and show us the results. It’s also capable of subdomain monitoring, alerts via Discord, Slack and Telegram, multiple
    API Keys. Lets install Findomain on our Kali Linux system and try to learn about it’s use.

    Findomain on Kali Linux

    Installing Findomain on Kali Linux

    Nah, we should not make a headline about it, it’s very simple, but we have to do it for better Search Engine Optimization. We just need to run following command to install Findomain on our updated Kali Linux system.

    sudo apt install findomain -y

    After applying the above command it will prompt for password of current user. Then the installation of findomain will start on our Kali Linux, as we can see in the following screenshot:

    installing findomain on kali linux

    The installation process will not take a minute, depending on our internet speed and system configuration.

    Using Findomain on Kali Linux

    Before run findomain against any target as always we will take a look on it’s options by running following command:

    findomain -h

    We can see the output in the following screenshot:

    help options for findomain

    Now we can set various platfrom’s API on findomain. For an example we are going to demonstrate how we can set SecurityTrails API on this tool. First we open SecurityTrails website.

    securitytrails homepage

    Then we need to click on “Sign Up Free” on the top right corner. Then we have the “SignUp” page as we can see in the following:

    securitytrails signup

    Here we can upload our details and sign up here. They will verify our email so we need to use original email or temp mail. After the mail verification is complete we can see our accounts page as following:

    securitytrails my account page

     Here we need to click on the “API” section. Then “API Keys”, and we get our API Key, as shown in the following screenshot (Our API Key is hidden due to security reasons):

    SecurityTrails API key

    Here one thing to remember on the basic Free plan of SecurityTrails we can use the API keys 50 times a month.

    Okey, Now we need to set it on our Findomain, we just have to copy our SecurityTrails API key and run the following command on our terminal:

    findomain_securitytrails_token=YourAccessToken

    We can see the above thing on the following screenshot:

    securitytrails API key seiing on findomain on Kali Linux

     Just like this we can add various API’s on our Findomain tool. Here we can know more about it.

    Now run Findomain against a target for an example here we are taking Google (hope they will not mind) and run the following command:

    findomain_securitytrails_token="YourAccessToken" && findomain -t google.com

    The results are as following screenshot:

    findomain working on Kali Linux

    There are many type of uses this tools offers, some of them are as following:

    1. Make a search of subdomains and print the info in the screen:

    findomain -t example.com

    2. Make a search of subdomains and export the data to a output file (the output file name in it case is example.com.txt):

    findomain -t example.com -o

    3. Make a search of subdomains and export the data to a custom output file name:

    findomain -t example.com -u example.txt

    4. Make a search of only resolvable subdomains:

    findomain -t example.com -r

    5. Make a search of only resolvable subdomains, exporting the data to a custom output file.

    findomain -t example.com -r -u example.txt

    6. Search subdomains from a list of domains passed using a file (we need to put a domain in every line into the file):

    findomain -f file_with_domains.txt

    7. Search subdomains from a list of domains passed using a file (we need to put a domain in every line into the file) and save all the resolved domains into a custom file name:

    findomain -f file_with_domains.txt -r -u multiple_domains.txt

    8. Query the Findomain database created with Subdomains Monitoring.

    findomain -t example.com --query-database

    9. Query the Findomain database created with Subdomains Monitoring and save results to a custom filename.

    findomain -t example.com --query-database -u subdomains.txt

    10. Import subdomains from several files and work with them in the Subdomains Monitoring process:

    findomain --import-subdomains file1.txt file2.txt file3.txt -m -t example.com

    Findomain notifications on Telegram/Discord/Slack

    Findomain was one of the first tools to use a relational database for tracking subdomains. It can manage millions or even trillions of subdomains, as well as thousands of them at once.

    First, we need to choose how we want to receive notifications. The options include Discord, Slack, or Telegram. Here, in the official documentations we can easily learn how to set it up for Discord, Slack and Telegram webhook.

    There are some of the uses. We can know about more uses on Findomain’s GitHub page.

    This is how we can install and run Findomain on our Kali Linux, which is the fastest and complete solution for domain recognition. Supports
    screenshoting, port scan, HTTP check, data import from other tools,
    subdomain monitoring, alerts via Discord, Slack and Telegram, multiple
    API Keys for sources and much more.

    Enjoy our articles? Make sure to follow us on Twitter and GitHub, we post article updates there. To join our KaliLinuxIn family, join our Telegram Group & Whatsapp Channel. We are striving to build a community for  Linux and  cybersecurity. For anything we always happy to help everyone on the comment section. As we know our comment section is always open to everyone. We read each and every comment and we always reply.

  • Ashok in Action — Elevate Recon Skills

    Before we go on a road trip on any adventure, what’s the first thing we do? We do a proper plan! We check the maps (Nowadays on a phone Map), look for the best routes, and maybe even scout out a few interesting stops along the way. Or we watch any YouTube video of that trip to know about various things. Skipping this step would leave us wandering aimlessly, and nobody wants that. The same goes for cybersecurity spaces.

    Reconnaissance, or recon in short, is that essential planning phase in our cybersecurity world. It’s like doing a bit of homework before doing the attack. Whether we’re looking to fortify your defenses or test them, understanding what we’re up against is half the battle. Without good recon, it’s like trying to find “One Piece” without a road poneglyphs—pretty much impossible!

    Installation and use of Ashok on Kali Linux

    In this article, We’re excited to introduce to Ashok, a tool that’s as reliable as our favorite road trip song playlist. Whether we’re just curious or looking to add a new skill to our cybersecurity toolkit, We hope this journey as enjoyable as discovering a new vulnerabilities on the test target. Let’s get started.

     As written on Ashok’s GitHub Page:

    Before any real attacks are planned So Ashok is an Incredible fast recon tool for penetration tester which is specially designed for Reconnaissance phase. And in Ashok-v1.1 you can find the advanced google dorker and wayback crawling machine.

    Main Features of Ashok

    • Wayback Crawler Machine
    • Google Dorking without limits
    • Github Information Grabbing
    • Subdomain Identifier
    • Cms/Technology Detector With Custom Headers

    Install Ashok on Kali Linux

     Installing Ashok on our Kali Linux system is very easy. We just need to open our terminal window and apply the following command to clone it from GitHub:

    git clone https://github.com/powerexploit/Ashok

    After that we can see the output in the following screenshot:

    clonning Asoke from GitHub

    In the above screenshot we can see the output of above command. Now Ashok is on our system. So we just need to change our current working directory to Ashok by using the following command:

    cd Ashok

    Now we need to install requirements by applying following command:

    python -m pip install -r requirements.txt

    This command will install all the necessary things to run on our Kali Linux system. As we can see in the following screenshot.

    Installing requirements for Ashok

    Now we can run Ashok tool on our Kali Linux system.

    Running Ashok on Kali Linux

    Now the time has come that we run Ashok on our system. Before running it on a target we check Ashok’s help section. To do that we need to run following command:

    python Ashok.py --help

    In the following screenshot we can see the output of the above command:

    Ashok help section

    In the above screenshot we can see that how to use Ashok for different recons. In the following list we shows the uses of Ashok:

    HTTP headers using –headers

    DNS lookup using –dns

    Sub-domain lookup using –subdomain

    NMAP scan using –nmap

    Extract data using Github username of target –username

    CMS (Content Management System like WordPress and other) Detection using –cms

    Extract links from target domain using –extract

    CIDR (Classless Inter-Domain Routing) subnet lookup using –cidr

    Banner grabbing using –banner

    GeoIP of target IP address using –geoip

    Internet archive crawling of target domain using –wayback

    Google dorking using number of results as dork number using –dorknumber

    For more details we can head over to Ashok’s WiKi Page. Let’s do a DNS scan of google.com. To do this we need to run following command:

    python Ashok.py --dns google.com

    We can see the output on the following screenshot:

    DNS scan using Ashok

    We also search for Internet archive (Wayback Machine) crawling on Ashok on our domain by using following command:

    python Ashok.py --wayback kalilinx.in

     We can see the result on the following screenshot:

    Ashok wayback machine crawling testing

    The outputs of this scan also saved in Ashok’s directory as we can see in the screenshot below.

    Wayback Machine's results stored

    This is the uses of Ashok as our recon tool. Here just for example we show two use cases. But it is capable to do more. We can check it’s Wiki page to learn more uses of it.

    This is how we can install and use Ashok and do our reconnaissance works easily on our Kali Linux system. Love our article? Make sure to follow us on Twitter and GitHub, we post article updates there. To join our KaliLinuxIn family, join our Telegram Group & Whatsapp Channel. We are striving to build a community for Linux and cybersecurity. For anything we always happy to help everyone on the comment section. As we know our comment section is always open to everyone. We read each and every comment and we always reply.

  • Install Nessus Vulnerability Scanner on Kali Linux

    In this detailed article we learn “How to install Nessus on Kali Linux 2024.x“. Nessus is a very popular and widely used vulnerability scanner and assessment tool for testing web application and mobile application.

    Nessus will be very helpful for penetration testers and bug bounty hunters. Nessus also helpful for web and mobile app developers to find and fix vulnerabilities. 

    Install Nessus on Kali

    Nessus is always updated and useful libraries for vulnerability and configuration checks. Also it’s analysis is very fast and accurate.

    Key-Features of Nessus

    • The latest intelligence, rapid updates, an easy-to-use interface.
    • Covers an industry-leading 50,000+ vulnerabilities.
    • Network devices: Nessus can audit firewalls/routers/switches (Juniper, Check Point, Cisco, Palo, Alto Networks), printers, storage.
    • Virtualization: Nessus also can audit Virtual Systems like, VMware, VirtualBox, ESX, ESXi, vSphere, vCenter, Hyper-V, and Citrix Xen Server.
    • Operating systems: Nessus can run against Windows, Mac, Linux, Solaris, BSD, Cisco iOS, IBM iSeries.
    • Databases: It will scan inside various databases like, Oracle, SQL Server, MySQL, DB2, Informix/DRDA, PostgreSQL, MongoDB
    • Web applications: Nessus can find vulnerabilities in Web servers, web services, OWASP vulnerabilities.
    • Cloud: We can use Nessus to scans cloud applications and instances like Salesforce and AWS et.
    • Compliance: Helps meet government, regulatory and corporate requirements. Nessus also will be useful for personal and development uses.

    Installing Nessus on Kali Linux 2024.x

    Nessus doesn’t comes pre-installed with Kali Linux, so we need to download and install it manually.

    Nessus vulnerability scanner package is available for download in Tenable’s site. This is the official download site for Nessus.

    Nessus selecting proper version for download for Kali Linux

    After selecting proper version of Nessus (Linux Debian amd64) for our system we need to click on Download as shown in the following screenshot.

    Downloading Nessus from official website

    After we download Nessus installer file for our Kali Linux system. It will be saved on our Downloads folder. So we open the terminal and apply command cd Downloads to move to our working directory to Downloads and run following command to install Nessus on Kali.

    sudo dpkg -i Nessus*.deb

    Then it will start installing as shown in the following screenshot:

    Installing Nessus deb file in Kali Linux

    Okey, It is now installed. Let’s check if the installation is correct and Nessus is working or not.

    First we enable Nessus service by using following command:

    sudo systemctl enable nessusd

    This command will enable nessusd services. After this we can start this service by using following command:

    sudo systemctl start nessusd

    Then we can check if it is running successfully or not via applying following command:

    sudo systemctl status nessusd.service

    If everything will be perfect then it should show outputs as following screenshot.

    Nessus service is running sucessfully

    In the above screenshot we can clearly see that Nessus service (nessusd) is active and running successfully.

    Nessus installed successfully

    Now we can run this. We need to open our web browser and navigate to https://localhost:8834 here we might got security warnings form browser but we can ignore it, because it is our localhost.

    avoiding the browser warnngs

    So we go to Advanced and processed to localhost.

    Then we reach the beautiful Nessus Setup, as shows in the following screenshot:

    Nessus Set-UP

    Here we can “Continue” with “Nessus Essentials”. Then we got a form asking about our details like name and e-mail id. Here we need to provide a original e-mail id because Nessus will verify it. So we fill it and click to 

    Nessus setup form fill up

    Then we click on “E-mail” and an “Activation Code” will be send to our given e-mail id.

    Nessus activation

    Now we give the “Activation Code” and click on “Continue”, in the following screenshot we have hided our activation code.

    Nessus sends activation code

    Then we need to create user by creating username and password for login.

    Creating username and paswsword for nessus

    Then we can login. After login we see the front page of Nessus.

    Nessus front page

    Here we can submit our targets. Targets like hostnames, IP address (IPV6 or IPV4), to scan the target. We can put networks here to scan.

    Similarly we can close this and click on “New Scan” to add targets, here we got lots of options as we can see in the following screenshot.

    nessus new scan

    From here we can scan our targets and know about it’s vulnerabilities.

    Nessus is very useful for security researcher and it is very easy to use it. So in this tutorial we learned how we can install Nessus on Kali.

    We can stop Nessus service on our system after using it by applying following command:

    sudo systemctl stop nessusd

    To start it again we can use:

    sudo systemctl start nessusd

    Then we just can go to https://localhost:8834 for Nessus.

    Nessus also have a Paid Professional version to know about it please check this.

    Love our article? Make sure to follow us on Twitter and GitHub, we post article updates there. To join our KaliLinuxIn family, join our Telegram Group & Whatsapp Channel. We are striving to build a community for Linux and cybersecurity. For anything we always happy to help everyone on the comment section. As we know our comment section is always open to everyone. We read each and every comment and we always reply.

  • Installing GoPhish on Kali Linux for Phishing Campaigns

    Phishing is one of the most common attacks in today’s cybersecurity world. Many hackers from noob to pro all uses this method to gain access by tricking human’s brain. But these days humans are clever enough to get trapped in this.

    Suppose we create a landing page of any popular website (for suppose Facebook) and send the target a email to the client that you have $200 unused advertising credit to be expire soon and when the user comes to the the landing page and there he suppose to provide his card details to get the free credit. Now these type of attacks generally not working. May work sometime for some targets because phishing is a very subjective attack but in most cases it really don’t work. A proper phishing campaign will be more effective for a bulk phishing attack.

    Understanding Phishing Campaigns

    In bulk phishing attack attack didn’t create the landing page and email for a specific people. They create those things in a very generic way and send the email to a large number of people. By using phishing campaign attackers try to trick people into giving up sensitive information, such as passwords, credit card numbers, or other various personal details. Attackers often do this by sending emails that appear to be from a legitimate source, like a bank or any well known brand. The email usually contains a link to a fake website that looks real. When the person enters their information on this fake site, the attackers steal it. Phishing Campaigns are well organized way to try phishing.

    Installing GoPhish on Kali Linux

    GoPhish on Kali Linux

    GoPhish is an open-source tool to run a phishing campaign. It is designed to help organizations to run phishing attack on their employees and educated them about this type of attacks. GoPhish is also used by bad attackers. Previously we need to install it from GitHub and there are many errors to run this on Kali Linux. Now we can install it easiest method ever.

    In today’s article we are going to learn how we can easily install GoPhish on our Kali Linux system and run it. Now this is very simple to do it. GoPhish is now available on Kali Linux repository so we just need to run following command to install it:

    sudo apt install gophish -y

    It requires password of user for authentication. In the following screenshot we can see the screenshot of applied command:

    installing Gophish on Kali Linux

    Now we can run GoPhish on our Kali Linux system by using following command:

    sudo gophish

    It may prompt for password and then it will start as we can see in the following screenshot:

    gophish running on kali linux

    Here we can see the link of GoPhish web application and we also can see default web admin login and password. Let’s open the link on our web browser.

    Got an warning on gophish web

    Opps…. We got a warning because this localhost web panel doesn’t have a certificate issued by a trusted certificate authority. No issue its running inside our system. So we click on the “Advanced” option and then click on the “Accept the Risk and Continue” option.

    Gophish warning problem solved on Kali Linux

    After that GoPhish login panel will be in front of us, as we can see in the following screenshot:

    GoPhish web login panel on Kali Linux

    We got the default username and password on the terminal window, we can login by using that credentials. Just after that GoPhish will prompt for resetting the password. We must need to change the default password for security seasons. Here we have to choose a strong password and set it. After that we are finally at the GoPhish web interface. Initially it looks like following screenshot:

    GoPhish on Kali Linux

    Now here we can create phishing campaigns and manage it easily. We are going to spoon feed everything. Researching own things are one of the best way to learn. Directly demonstrating of running a phishing campaigns on a public domain is not so much ethical in our opinion. But everything is there on the “User guide” option.

    GoPhish sucessfully running

    On the “User Guide” and “API Documentation” we got everything we need to learn. Like on the “User Guide” we get a well organized menu for every options, as we can see in the following screenshot:

    GoPhish User Guide on Kali Linux

    This is how we can install and run GoPhish on Kali Linux system. GoPhish is a very powerful tool which simplifies the process of organizing phishing simulations. By using GoPhish on Kali Linux, we can effectively test and improve our organization’s resilience to phishing attacks.

    Warning: This article is for research and educational purposes only. We are not responsible for any actions or damages resulting from using this information. Use GoPhish only having explicit permission to test. Unauthorized use can result in legal consequences. We strongly advise ethical and responsible usage.

    Love our article? Make sure to follow us on Twitter and GitHub, we post article updates there. To join our KaliLinuxIn family, join our Telegram Group & Whatsapp Channel. We are striving to build a community for Linux and cybersecurity. For anything we always happy to help everyone on the comment section. As we know our comment section is always open to everyone. We read each and every comment and we always reply.

  • Maryam — OSINT Fremework for Information Gathering

    With the latest Kali Linux 2020.4 update Kali Linux repository now comes with OWASP Maryam Open-Source Intelligence (OSINT) Framework. Maryam Framework will be very helpful for penetration testers and cybersecurity experts. This is based on Recon-ng and written on Python3.

    Maryam Kali Linux OSINT tool

    What is Maryam

    Open-source intelligence (OSINT) uses open source tools to collect information and analyze them for a specific purpose. OSINT can be very helpful for cybersecurity experts to use to garner data about particular organizations.

    Today, using Open sources like Bing, Google, Yahoo, etc, for data gathering, are essential steps for reconnaissance, which is a common task. It should be a tool to automate this routine. One of the best tools in this field is ​The OWASP Maryam. The interface of Maryam is is very similar to Recon-ng and Metasploit. If we are familiar with these tools then Maryam will be very easy to use.

    Key Features of Maryam

    1. Metasploit like Interface.
    2. Identifying WebApps and WAF.
    3. Extracts Emails, Docs and Subdomains from search engines.
    4. Extracts Links, CSS and JS files, Emails, Keywords from Web Sources.
    5. Extracting DNS, TLD by brute-force.
    6. Crawl Web Pages and search our RegExp.
    7. More upgrading in developing…

    Installing Maryam on Kali Linux

    As we told that Maryam comes with Kali Linux repository, so we don’t need much effort to install it. We can install it simply using following command:

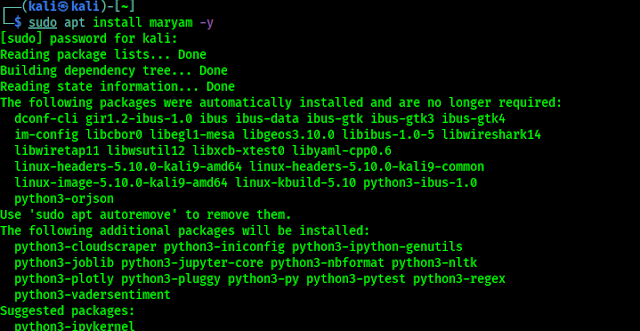
    sudo apt install maryam -y

    After putting our sudo password Maryam installing will be start on our system. As we can see in the following screenshot:

    installing maryam on kali linux

    After the installation process is done, we can check the the tool is running by following command:

    maryam

    We can see the output of the above command in the following screenshot:

    maryam framework

    Here we need to run help command to see the the help options of Maryam Framework as we can see in the following screenshot:

    maryam help options

    It’s interface is seems very similar to Metasploit. Here we can run following command to see the modules:

    show modules
    modules on maryam

    Grabbing Social Media using Maryam

    Let’s run this tool. For an example we are running social_nets OSINT module. Before running it we can check it’s help by just entering the module name or <module-name> –help, as we can see the help of social_nets in the following screenshot:

    social nets module on maryam

    Let’s run this module by following command:

    social_nets -q hax4us -e google,yahoo,bing

    By using the above command we are trying to discover social media accounts of hax4us (my friend’s brand) on the search results of Google, Yahoo and Bing. We can use more supported search engines here (like Yandex etc).

    Now multiple use of this function may be detected by search engines and they will detect the bot and it gives following CAPTCHA errors.

    Google captcha errors caused by bot
    Google got the bot

    Finding Document Files

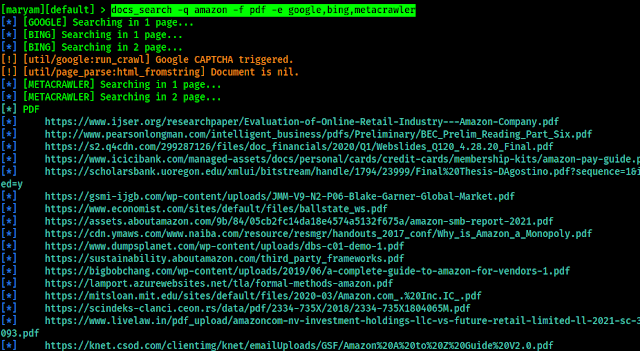
    We can easily find Document files like PDF files, text files etc by using Maryam Open-Source Intelligence Framework, we are going use docs_search module for this, and the command will be like following:

    docs_search -q amazon -f pdf -e google,bing,metacrawler

    For searching document we had used docs_search module in the above command, and -q flag to set our query, -f flag used to specify file format and -e to specify engines (search engines) to find these files.

    And in the following screenshot we can see that we got links of PDF files related to Amazon.

    searching files using maryam

    DNS Brute Force using Maryam

    Let’s have a look how can we Brute Force DNS records using Maryam’s dnsbrute module. To do so we are going to use following command:

    dnsbrute -d target.com --thread 10 --wordlist /path/of/wordlist

    Crawling Pages using Maryam

    Now we are going to use the crawl_pages module to crawl an website (Regex search) for juicy information. To do so we are going to use following command:

    crawl_pages -d koushikpal.com -r https?://[A-z0-9./]+

    In the following screenshot we can see the output. It scans the website for duplicate information.

    crawling websites for regex

    Final Words

    This is how we can install and use Maryam on our Kali Linux system, we learned basic things we can do with OWASP Maryam OSINT Framework. OWASP Maryam is a modular open-source framework based on OSINT and data gathering. It is designed to provide a robust environment to harvest data from open sources and search engines quickly and thoroughly.

    It has a lots of advanced features like we can set proxy, agents and timeout. For more information we can check the official page.

    Love our article? Make sure to follow us on Twitter and GitHub, we post article updates there. To join our KaliLinuxIn family, join our Telegram Group & Whatsapp Channel. We are striving to build a community for Linux and cybersecurity. For anything we always happy to help everyone on the comment section. As we know our comment section is always open to everyone. We read each and every comment and we always reply.

  • What Cybersecurity Experts Do with a suspicious E-Mail?

    In today’s digital era, we forgot about sending letters to our friends; nowadays, we have emails. As cybersecurity experts, we have lots of encounters with suspicious target emails, sometimes during red teaming for information gathering we also need to go offensive to extract details of a person from e-mail address. Usually we analyze metadata, tracing the email’s journey through servers to pinpoint its origin. Then, we analyze the sender’s identity or other information, checking if their are signs of impersonation or phishing. Next, we carefully examine the email’s content for malicious links or attachments. But that is a manual process and seems very boring for a lazy person.

    e-mail forensics on Kali Linux using Mosint tool

    Mosint the Mail OSINT

    If we have a OSINT (Open Source Intelligence) tool, then manually checks?  Today on our deck we have an OSINT tool called Mosint (did this name came from Mail OSINT?). Mosint is an automated email OSINT tool written in Go language that allows us to investigate for target emails in a fast and efficient manner. It consolidates numerous services, enabling security researchers to swiftly access a wealth of information.

    Now it’s time to install Mosint on our Kali Linux system. Here we are using Kali Linux system but on the same way we can install it other Debian-based Linux distributions.

    It is on the Go language so first we need to install Go language on our system by using following command:

    sudo apt install golang -y

    The above command will install Golang on our Kali Linux system, as we can see in the following screenshot:

    installing Golang on Kali Linux

    If this method of installing Golang isn’t working then we can install it manually by following our old article about installing Golang on Kali Linux system.

    Now we have installed Golang on our Kali Linux system and now we are all set to install Mosint. We can clone it from GitHub and install it but that thing we did on all GitHub cybersecurity tools. What if today we do something different. Today we are gonna install and run it via Docker. Now  a Docker container is a lightweight, portable, self-sufficient package that includes all necessary components to run program. We already have a dedicated article on Docker.

    Docker comes pre-installed on Kali Linux’s almost all versions but in case we need to install it we can run following command:

    sudo apt-get install docker.io -y

    in the following screenshot we can see that we already have docker on our system.

    docker installation on Kali Linux

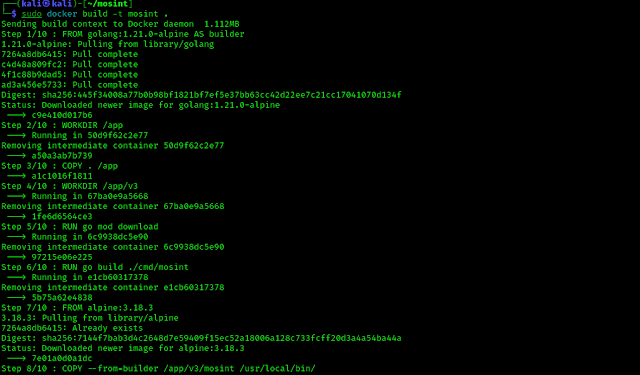
    Now we can easily install Mosint on our system via docker by simply using following command:

    sudo docker build -t mosint .

    We can see the process of above command on the following screenshot:

    mosint installation via docker on kali linux

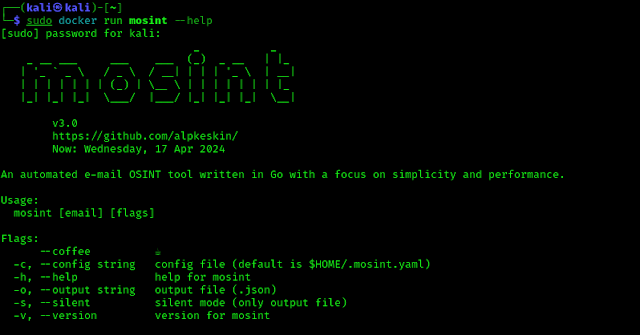
    It may take a minute depending on our internet speed and system configuration. After the setup is complete we run the Mosint tool via Docker. First let’s check the help options via following command:

    sudo docker run mosint --help

    In the above command first we use sudo command to run Docker as the superuser or root user otherwise it will show us “permission denied” issue. Then we call Docker and command it to run run Mosint then we can use Mosint’s flags to use it, as example here we used the –help flag to see what we can do with Mosint, as we can see in the following screenshot:

    checking help options of mosint via docker on Kali Linux

    Let’s not wasting anymore time and run it against an e-mail address. So the command will be as following:

    sudo docker run mosint mail@email.com

    In the place of mail@email.com we need to put our target e-mail id. Here for example we choose our business e-mail address and we can see the output on the following screenshot:

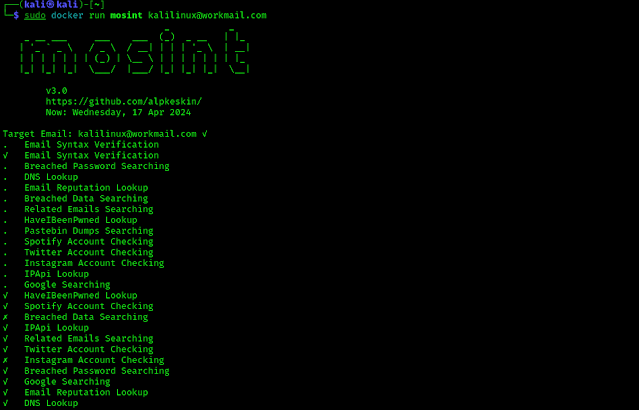
    mosint analysing an Email on Kali Linux

    On the following screenshot we can see the result:

    Mosint tool results against a e-mail id on Kali Linux

    Mosint can check various services to gather information of an e-mail id. On the above screenshot we can see various details like It’s not a disposable mail address, IP address of mail service provider, Social media account information (yes we don’t have any with this mail), and even Google search results.

    Mosint’s main features are:

    1. Fast and simple email-based scanning
    2. Optimized for ease of use and lightweight on resources
    3. Email verification and validation
    4. Checking Social Media Accounts
    5. Checking data breaches and password leaks
    6. Finding related emails and domains
    7. Scanning pastebin dumps
    8. Google Search
    9. DNS/IP Lookup
    10. Output to JSON file

    Services used by Mosint

    There are lot’s of functions are in this Mosint tool. It also uses some online services like

    Some of the above services requires to put API keys on the Mosint tool for details we can check their GitHub repository

    Extra Talks About E-mail’s Forensics

    This is the basics to gather information about a target mail id. Previously we need to do things manually and complete the following checklist:

    1. Header Investigation: Suppose we have received a package. Before opening it, we check the package’s label to see where it’s came from and who sent it. Similarly, we’ll check the email’s header, which is like its digital label, to trace its origin & path.
    2. Metadata Check: Sometimes file like image files have metadata store inside it, in simple words these are like where about of files. So if we get an e-mail with files we can check the metadata to extract some information like when they were sent, from which device, and sometimes even the sender’s location.
    3. IP Address Tracing: This is very important to check the sender’s IP address, IP will lead us to target’s location.
    4. Email Service Provider Investigation: There are different types of mail carriers. Some are like the big, well-known e-mail services, while others are like local e-mail service providers. If we identify the email service provider, then in some cases we can understand more about how the email was sent.
    5. Content Analysis: May be the email content is like deciphering a secret code. We’ll carefully read through the email to uncover any hidden meanings, clues, or unique characteristics that could reveal more about the sender.
    6. Attachments Examination: If the e-mail comes with some extra media files with it then before opening it, we would inspect everything to make sure it’s safe because some file formats can be comes with execution payloads.
    7. Social Media and Online Presence: When we need to search something we use search engines. Similarly we’ll search for the email ID on social media and other online platforms. This helps us build a profile of the target and potentially uncover more about their identity and activities.

    This is how we cybersecurity experts inspect an e-mail. We have try to cover the basic things of it and learnt using of Mosint tool on Kali Linux system. Hope this article will be helpful.

    Love our article? Make sure to follow us on Twitter and GitHub, we post article updates there. To join our KaliLinuxIn family, join our Telegram Group & Whatsapp Channel We are trying to build a community for Linux and Cybersecurity. For anything we always happy to help everyone on the comment section. As we know our comment section is always open to everyone. We read each and every comment and we always reply.

  • EyeWitness — Web Footprints and Enumeration

    EyeWitness is a tool that is designed for Kali Linux and allows a penetration tester to capture screenshots of a website without leaving the Terminal. It also provide some server header info, and identify default credentials if known.

    EyeWitness does all of the work in the background. Imagine having to visually profile multiple websites, open Virtual Network Computing (VNC) servers, and use Remote Desktop Protocols (RDPs). This can be a time-consuming task. EyeWitness takes the screenshots, stores them offline, and generates HTML reports.

    EYEWITNESS Kali Linux

    EyeWitness comes with Kali Linux repository. We can install it using apt-get install but if we want we also can clone it from GitHub, but here we Kali users download it by using following command:

    sudo apt-get install eyewitness

    After providing our root superuser password it will start downloading, as we can see in the following screenshot.

    installing eyewitness on Kali Linux

    Now we can check the help options of this eyewitness tool by using following command:

    eyewitness -h

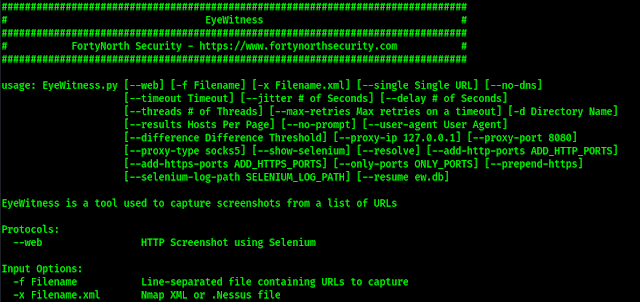
    Above command will lead us to the help section of eyewitness tool, as shown in the following screenshot:

    eyewitness help options

    Let it run against our own website as a single target. So we need to use following command:

    eyewitness --web --timeout 20 --single kalilinux.in

    Here we have set –web flag because our target runs on web protocol, we have set the –timeout on 20 seconds (this is optional default is 7 seconds) because we know our website and internet connection both are slow 😢. Then we put a –single target.

    On the following screenshot we can see the output generated by eyewitness.

    Eyewitness generates reports

    This output is saved on home/kali/2021-5-29_102348 (Path will be different for everyone, but mentioned here) as we can see on the above screenshot. It also prompts for opening the report now. Here we press Y and Enter. Then the HTML report will open in front of us on our default browser, as we can see on the following screenshot:

    eyewitness html report

    This is for taking screenshot of a single website without visiting it, the left-hand column contains information about the web request, while the right-hand column contains the screenshots.

    Now If we have to visually profile multiple websites, open Virtual Network Computing (VNC) servers, and use Remote Desktop Protocols (RDPs) then we need to have a list of all URLs. Here we have one list of URLs separated by new line.

    list of sites to test

    Now we use following command to take screenshot of every URLs on the url.txt file by using following command:

    eyewitness -f url.txt --web

    Here -f flag used to import targets from a file. If we want to import target from Nmap XML or .Nessus file then we need to use -x flag in the place of -f flag. The output is showing on the following screenshot:

    eyewitness reports of urls lists

    After opening the report we can see is on our browser.

    eyewitness reports in html format

    This tool is very handy when profiling multiple services and websites at once. Now that we have completed this article, and we are able to perform web enumeration using the EyeWitness tool on our Kali Linux system.

    That’s for today. Love our articles? Make sure to follow us on Twitter and GitHub, we post article updates there. To join our KaliLinuxIn family, join our Telegram Group & Whatsapp Channel We are trying to build a community for Linux and Cybersecurity. For anything we always happy to help everyone on the comment section. As we know our comment section is always open to everyone. We read each and every comment and we always reply.

  • HTTrack — Make any Website Offline

    HTTrack is a free tool that can clone an entire website. HTTrack allows to download any website in local folder. It comes pre-installed in Kali Linux.

    HTTrack copies all the website including HTML pages, images, directories, links, structures from the server to our system’s drive. It make a page by page copy of an website. That we can visit the website offline. This helps penetration testers a lot. When we don’t have to study a a website’s content in short time then we can save it on our local drive for reading in future.

    httrack copy website in kali linux

    HTTrack has two versions one is command line (CLI) another is graphical based (GUI). In our this detailed post we will talk about these both.

    HTTrack

    HTTrack comes with Kali Linux full version or we can install it on Kali or other Debian based distro by using following command:

    sudo apt-get install httrack -y

    After the installation process done we can copy an website to copy a website we use following command:

    httrack https://site_ur -O /home/user/directory

    The above command will clone the example website on our required directory. Then we can browse it’s index page from our local disk.

    Otherwise we can just use httrack command to run it on interactive mode:

    httrack

    Then it will as us the project name as we can see in the following screenshot:

    httrack run and project name

    Here we can enter our project name as we wish. Then we press return or enter key and it will ask for path to save the cloned offline website. We can choose any path on our system or simply press Enter key to use default path i.e /home/kali/websites

    choosing path for httrack

    Here we need to put the URL of websites. We can clone multiple websites by entering their URL’s separated by comma or blank space. For an example we are going to clone the blog of re4son and we put the URL as we can see in the following screenshot:

    making offline copy of a website

    We press return and we get some other options.

    1. Mirror Web Site(s)
    2. Mirror Web Site(s) with Wizard
    3. Just Get Files Indicated
    4. Mirror ALL links in URLs (Multiple Mirror)
    5. Test Links In URLs (Bookmark Test)

    We can choose any number as per our requirements here for an example we just mirror a website so we choose 1 and press Enter .

    Then we need to set a proxy we don’t using any proxy here so we simply hit Enter.

    Now it will ask for define wildcards we also don’t need any special wildcards so we press Enter again for none.

    Then we can choose manual options here we can type help for options but we hit Enter again to skip it.

    Now we are ready to mirror or clone the website. HTTrack asks that we are ready or not to lunch the mirror process here we press y for yes and hit Enter.

    Then our cloning process will started as we can in the following screenshot:

    Mirror a website

    Here it will take some time depending how big website we have chosen and our network speed.

    After completing the process we can see offline copy of our website in our local directory /home/kali/websites

    httrack offline copy

    Then inside of our project directory (Example was our project name) we got the website’s offline copy.

    offline copy of our website

    We can open the index.html file on any browser to access the offline website.

    In the following screenshot we can see the offline website is opened in chromium web browser and check the URL section to be sure that it is offline.

    cloned wesite using httrack

    Now this is not end. HTTrack have a GUI version let’s talk about it.

    WebHTTrack

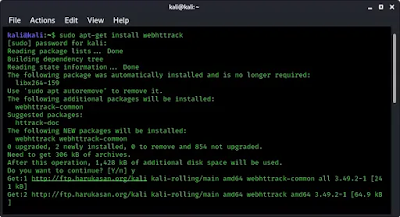
    WebHTTrack is a web-based Graphical User Interface version of HTTrack. We can install it by using following command:

    sudo apt-get install webhttrack -y
    webhttrack installation

    Now we can launch it by simply using webhttrack command on our terminal. Also we can start it from application menu.

    webhttrack in application menu

    After launching it we can see that it opens in our browser. As we told it is a web based tool. We can see it is opened in our browser in the following screenshot:

    Here default language is English or we can change the language. We are alright with English so we click on “Next” Then we got something like following screenshot:

    webhttrack filling details

    Here we can fill the projects name, paths etc and click on next.

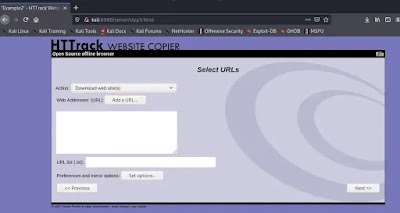
    webhttrack url input

    Here we can fill the inputs like URLs for cloning and other parameters then we click on “Next”.

    Then we will be on the Start Page. Here we got the “Start” button and we press it.

    Then it will start downloading the website on our defined storage location.

    completed mirroring website

    From here we can see the mirrored website. This GUI based tool is very easy to use.

    Love our articles? Make sure to follow us on Twitter and GitHub, we post article updates there. To join our KaliLinuxInfamily, join our Whatsapp Channel & Telegram Group. We are trying to build a community for Linux and Cybersecurity. For anything we always happy to help everyone on the comment section. As we know our comment section is always open to everyone. We read each and every comment and we always reply.