Category: Custom Tools For Kali Linux

  • 🛠️ Hack Smarter! Install DeepSeek AI on Kali Linux in 2 commands! [No GPU]

    🛠️ Hack Smarter! Install DeepSeek AI on Kali Linux in 2 commands! [No GPU]

    Imagine needing a powerful GPU just to cybersecurity experiment with AI. Ridiculous, right? Hackers don’t rely on expensive hardware—we make the most of what we have. In the world of cybersecurity, knowledge is power, and AI is the next big weapon. But what if we could run it right on our low end Kali Linux computer, even without a GPU?

    Most AI models are resource-hungry, and codes are locked behind corporate-controlled cloud services that spy on everything we do. Take ChatGPT, for an example—completely closed-source and tied to a centralized system that logs every interaction. That’s not how real hackers work. We need tools that are lightweight, private, and fully under our control. Come on That’s why we prefer Linux over Windows.

    This is where DeepSeek comes in—a fully open-source AI model you can run locally, without sending your data to some shady cloud server. Yes, it’s a Chinese-developed model, but unlike ChatGPT, it’s transparent and open for anyone to inspect. No hidden tracking, no corporate lock-in—just raw AI power, running on our own computer.

    DeepSeek on Kali Linux

    The best part? We don’t need a high-end GPU. Even an older PC (Corei5 4th gen we are using) can handle DeepSeek with the right setup. Get ready to take control and bring AI to our Kali Linux machine? That’s enough intro let’s get started. 🚀

    Installing DeepSeek on Kali Linux

    We don’t have large computer systems with GPU we just got a simple Intel i5 4th gen CPU with 8 GB DDR3 RAM (It’s a 12 years old infrastructure). We run Kali Linux on it seamlessly, now on the Kali Linux system we are going to install DeepSeek on it.

    To do that we need Ollama services on our system. To install and activate Ollama services on our system we need to run following command on our terminal:

    curl -fsSL https://ollama.com/install.sh | sh

    The above command will download & run the installation file for Linux environment as we can see in the following screenshot:

    Downloading Script of DeepSeek for Linux

    On the above screenshot we can see that the downloading process is started. It will take some time depending on our system resources and internet speed.

    installed and runned ollama services on Kali Linux

    After downloading the bash script it will start installing that and then it will automatically starts ollama services. Everything is automatic. By any chance things go different we can check if everything is correct.

    We can verify the installation by running following command:

    ollama --version

    Also we can check if Ollama is running or not by applying following command:

    systemctl is-active ollama.service

    If everything is set we can see Ollama version and active status as the following screenshot:

    Ollama services installed and activated on Kali Linux

    Now we start the main thing. Let’s install DeepSeek. As we are in low end system we are going to install a basic version of DeepSeek, to do so we need to run the following command:

    ollama run deepseek-r1:1.5b

    Here we choose 1.5b model, it’s a basic model for smaller scale AI works. This will run on our system perfectly. For larger systems owners here is the list.

    Model Download Size RAM Needed CPU Best For
    1.5B ~1.1GB 4GB Old CPUs Low-end PCs, Basic AI
    7B ~4.7GB 8GB Mid-range CPUs Balanced AI tasks
    8B ~4.9GB 10GB Fast CPUs Better AI performance
    14B ~9GB 16GB Fast CPUs Advanced AI tasks
    32B ~20GB 32GB High-end CPUs AI developers
    70B ~43GB+ 64GB Workstation CPUs AI research
    671B ~404GB+ 1.5TB Workstation CPUs AI research

    We can choose the model as per our system. For this tutorial and as per our system we have choose model 1.5b (shown in above command). Now it’s time to hit and run the above command. The screenshot shows the output of the above command.

    Deepseek installed on Kali Linux

    Now we have DeepSeek on our system’s terminal. Let’s ask it something. Our chatting screenshot is following.

    Chat with DeepSeek on Kali Linux

    VoilĂ . We installed DeepSeek on our Kali Linux system locally which runs on very low end CPU. That’s how can easily install DeepSeek on Kali Linux or any other Debian based Linux system easily.

    Creating some stuff using DeepSeek

    Enjoy our articles? Make sure to follow us on Twitter and GitHub, we post article updates there. To join our KaliLinuxIn family, join our Telegram Group & Whatsapp Channel. We are striving to build a community for Linux and cybersecurity. For anything we always happy to help everyone on the comment section and on Telegram Group. As we know our comment section is always open to everyone. We read each and every comment and we always reply.

  • AnonX — Anonymous and Encrypted File Sharing

    There are many ways to share files anonymously. Previously we talked about Utopia (P2P file share and encrypted mail). But here AnonX is bash & Python script to share files anonymously in an encrypted way (AES-256-CBC encryption).

    AES-256 is a very strong & advanced encryption method, cracking this encryption using advanced computers would take billions of years to break.

    AnonX is an encrypted file uploader and downloader. The uploaded archive lasts for one week and shall remove from the server. AnonX encrypts (AES-256-CBC encryption) the directory before uploading it to the server. The download function requires the download ID and AES password to successfully download and decrypt the archive. Maximum upload size in AnonX is 2 GB.

    anonymous file sharing using anonx

    AnonX is created by Suleman Malik and it is inspired from transferwee. This script is hosted on GitHub, so we clone it by using following command on our Kali Linux terminal:

    git clone https://github.com/samhaxr/AnonX

    It will be cloned on our system, as we can see in the following screenshot:

    anonx clonning from github

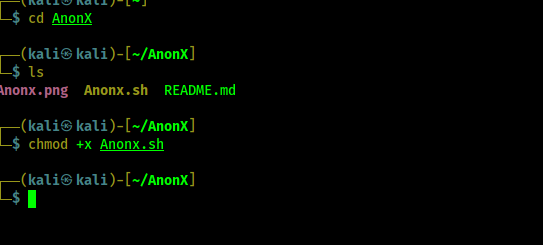
    Then we go to the directory by using cd command:

    cd AnonX

    Here we get our bash script called Anonx.sh. Before run it we need to give it executable permission by using following command:

    chmod +x Anonx.sh
    anonx exetuable permission

    Now we can run this tool by using following command:

    ./Anonx.sh

    Then the main menu of this tool will come front in us, as we can see in the following screenshot:

    Anonx main menu

    Here we can see options for Download and Upload files. We also got options to see the lists of download and upload.

    First we upload a file using upload. To do that we choose “1” and press Enter ⤷.

    Anonx prompt for folder name

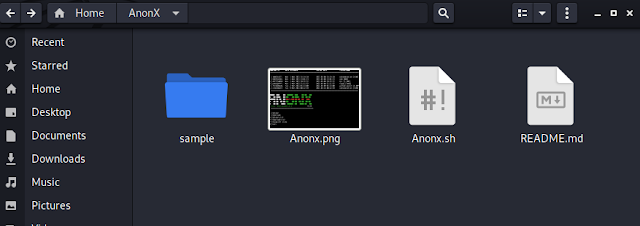
    We can see that AnonX prompt for folder name, before putting folder’s name here we need to move our folder to the AnonX directory, in the following screenshot we can see that we have put our folder in the tool’s directory.

    Anonx directory containing folder to be upload
    Anonx directory containing folder to be upload

    We have a put a folder called sample for just showing an example. Here we need to remember that all files in the folder will be archived, so larger files may took some time. Then we type the name of the folder in the AnonX where it asked us for the folder name.

    Anonx prompted for password to encrypt the folder

    Then it will process the files (archive it) and encrypt them. We need to put a password to encrypt the folder. We can choose our password as we wish and re-type it to verify the password.

    After that folder will be uploaded and we got a download ID (PaGq81dQHX, in our case) for this file. We can use this ID when we want to download the file or we can send this ID to that person who wants to receive this file.

    Anonx folder uploaded

    We can send sensitive data this way to anyone. The receiver just need the Download ID to download the file and the password we set to decrypt the encrypted file.

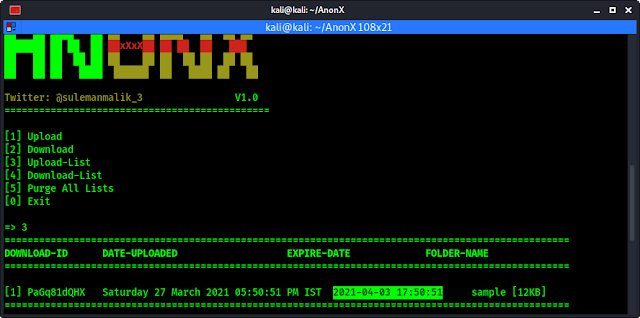
    We can see our upload list by pressing 3 and Enter ⤷ in the main menu of AnonX.

    anonx upload list

    In the upload list we can see our uploaded folders with download ID, upload date, expire date and folder name.

    When we are going to download it we need to choose option 2 and press ⤷.

    Here we will be asked to put the download ID for the file.

    Anonx download ID for the file

    Then it prompts for download file. We need to press y for yes.

    anonx prompts for download

    After that AnonX will download the folder and when the will be complete it asks for the password we used when we encrypted the file.

    anonx prompts encryption password to decrypt it
    AnonX prompts for encryption password to decrypt it

    After putting the encryption password we got the folder. In the following screenshot we can see the download list that we have downloaded the folder.

    anonx downloaded the folder

    The download folder also stored in the AnonX directory.

    In this way we can share encrypted files and folders anonymously. For a batter security we need to choose a complex & non-dictionary password. Although AES 256 is a very strong encryption.

    AES 256 is virtually impenetrable using brute-force methods. While a 56-bit DES key can be cracked in less than a day, AES encryption would take billions of years to break using current computing technology.

    Official Video Tutorial for AnonX


    Love our article? Make sure to follow us on Twitter and GitHub, we post article updates there. To join our KaliLinuxIn family, join our Telegram Group & Whatsapp Channel. We are striving to build a community for  Linux and cybersecurity. For anything we always happy to help everyone on the comment section. As we know our comment section is always open to everyone. We read each and every comment and we always reply.

  • How to Install & Use Ngrok on Kali Linux

    What is Ngrok ?

    Ngrok is a multi-platform application that provides us to forward our local development server to the internet without port forwarding. Ngrok hosts our locally hosted web server in to a subdomain of ngrok.com. That means we can easily show our localhost in the internet without owning domain names/static IP or port forwarding.

    Ngrok is a very good tool for the developers to check and show the projects to the clients before launching the project. But as everything it also be misused by the bad guys. They always trying to host their localhost phishing page on Ngrok to capture victims on the internet. So as a cybersecurity expert we need to look up on this Ngrok.

    How to install ngrok on Kali  Linux

    Warning:- Learning is the most beneficial way to protect everyone in the cybersecurity field, so our this article will focus on educational things. Ngrok is like a knife, knife is created for helping people to cut vegetables, but bad guys misuse it. Same for Ngrok also, it is created to help developers but bad guys misuse it. So don’t try to misuse it against anyone. We will not responsible for that.

    Download & Configure Ngrok on Kali Linux

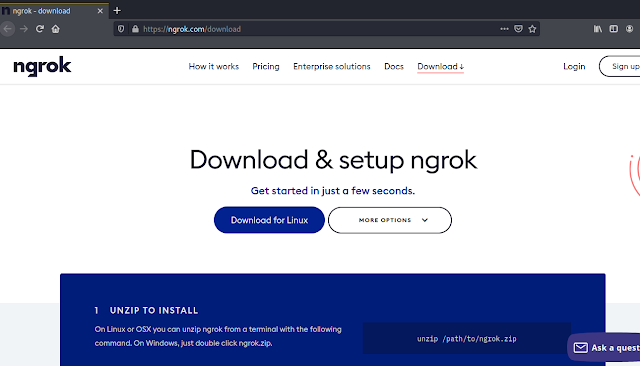
    To install Ngrok on our Kali Linux system we need to open our browser and navigate to the official Ngrok’s download page. Then we can see the webpage like the following screenshot:

    ngrok download page

    Here we need to click on “Download for Linux”, because we are using Linux. For other OS we can go on the “More Options”. After clicking on download we can see that download is started.

    download ngrok

    After download the starting it may not take much time with decent internet. The ZIP file will be downloaded on our “Downloads” directory. We need to go to the “Downloads” directory and decompress the compressed file.

    We open the terminal and use following command to go to our “Downloads” directory.

    cd Downloads

    Then we unzip the downloaded ZIP file by using following command:

    unzip ngrok-stable*zip

    In the following screenshot we can see that our zip compressed file is extracted.

    ngrok zip extracting

    Now our ngrok file is decompressed. Before running it we need to give it executable permission by using following command:

    chmod +x ngrok

    executable permission ngrok

    Now we are all set to run. But wait, we need to setup Ngrok before running. We need to set authentication with Ngrok API token. Where I can get my token? Well for that we need to sign up on Ngrok website. Lets navigate to Ngrok signup page on our browser.

    ngrok signup page

    Here we need to fill up our name and email and choose a password. If we want we can use disposable mail address to login and verify our mail address we don’t need to give our own mail address.

    logged in on ngrok

    After verifying our mail address we can get the API token on the “Your Authentication” area on the sidebar, as we can see in the following screenshot:

    ngrok authentication command

    In the above screenshot we can see our Ngrok authentication API key and the command to set it up. For security we had hided a part of our API keys. So we run the command with API key to set up the Ngrok.

    ./ngrok authtoken 1xyqb*****************25PTTHqMpHqB

    In the above command again we hided our the same API key with *. In the following screenshot we can see the output of the command:

    ngrok authentication command

    Now we are all set to run Ngrok. For an example we forward a locally hosted demo website to the internet.

    Using Ngrok on Kali Linux

    Ngrok’s work is simple it just host our local website to internet. So first we need a local website. Here we have a demo html page on our desktop, and we had opened it on Firefox browser.

    website demo

    But it is just a html page we need to host it locally. For that, we need to run a localhost server on our desktop. We open another terminal and go to the directory where our html page is stored. Then run python localhost server there to host the html page on our localhost by using following command:

    sudo python3 -m http.server 80

    In the following screenshot we can see that our local web server is started:

    python3 http server

    Now we can check it by opening our localhost IP on our browser 127.0.0.1. In the following screenshot we can see that page is now accessible by using our local host IP (127.0.0.1).

    localhost server is started

    Now this is accessible from our computer by using localhost IP (127.0.0.1), and from devices on the same network by using our Local IP (IP assigned by router for our Kali Linux system). But it isn’t available for other network, because this web server isn’t hosted on internet.

    Now we leave our web host terminal as it is, and back to our previous terminal window (where we setup Ngrok), and run the following command to run Ngrok:

    ./ngrok http 80

    Here we run the Ngrok script on http with port number 80, because our localhost server is running on port 80. (If we can’t use the localhost port 80 then we can use other ports like 8080 or 8888, in that case we need to specify our that port on Ngrok).

    After that we can see our Ngrok is started as we can see in the following screenshot:

    ngrok is running

    In the above screenshot we can see our forwarding link. Using that forwarding link (in actual links both http and https) we can see our that page from our browser.

    ngrok forwards our localhost site on the internet

    Not only from our browser we can access it from anywhere on the internet by the link provided by Ngrok.

    Ngrok site on Mobile

    We can see that page on our mobile which is connected to mobile data (not in our WiFi network). This link will be active until we don’t close the Ngrok tunnel, but in real life uses Ngrok can’t run this for a long time in their free plan. It can be a temporary solution.

    This is how we can use Ngrok on Kali Linux, this is the solution for hosting our local website or web server on the internet. Here we don’t need a static IP address neither requires port forwarding.

    Love our article? Make sure to follow us on Twitter and GitHub, we post article updates there. To join our KaliLinuxIn family, join our Telegram Group & Whatsapp Channel. We are striving to build a community for Linux and cybersecurity. For anything we always happy to help everyone on the comment section. As we know our comment section is always open to everyone. We read each and every comment and we always reply.

  • Install Nessus Vulnerability Scanner on Kali Linux

    In this detailed article we learn “How to install Nessus on Kali Linux 2024.x“. Nessus is a very popular and widely used vulnerability scanner and assessment tool for testing web application and mobile application.

    Nessus will be very helpful for penetration testers and bug bounty hunters. Nessus also helpful for web and mobile app developers to find and fix vulnerabilities. 

    Install Nessus on Kali

    Nessus is always updated and useful libraries for vulnerability and configuration checks. Also it’s analysis is very fast and accurate.

    Key-Features of Nessus

    • The latest intelligence, rapid updates, an easy-to-use interface.
    • Covers an industry-leading 50,000+ vulnerabilities.
    • Network devices: Nessus can audit firewalls/routers/switches (Juniper, Check Point, Cisco, Palo, Alto Networks), printers, storage.
    • Virtualization: Nessus also can audit Virtual Systems like, VMware, VirtualBox, ESX, ESXi, vSphere, vCenter, Hyper-V, and Citrix Xen Server.
    • Operating systems: Nessus can run against Windows, Mac, Linux, Solaris, BSD, Cisco iOS, IBM iSeries.
    • Databases: It will scan inside various databases like, Oracle, SQL Server, MySQL, DB2, Informix/DRDA, PostgreSQL, MongoDB
    • Web applications: Nessus can find vulnerabilities in Web servers, web services, OWASP vulnerabilities.
    • Cloud: We can use Nessus to scans cloud applications and instances like Salesforce and AWS et.
    • Compliance: Helps meet government, regulatory and corporate requirements. Nessus also will be useful for personal and development uses.

    Installing Nessus on Kali Linux 2024.x

    Nessus doesn’t comes pre-installed with Kali Linux, so we need to download and install it manually.

    Nessus vulnerability scanner package is available for download in Tenable’s site. This is the official download site for Nessus.

    Nessus selecting proper version for download for Kali Linux

    After selecting proper version of Nessus (Linux Debian amd64) for our system we need to click on Download as shown in the following screenshot.

    Downloading Nessus from official website

    After we download Nessus installer file for our Kali Linux system. It will be saved on our Downloads folder. So we open the terminal and apply command cd Downloads to move to our working directory to Downloads and run following command to install Nessus on Kali.

    sudo dpkg -i Nessus*.deb

    Then it will start installing as shown in the following screenshot:

    Installing Nessus deb file in Kali Linux

    Okey, It is now installed. Let’s check if the installation is correct and Nessus is working or not.

    First we enable Nessus service by using following command:

    sudo systemctl enable nessusd

    This command will enable nessusd services. After this we can start this service by using following command:

    sudo systemctl start nessusd

    Then we can check if it is running successfully or not via applying following command:

    sudo systemctl status nessusd.service

    If everything will be perfect then it should show outputs as following screenshot.

    Nessus service is running sucessfully

    In the above screenshot we can clearly see that Nessus service (nessusd) is active and running successfully.

    Nessus installed successfully

    Now we can run this. We need to open our web browser and navigate to https://localhost:8834 here we might got security warnings form browser but we can ignore it, because it is our localhost.

    avoiding the browser warnngs

    So we go to Advanced and processed to localhost.

    Then we reach the beautiful Nessus Setup, as shows in the following screenshot:

    Nessus Set-UP

    Here we can “Continue” with “Nessus Essentials”. Then we got a form asking about our details like name and e-mail id. Here we need to provide a original e-mail id because Nessus will verify it. So we fill it and click to 

    Nessus setup form fill up

    Then we click on “E-mail” and an “Activation Code” will be send to our given e-mail id.

    Nessus activation

    Now we give the “Activation Code” and click on “Continue”, in the following screenshot we have hided our activation code.

    Nessus sends activation code

    Then we need to create user by creating username and password for login.

    Creating username and paswsword for nessus

    Then we can login. After login we see the front page of Nessus.

    Nessus front page

    Here we can submit our targets. Targets like hostnames, IP address (IPV6 or IPV4), to scan the target. We can put networks here to scan.

    Similarly we can close this and click on “New Scan” to add targets, here we got lots of options as we can see in the following screenshot.

    nessus new scan

    From here we can scan our targets and know about it’s vulnerabilities.

    Nessus is very useful for security researcher and it is very easy to use it. So in this tutorial we learned how we can install Nessus on Kali.

    We can stop Nessus service on our system after using it by applying following command:

    sudo systemctl stop nessusd

    To start it again we can use:

    sudo systemctl start nessusd

    Then we just can go to https://localhost:8834 for Nessus.

    Nessus also have a Paid Professional version to know about it please check this.

    Love our article? Make sure to follow us on Twitter and GitHub, we post article updates there. To join our KaliLinuxIn family, join our Telegram Group & Whatsapp Channel. We are striving to build a community for Linux and cybersecurity. For anything we always happy to help everyone on the comment section. As we know our comment section is always open to everyone. We read each and every comment and we always reply.

  • AngryOxide — Easiest Way to Crack WiFi

    Warning:- This article is for research and educational purposes only. we are not responsible for anything you do or damage you cause from this article. We strongly advise to use against networks that you have permission or you have owned. For demonstration we are going to use our own network.

    Previously we have discussed about various WiFi penetration testing methods. Now, in this ultimate guide, we are going to discuss the easiest tool to test the security of a WiFi network using our Kali Linux system. Before starting this article we need to know that our normal computer or laptop’s WiFi usually not capable to crack WiFi networks. They normally don’t support monitor mode and packet injection. We need a capable WiFi adapter to do so. We have a list of capable WiFi adapter for monitor mode and packet injection.

    Unlock WiFi passwords with Kali Linux & AngryOxide. Ultimate WiFi penetration testing guide. Crack WiFi now!

    Let’s start, We are going to use a tool named “AngryOxide“. AngryOxide is a command line based tool written on Rust. As of now, it is not included with Kali Linux, so we need to install it from its GitHub repository.

    Installing AngryOxide on Kali Linux

    First, we start by installing Cargo on our Kali Linux system, as AngryOxide requires Cargo to run. Cargo is Rust’s build system and package manager. We can easily install it via using following simple command on our updated Kali Linux Terminal:

    sudo apt install cargo -y

    This can take some time to install it depending on our internet speed and system configuration. In the following screenshot we can see the process.

    installing cargo on Kali Linux

    Now we are going to clone AngryOxide’s repository on our Kali Linux system by using following command.

    git clone https://github.com/Ragnt/AngryOxide

    After the cloning process is complete, we can navigate to the directory and view the files using the cd AngryOxide && ls command [Learn how to use Linux Terminal commands and bash scripting]. We can see the output of above commands from the following screenshot:

    Cloning AngryOxide from GitHub on Kali Linux

    Now we can compile it by using following command:

    make

     We can see the process of above command in the following screenshot:

    compiling AngryOxide

    It may take some time depending on our system performance and internet speed. After finishing this we are gonna install this by using following command.

    sudo make install

    The following screenshot shows the installation process.

    Installation of AngryOxide on Kali Linux

    Now we can run this tool from anywhere on our computer. Suppose we need output on our Desktop then we just need to open our Terminal on our Desktop location. To do that we need to run following command:

    cd ~/Desktop

    Now we can easily run this tool. Let first we run it check the help options of this AngryOxide tool by using following command:

    angryoxide -h

    In the following screenshot we can see the help options (menu) of AngryOxide tool.

    menu of angryoxide tool

    WiFi Testing Options of AngryOxide

    We are going to use these options to crack (better read security test) to any Wireless Network near by. Before that let we understand the working by using the options we got. In following list we are going to break down these options.

    1. Interface (-i, –interface): This is like choosing which WiFi card or adapter we want to use for testing.
    2. Channel (-c, –channel): We can think of WiFi channels like different radio stations. This option lets you choose specific channels to scan. If you don’t specify any, it will automatically scan commonly used channels 1, 6, and 11.
    3. Band (-b, –band): WiFi can operate on different frequency bands like 2.4GHz or 5GHz. This option lets you specify which band or frequency range to scan.
    4. Output Filename (-o, –output): This is where you specify the name of the file where the results of the test will be saved.
    5. Target Entry (-t, –target-entry): Here, we can specify a particular WiFi network (identified by MAC address or SSID) that we want to target for testing. If we don’t specify any, AngryOxide will test all networks it finds.
    6. Whitelist Entry (-w, –whitelist-entry): This is for specifying networks that we don’t want to attack. It’s like commanding AngryOxide, “Leave these networks alone.”
    7. Attack Rate (-r, –rate): Adjusts how aggressively the tool attacks networks.
    8. Combine (–combine): Combines output files into one for easier analysis.
    9. No active (–noactive): Disable activated Monitor mode of WiFi adapter.
    10. Autohunt (–autohunt): Automatically scans and focuses on channels where targets are found.
    11. Auto exit (–autoexit): Tells the tool to stop automatically once it has gathered all the needed data.
    12. No transmit (–notransmit): Makes the tool passive, meaning it observes without sending any data.
    13. No deauth (–nodeauth): Disables sending deauthentication frames, which are sometimes used in attacks.
    14. No tar (–notar): Prevents the tool from packaging the output files into a tar file.
    15. Disable mouse (–disablemouse): Turns off mouse capture, useful for headless operation (no graphical interface).
    16. Dwell Time (–dwell): Adjusts the time spent on each channel during scanning.

    Running AngryOxide against WiFi

    First we can check network interfaces we are using on our system by using following command:

    ip a

    In the following screenshot, we can see the network interfaces on our Kali Linux system.

    network interfaces on Kali Linux system
    MAC address is hidden due to security & privacy

    In the above screenshot we can see that our computer have only a wlan0 wireless network interface. We are using Kali Linux on our Desktop PC and that is an external WiFi card Alfa AWUS036NEH, if we were using a laptop then we might get two wireless network one for inbuilt wireless card another for external wireless card. in that case we have wlan0 and wlan1 as our network interface.

    Now we run AngryOxide tool to set our interface (wlan0) without making any noise on surrounding networks with no deauth and no transmit options. Here we requires root permissions, so our command will be as following.

    sudo angryoxide -i wlan0

    In the following screenshot we can see that our AngryOxide is running with a very beautiful command line interface and discovered some wireless networks. Here we also can see various options regarding discovered networks. Here we can use our keyboard for navigating things like q to quit, a/d to change tabs, space for pause, w/s to scrool, k for keybinds.

    Running AngryOxide on Kali Linux
    We have hidden MAC addresses to maintain our privacy.

    Here for an example we have choose a WiFi network named Zero (SSID is the name of the WiFi Network). To select it we need to press down arrow key ⬇. Then we need to press 🇹 button on our keyboard to start attack on it. As we can see in the following screenshot.

    attacking on WiFi using AngryOxide

    We can also see that we have captured 4-Way Handshake. 4-Way Handshake is capturing 4 messages (EAPOL Messages). Basically in normal language to understand this attack process we think like AngryOxide send de-authentication packets to target network (lots of packets on a network) which creates a traffic jam and all connected devices are disconnected due to overload then those connected devices or clients automatically try to connect to the network and send request to connect. Here is the catch in that request it send password also for validation. Password in the sense hash of the password. We capture the request using various applications just we are doing using AngryOxide. This capture process called handshake capturing.

    If we press 🇩 on our keyboard two times and go to the “Handshake” tab then we can clearly see that AngryOxide have captured handshakes successfully. Which shown in the following screenshot.

    Handshake Captured

    Now our work is done. We can quit this by pressing 🇶 button on our keyboard.

    confirming exit of AngryOxide

    Then AngryOxide will ask for confirming the exit. Here we press 🇾 button to confirm our exit. We had run AngryOxide on our Desktop so after exit we can see a ZIP file on our Desktop. As we can see in the following screenshot.

    AngryOxide ZIP file created on oue Kali Linux Desktop

    Now we can easily extract this ZIP file by right click and choosing “Extract Here” option.

    extracting ZIP file on Kali Linux

    It will create a directory (Folder for Windows users) on our Desktop, inside that directory we can see some files.

    opening extracted files from AngryOxide ZIP

    Cracking WiFi passwords

    YOO! Handshake file is captured. Now what? It’s time to crack down this hash into plain text password. To do this we are going to use HashCat tool. Previously we have discussed about Hashcat.

    Sometimes we got the handshake (cap/pcap/pcapng) file then we need to convert it to put it on Hashcat for cracking Paswword. But AngryOxide already providing us the Hashcat format (filename.hc22000 format) which saves our some time. Lets crack this using Hashcat.

    We need to open a terminal window and run following command:

    hashcat <full-path-of-hashfile> <full-path-of-wordlist>

    In our case the command will be as following

    hashcat /home/kali/Desktop/oxide-2024-05-01_21-14-38/Zero.hc22000 /usr/share/seclists/Passwords/WiFi-WPA/probable-v2-wpa-top447.txt

    Here we are using a passwordlist or wordlist which contains top 447 common passwords for WiFi cracking. We can download these kind of wordlists from internet (here we have used seclists, which can be installed on Kali Linux by sudo apt install seclists command).

    Hashcat is trying to crack the password
    Hashcat is trying to crack the password

    If the password isn’t common, then we might not find it. In that case, we need to run a dictionary attack. Which may took several years to crack a tough password depending on our System password (GPU’s are useful in this case).

    We intentionally put an easy password for our WiFi to demonstrate this tutorial. But with a large wordlist the chance of cracking the hash increased.

    In the following screenshot we can see that password for SSID named Zero is cracked.

    caracked WiFi password using AngryOxide and HashCat on Kali Linux

    This is how we can easily capture WiFi handshake files using AngryOxide and crack WiFi password using Hashcat on Kali Linux system.

    Note:- This article is intended solely for educational and research purposes. We hereby absolve ourselves of any responsibility for the consequences of actions taken as a result of the information provided herein. Proceed with caution and understand that unauthorized use of the techniques described within may result in severe legal repercussions. We vehemently advise against employing these methods on networks without explicit permission from the network owner or administrator. For the purpose of demonstration, we will be conducting our experiments exclusively on our own network.

    Love our article? Make sure to follow us on Twitter and GitHub, we post article updates there. To join our KaliLinuxIn family, join our Telegram Group & Whatsapp Channel. We are striving to build a community for Linux and cybersecurity. For anything we always happy to help everyone on the comment section. As we know our comment section is always open to everyone. We read each and every comment and we always reply.

  • What Cybersecurity Experts Do with a suspicious E-Mail?

    In today’s digital era, we forgot about sending letters to our friends; nowadays, we have emails. As cybersecurity experts, we have lots of encounters with suspicious target emails, sometimes during red teaming for information gathering we also need to go offensive to extract details of a person from e-mail address. Usually we analyze metadata, tracing the email’s journey through servers to pinpoint its origin. Then, we analyze the sender’s identity or other information, checking if their are signs of impersonation or phishing. Next, we carefully examine the email’s content for malicious links or attachments. But that is a manual process and seems very boring for a lazy person.

    e-mail forensics on Kali Linux using Mosint tool

    Mosint the Mail OSINT

    If we have a OSINT (Open Source Intelligence) tool, then manually checks?  Today on our deck we have an OSINT tool called Mosint (did this name came from Mail OSINT?). Mosint is an automated email OSINT tool written in Go language that allows us to investigate for target emails in a fast and efficient manner. It consolidates numerous services, enabling security researchers to swiftly access a wealth of information.

    Now it’s time to install Mosint on our Kali Linux system. Here we are using Kali Linux system but on the same way we can install it other Debian-based Linux distributions.

    It is on the Go language so first we need to install Go language on our system by using following command:

    sudo apt install golang -y

    The above command will install Golang on our Kali Linux system, as we can see in the following screenshot:

    installing Golang on Kali Linux

    If this method of installing Golang isn’t working then we can install it manually by following our old article about installing Golang on Kali Linux system.

    Now we have installed Golang on our Kali Linux system and now we are all set to install Mosint. We can clone it from GitHub and install it but that thing we did on all GitHub cybersecurity tools. What if today we do something different. Today we are gonna install and run it via Docker. Now  a Docker container is a lightweight, portable, self-sufficient package that includes all necessary components to run program. We already have a dedicated article on Docker.

    Docker comes pre-installed on Kali Linux’s almost all versions but in case we need to install it we can run following command:

    sudo apt-get install docker.io -y

    in the following screenshot we can see that we already have docker on our system.

    docker installation on Kali Linux

    Now we can easily install Mosint on our system via docker by simply using following command:

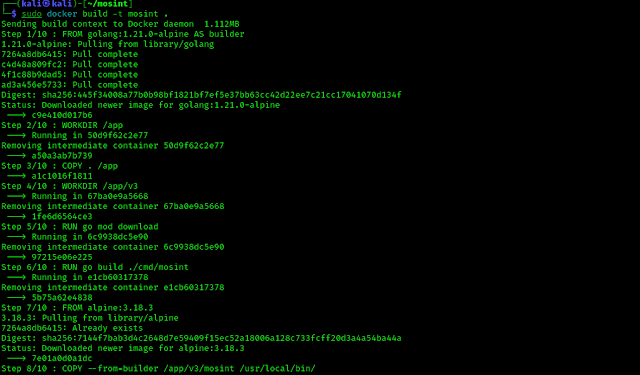
    sudo docker build -t mosint .

    We can see the process of above command on the following screenshot:

    mosint installation via docker on kali linux

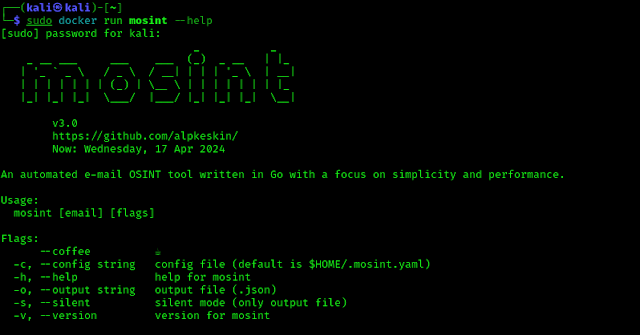
    It may take a minute depending on our internet speed and system configuration. After the setup is complete we run the Mosint tool via Docker. First let’s check the help options via following command:

    sudo docker run mosint --help

    In the above command first we use sudo command to run Docker as the superuser or root user otherwise it will show us “permission denied” issue. Then we call Docker and command it to run run Mosint then we can use Mosint’s flags to use it, as example here we used the –help flag to see what we can do with Mosint, as we can see in the following screenshot:

    checking help options of mosint via docker on Kali Linux

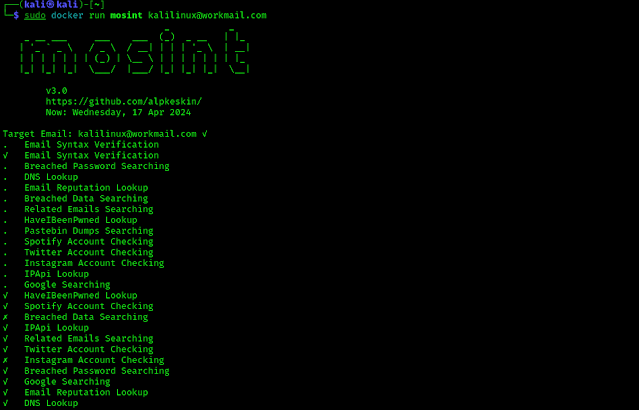
    Let’s not wasting anymore time and run it against an e-mail address. So the command will be as following:

    sudo docker run mosint mail@email.com

    In the place of mail@email.com we need to put our target e-mail id. Here for example we choose our business e-mail address and we can see the output on the following screenshot:

    mosint analysing an Email on Kali Linux

    On the following screenshot we can see the result:

    Mosint tool results against a e-mail id on Kali Linux

    Mosint can check various services to gather information of an e-mail id. On the above screenshot we can see various details like It’s not a disposable mail address, IP address of mail service provider, Social media account information (yes we don’t have any with this mail), and even Google search results.

    Mosint’s main features are:

    1. Fast and simple email-based scanning
    2. Optimized for ease of use and lightweight on resources
    3. Email verification and validation
    4. Checking Social Media Accounts
    5. Checking data breaches and password leaks
    6. Finding related emails and domains
    7. Scanning pastebin dumps
    8. Google Search
    9. DNS/IP Lookup
    10. Output to JSON file

    Services used by Mosint

    There are lot’s of functions are in this Mosint tool. It also uses some online services like

    Some of the above services requires to put API keys on the Mosint tool for details we can check their GitHub repository

    Extra Talks About E-mail’s Forensics

    This is the basics to gather information about a target mail id. Previously we need to do things manually and complete the following checklist:

    1. Header Investigation: Suppose we have received a package. Before opening it, we check the package’s label to see where it’s came from and who sent it. Similarly, we’ll check the email’s header, which is like its digital label, to trace its origin & path.
    2. Metadata Check: Sometimes file like image files have metadata store inside it, in simple words these are like where about of files. So if we get an e-mail with files we can check the metadata to extract some information like when they were sent, from which device, and sometimes even the sender’s location.
    3. IP Address Tracing: This is very important to check the sender’s IP address, IP will lead us to target’s location.
    4. Email Service Provider Investigation: There are different types of mail carriers. Some are like the big, well-known e-mail services, while others are like local e-mail service providers. If we identify the email service provider, then in some cases we can understand more about how the email was sent.
    5. Content Analysis: May be the email content is like deciphering a secret code. We’ll carefully read through the email to uncover any hidden meanings, clues, or unique characteristics that could reveal more about the sender.
    6. Attachments Examination: If the e-mail comes with some extra media files with it then before opening it, we would inspect everything to make sure it’s safe because some file formats can be comes with execution payloads.
    7. Social Media and Online Presence: When we need to search something we use search engines. Similarly we’ll search for the email ID on social media and other online platforms. This helps us build a profile of the target and potentially uncover more about their identity and activities.

    This is how we cybersecurity experts inspect an e-mail. We have try to cover the basic things of it and learnt using of Mosint tool on Kali Linux system. Hope this article will be helpful.

    Love our article? Make sure to follow us on Twitter and GitHub, we post article updates there. To join our KaliLinuxIn family, join our Telegram Group & Whatsapp Channel We are trying to build a community for Linux and Cybersecurity. For anything we always happy to help everyone on the comment section. As we know our comment section is always open to everyone. We read each and every comment and we always reply.

  • Passhunt on Kali Linux — Exposes the Nightmare of Default Passwords

    Hope you are all doing awesome. As always, today we’re agin going to learn something from the basics of cybersecurity world, where a seemingly harmless string of characters can become our nightmare. Yes, you guessed it—we’re talking about default passwords. Not only that We also learn how we can use a tool called Passhunt on our Kali Linux system and find loopholes on various devices.

    Why Default Passwords Are So Dangerous?

    Now, imagine we’re working on our own home or office. We’ve got all these trusty devices—like routers, webcams, printers—keeping our connection the world and running our work smoothly. But here’s the catch: many of these devices come with default usernames and passwords straight out of the box.

    At first glance, default passwords might seem like a easy shortcut. After all, who wants to spend time to set up a new password when we can just use the one that’s already there, right? Wrong! Default passwords are like leaving the front door of our system wide open for bad characters. Devices with default credentials aren’t just in danger—they are the danger. Anybody can enter the system without knocking the door.

    meme on devices with default credentials

    Let we have a look how default passwords can lead to some serious cyber attacks on us.

    • Network Nets: Imagine that—we’ve got our brand new router up and running, blissfully unaware that it’s still using the default password. Along comes a crafty bad attacker who sniffs out our router’s vulnerability faster than we can type “password123.” With access to our router, the attacker can wreak havoc on our entire network—slowing down our internet, eavesdropping on our data, or even launching full-blown cyber attacks. It’s like handing over the keys to our system on a silver platter!
    • Web Woes: Next up, we’ve got webcams. These little things might seem innocent enough, but with default passwords, they’re serious trouble makers. Imagine a attacker gaining access to our webcam without we even knowing it. They could spy on our every move, invade our privacy, or even use the footage for blackmail. It’s like having an unwanted guest lurking in the shadows of our home, and nobody wants that!
    • Printer Predicaments: Last but not least, let’s talk about printers. Yes, even these humble machines aren’t safe from the perils of default passwords. With access to our printer, a attacker could intercept sensitive documents, manipulate print jobs, or even launch a good old-fashioned printer hack (yes, that’s a thing!), gaining unauthorized access to sensitive documents stored on the printer’s memory. It’s like turning your trusty printer into a cyber tool, ready to strike at a moment’s notice.

    So, what’s the moral of the story? It’s simple: always, always, always change default passwords. Whether it’s for our router, our webcam, our printer, or any other device in our supervision, we shouldn’t take shortcuts when it comes to security. Humans are the most weakest point in any security system. Humans are normally stupid, not really, a better word would ignorant, they don’t aware how stuff works. We just want that our router runs perfectly for Netflix and chill.

    Hunting down default passwords using Passhunt

    Enough talking about layman’s who ever reading this considers as a cyber security expert and we cyber security experts didn’t came here to learn those above things. We wanna test these kind of vulnerabilities due to human errors. Passhunt is a Python script which is going to help us on this matter.

    This Passhunt tool originally created by Viral Maniar which can search through 523 vendors and their 2084 default passwords. It works like a database. Passhunt was giving some issues on newer Python and Kali Linux version. We have updated this script and removed some unwanted lines to run it on our Kali Linux system.

    Let’s fire up our Kali Linux Terminal and type following command to clone Passhunt from Github:

    git clone https://github.com/jaykali/Passhunt

    After pressing Enter ↲ button on our keyboard Passhunt will be downloaded on our system as we can see in the following screenshot.

    Passhunt clonning from Github

    Now we are going to use cd command to go to the Passhunt directory. The command will be following:

    cd Passhunt

    Now we need to install required dependencies to run Passhunt and the command will be following:

    pip3 install -r requirements.txt

    It may take some seconds depending on our internet speed and system configuration. In the following screenshot we can see the output of above commands.

    preparing Passhunt on Kali Linux

    Now we are going to run Passhunt by using following command:

    python passhunt.py

    Now our password hunter Passhunt is ready and running as we can see in the following screenshot.

    Passhunt running on Kali Linux

    In the above screenshot we can see that there are 3 options only on the main menu.

    1. List supported vendors: By pressing 1 and Enter we can see all the supported vendors (brands) names list.
    2. Search Default Password: We can Hit 2 and Enter to search for a Vendor’s default credentials.
    3. Exit: To quit this tool we just need to type 3 and hit Enter.

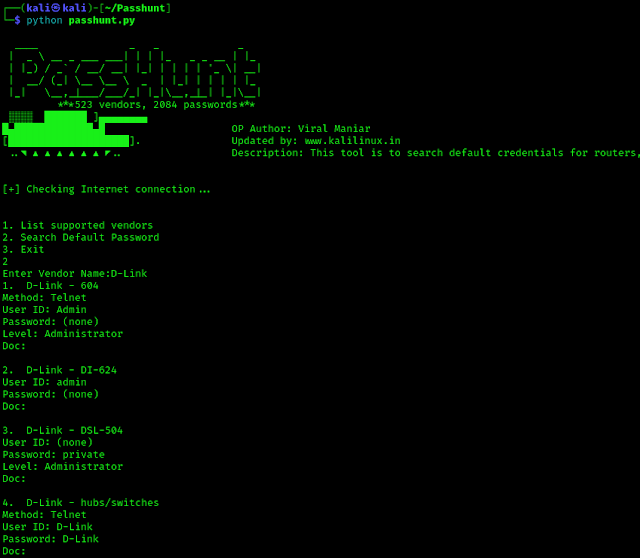
    Now assume we have encountered with a D-Link device, and we are thinking to try default passwords login on this then we can search for it on Passhunt by pressing 2 and hit Enter ⤶.

    Then it will prompt for vendor’s name we can use D-Link in our case. After that we are able to see the list of D-Link devices and their default credentials. Here we can choose our target device as we can see in the following screenshot:

    passhunt is hunting for default credentials

    This is how we can search for default password database using Passhunt on our Kali Linux system. Nowadays default password devices are rare every device have it’s own default password written on somewhere in the packets. But there are some web services which are old and not updated for a while even offices, universities, households use very old model routers for saving some bucks. Humans are 

    Humans are ignorant they really don’t care about these online security. They uses same passwords on internet banking, social media even in shopping sites also. They don’t change the default passwords of devices. Those things are really scary.

    One more thing, If our target device is a router and it have a WPS button (ultra modern routers usually don’t have WPS button, others may have) then we can also try Pixie Dust Attack to crack it.

    That is it for today. We already knows that default passwords are very risky and learn something new i.e using Passhunt on our Kali Linux system and search for default passwords and credentials.

    Love our article? Make sure to follow us on Twitter and GitHub, we post article updates there. To join our KaliLinuxIn family, join our Telegram Group & Whatsapp Channel We are trying to build a community for Linux and Cybersecurity. For anything we always happy to help everyone on the comment section. As we know our comment section is always open to everyone. We read each and every comment and we always reply.

  • HTTrack — Make any Website Offline

    HTTrack is a free tool that can clone an entire website. HTTrack allows to download any website in local folder. It comes pre-installed in Kali Linux.

    HTTrack copies all the website including HTML pages, images, directories, links, structures from the server to our system’s drive. It make a page by page copy of an website. That we can visit the website offline. This helps penetration testers a lot. When we don’t have to study a a website’s content in short time then we can save it on our local drive for reading in future.

    httrack copy website in kali linux

    HTTrack has two versions one is command line (CLI) another is graphical based (GUI). In our this detailed post we will talk about these both.

    HTTrack

    HTTrack comes with Kali Linux full version or we can install it on Kali or other Debian based distro by using following command:

    sudo apt-get install httrack -y

    After the installation process done we can copy an website to copy a website we use following command:

    httrack https://site_ur -O /home/user/directory

    The above command will clone the example website on our required directory. Then we can browse it’s index page from our local disk.

    Otherwise we can just use httrack command to run it on interactive mode:

    httrack

    Then it will as us the project name as we can see in the following screenshot:

    httrack run and project name

    Here we can enter our project name as we wish. Then we press return or enter key and it will ask for path to save the cloned offline website. We can choose any path on our system or simply press Enter key to use default path i.e /home/kali/websites

    choosing path for httrack

    Here we need to put the URL of websites. We can clone multiple websites by entering their URL’s separated by comma or blank space. For an example we are going to clone the blog of re4son and we put the URL as we can see in the following screenshot:

    making offline copy of a website

    We press return and we get some other options.

    1. Mirror Web Site(s)
    2. Mirror Web Site(s) with Wizard
    3. Just Get Files Indicated
    4. Mirror ALL links in URLs (Multiple Mirror)
    5. Test Links In URLs (Bookmark Test)

    We can choose any number as per our requirements here for an example we just mirror a website so we choose 1 and press Enter .

    Then we need to set a proxy we don’t using any proxy here so we simply hit Enter.

    Now it will ask for define wildcards we also don’t need any special wildcards so we press Enter again for none.

    Then we can choose manual options here we can type help for options but we hit Enter again to skip it.

    Now we are ready to mirror or clone the website. HTTrack asks that we are ready or not to lunch the mirror process here we press y for yes and hit Enter.

    Then our cloning process will started as we can in the following screenshot:

    Mirror a website

    Here it will take some time depending how big website we have chosen and our network speed.

    After completing the process we can see offline copy of our website in our local directory /home/kali/websites

    httrack offline copy

    Then inside of our project directory (Example was our project name) we got the website’s offline copy.

    offline copy of our website

    We can open the index.html file on any browser to access the offline website.

    In the following screenshot we can see the offline website is opened in chromium web browser and check the URL section to be sure that it is offline.

    cloned wesite using httrack

    Now this is not end. HTTrack have a GUI version let’s talk about it.

    WebHTTrack

    WebHTTrack is a web-based Graphical User Interface version of HTTrack. We can install it by using following command:

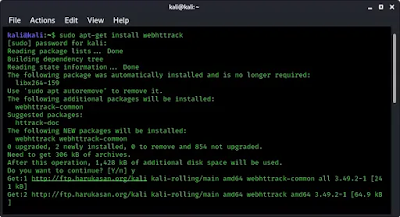
    sudo apt-get install webhttrack -y
    webhttrack installation

    Now we can launch it by simply using webhttrack command on our terminal. Also we can start it from application menu.

    webhttrack in application menu

    After launching it we can see that it opens in our browser. As we told it is a web based tool. We can see it is opened in our browser in the following screenshot:

    Here default language is English or we can change the language. We are alright with English so we click on “Next” Then we got something like following screenshot:

    webhttrack filling details

    Here we can fill the projects name, paths etc and click on next.

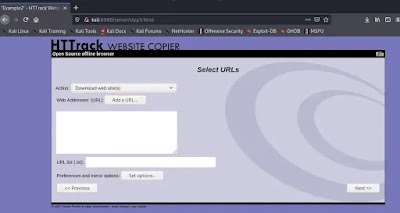
    webhttrack url input

    Here we can fill the inputs like URLs for cloning and other parameters then we click on “Next”.

    Then we will be on the Start Page. Here we got the “Start” button and we press it.

    Then it will start downloading the website on our defined storage location.

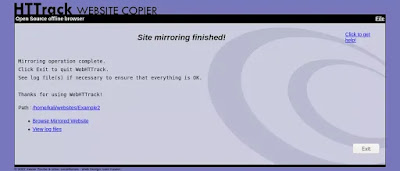
    completed mirroring website

    From here we can see the mirrored website. This GUI based tool is very easy to use.

    Love our articles? Make sure to follow us on Twitter and GitHub, we post article updates there. To join our KaliLinuxInfamily, join our Whatsapp Channel & Telegram Group. We are trying to build a community for Linux and Cybersecurity. For anything we always happy to help everyone on the comment section. As we know our comment section is always open to everyone. We read each and every comment and we always reply.

  • NIPE — Fully Anonymize Total Kali Linux System

    Becoming anonymous is a very good way to hide ourself form all kind of surveillance. But we get only few option because VPN is really bad, specially those free one. Free VPN’s keeps logs and we can be traced.

    We can use TOR network, not the browser only. Tor can’t be traced easily it is very hard (practically close to impossible). Read our detailed article on Tor network.

    We can use Tor as a default gateway for our network. Then all the traffic on our PC will transfer via Tor network and it’s not possible to trace us. We can do this manually with a server but manual configuration of this will consume a lot of time and hard work. Automated tools will help us.

    Kali LInux anonymous total system with NIPE

    This is not the first, previously we made an article on AnonSurf, but that tool is not updated in last 3 years and we got a lot of issues.

    In today’s article we gonna talking about Nipe. This perl script enables us to directly route all our traffic from our computer to the Tor network through which we can use the internet anonymously without having to worry about tracked or traced back.

    First of all we need to clone this repository from GitHub by using following command:

    git clone https://github.com/htrgouvea/nipe

    Then it will copied to our system we can go inside the directory using cd command:

    cd nipe

    The screenshot of the above commands is following:

    clonning nipe from github to kali linux

    Now we need to install libraries and dependencies by using following command:

    sudo cpan install Try::Tiny Config::Simple JSON

    Now for new comers cpan might be a strange command, cpan helps to install packages or modules for Perl. In simple words we can say ‘Python have pip‘ & ‘Perl have cpan‘.

    After this we can install this Perl script using following command:

    sudo perl nipe.pl install

    Then the installation process will start. After the installation we got a notification that some services need to restart, here we press “TAB” button and select OK by pressing ENTER, as we can see in the following screenshot:

    services restart for NIPE

    After this we can say that our installation process is done. Now we are ready to ROCK.

    First of all we check the status of NIPE tool by applying following command:

    sudo perl nipe.pl status

    The screenshot of the command is following:

    nipe status on Kali Linux

    In the above screenshot we can see that NIPE is disabled here but we can start it using following command:

    sudo perl nipe.pl start

    After applying these command NIPE services will be started, now again if we can check the status by applying sudo perl nipe.pl status command then, we can see the output as the following screenshot:

    anonymous services has been started on Kali Linux

    Now we need to test our IP by opening dnsleaktest website to make sure that our original IP address is hided. Checking this will be a good test for NIPE tool beneficial for everyone.

    When we are done we can off this Tor gateway and get back to our original IP address by applying following command:

    sudo perl nipe.pl stop

    After applying the above command NIPE will stop and we get back our original IP. We can check the status, as we did in the following screenshot:

    nipe service stopped on Kali Linux

    NIPE makes Tor network our default gateway. This is how we can anonymise our total Kali Linux system. This process is enough secure. Practically cracking Tor is close to impossible but as we know theoretically everything is possible.

    Love our articles? Make sure to follow us on Twitter and GitHub, we post article updates there. To join our KaliLinuxInfamily, join our Whatsapp Channel & Telegram Group. We are trying to build a community for Linux and Cybersecurity. For anything we always happy to help everyone on the comment section. As we know our comment section is always open to everyone. We read each and every comment and we always reply.

  • GSM Signal Tapping using RTL-SDR

    In our previous articles we learnt the basics of RTL-SDR
    and Created our own airplane radar using RTL-SDR using our Kali Linux system. So in
    this article we are not going to cover the basics again. Please make
    sure to read our previous articles carefully. One more thing, buying RTL-SDR from our Amazon link will support us, we earn a little commission income.

    Mobile call hacking using Kali Linux

    In our this detailed article we are going to discuss about scanning and analyzing GSM traffic using our RTL-SDR on Kali Linux with the help of kalibrate-rtl tool. This tool can scan for GSM based stations in a frequency band.

    Scanning for GSM Signals

    As we told we are going to use kalibrate-rtl or kal tool to scan GSM traffic. So we need to install it on our system. We can easily install it on our Kali Linux by applying following command:

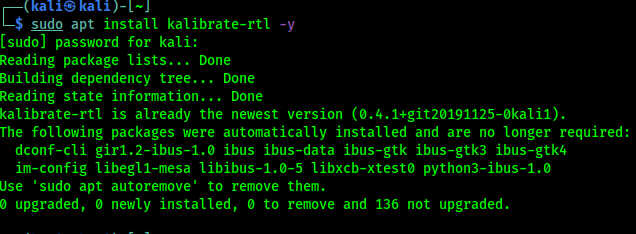
    sudo apt install kalibrate-rtl -y

    In the following screenshot we can see the output:

    kalibrate-rtl tool installed on our Kali Linux system
    kalibrate-rtl is already installed on our Kali Linux system

    Most of the countries use GSM900 band, but in USA it’s GSM850. We are scanning for GSM900 band, our USA friends need to use GSM850 in the place of GSM900.

    We need to plugin our RTL-SDR with antenna at first, Then to scan GSM900 traffic we run following command on our terminal:

    kal -s GSM900 -g 40

    The following screenshot shows the output of the above command:

    kalibrating GSM signals

    In the above screenshot we can see that there are many channels, but we need to note the frequencies, in our case we are going to use 953.4MHz.

    Now we open GQRX tool and enter the frequency in the Receiver Options window, shown in the following screenshot:

    gqrx showing GSM signal

    We can see the waterfall that the device is able to catch the signals perfectly.

    Analyzing GSM Packets

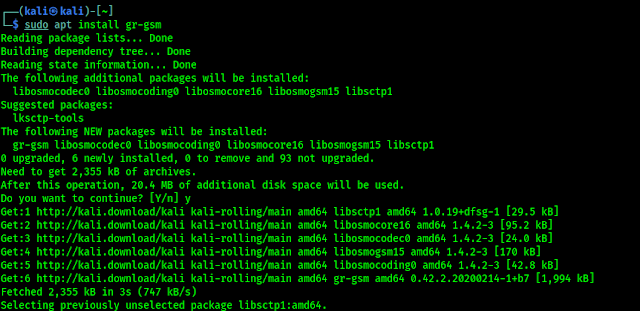
    Now we need to install gr-gsm tool by using following command:

    sudo apt install gr-gsm -y

    We can see the output in the following screenshot:

    installing gr-gsm on Kali Linux

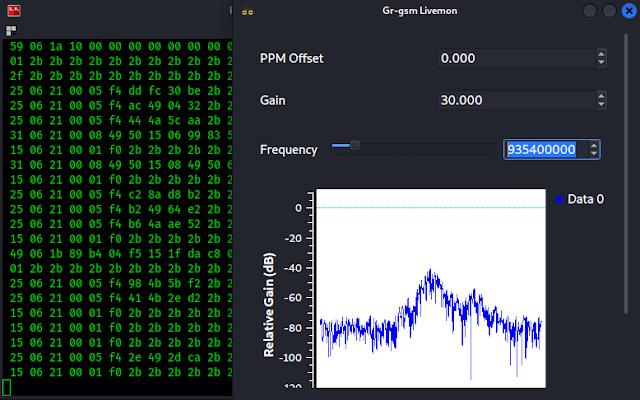
    This gr-gsm tool will help us to look the data at the packet level. After the installation process is done, we need to run following command to start the monitoring packets:

    grgsm_livemon

    Here a new window will open, we will change the frequency we are working with (we had noted the 935.4MHz while using kalibrate). As we can see in the following screenshot:

    grgsm livemon

    On the gr-gsm livemon window we can see the frequency and in the terminal window we can see the data traffic. Now we need to analyze the data packets using Wireshark. We leave this gr-gsm livemon terminal and window as it is capturing packets and open our Wireshark from application menu or from another terminal using wireshark command.

    wireshark taffic analysis

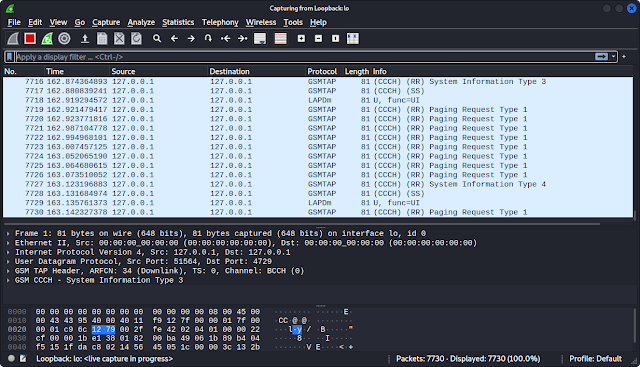
    Here we need to select the interface. Our interface will be Loopback: lo by double clicking over it. Then we can see the packets on the Wireshark, as following screenshot:

    gsm packats on wireshark

    We need to apply the display filter now. We need to add the filter gsmtap. Then we need to look on the packet Info tab for System Information Type 3.

    System information type 3 on Wireshark

    Now we need to check the GSM CCCH > Location Area Identification (LAI). There we will get the information about the data packets. Shown in the following screenshot:

    captured gsm traffic information using rtl-sdr and wireshark on Kali Linux

    In the highlighted line we can see that the mobile network provider is BSNL and this packets are transmitting from West Bengal. This is how we analyze GSM signal and how GSM packets travel on our Kali Linux.

    This is how we can analyze GSM packets using RTL-SDR on our Kali Linux system. We can’t say much for our ethical policy. Everything more than above can be misused. There are lots of good tutorials on GSM sniffing on the internet we just need to find out them, we just made an easy start. Our suggestion will be crazydanishhacker, he is far batter than us on this topic. He did well in his website and YouTube channel.

    Love our articles? Make sure to follow us on Twitter and GitHub, we post article updates there. To join our KaliLinuxIn family, join our Telegram Group. We are trying to build a community for Linux and Cybersecurity. For anything we always happy to help everyone on the comment section. As we know our comment section is always open to everyone. We read each and every comment and we always reply.