Category: Configure

  • Install VirtualBox on Kali Linux

    Install VirtualBox on Kali Linux

    Usually we use Virtual Machines on Windows and use Kali Linux there. But there are lots of Kali fans using Kali Linux directly (as a primary OS) on their PC. Here we sometime need to install virtual machine of other OS or vulnerable virtual machine.

    Install VirtualBox in Kali Linux

    We have already discussed a way where we had used KVM (Kernel Virtual Manager) in our Metasploitable2 and Windows installation in Linux. Al tough KVM has lots of functions but majority of people will chose VirtualBox because they are used to with VirtualBox.

    Oracle VM VirtualBox is a free and open-source hosted hypervisor for x86 virtualization in this tutorial we describe how easily we can install VirtualBox in our Kali Linux system and use it.

    First of all we need to go to the Linux download section of VirtualBox by clicking on this link. A new window will open like following screenshot:

    VirtualBox download

    In the above screenshot we can see that VirtualBox is not directly available for Kali. But the Ubuntu’s VirtualBox will work in Kali Linux and almost other Debian based distributions.

    Now we download the VirtualBox for latest Ubuntu version. It is a .deb file with almost 85 MB of size.

    After download the deb installer file on the Downloads folder we open the the terminal there and to install it we apply following command:

    sudo dpkg -i virtualbox*.deb

    Then it will start installing VirtualBox on our Kali Linux system.

    VirtualBox started installing

    After a little bit of time (depending on our computer’s performance) it will complete.

    Now we can search the VirtualBox on the Application menu.

    Searching for VirtualBox in Application menu

    Now we click on this to open it. It will open in the following screenshot:

    VirtualBox Installed in Kali Linux

    Now we can use it to configure any other OS under Kali Linux. This is how we can install VirtualBox in our Kali Linux machine and the installation process of other OS in it will be the same as we do it on Windows.

    Using Kali Linux as primary OS ? Our daily life with Kali Linux might be interesting.

    Liked our tutorial? Don’t miss out! Connect with us on Twitter and GitHub for instant
    updates on our latest articles. Ready to dive into the world of Kali
    Linux and Cybersecurity? Become a part of our thriving community by
    joining our lively Telegram Group. We’re on a mission to foster a strong
    community dedicated to Linux and Cybersecurity enthusiasts. Have
    questions or thoughts? Drop a comment – we’re here to assist! Our
    comment section is your space to engage, and we make sure to read and
    respond to each one.

  • [Easy] How to Install Brave Browser on Kali Linux

    Brave Browser is really a good privacy & safety focused browser, which have advanced features like less memory per tab compared to Firefox and Chrome which make is very fast and lightweight, it comes with crypto wallet, private window through TOR network and many more. There are lots of good reason to use Brave Browser. But in this brief article we are not going to cover all the reasons to use Brave Browser.

    Install Brave Browser on Kali Linux

    Here in this article we just cover how we can install Brave Browser on Kali Linux system in short. Not only Kali, we can use this method to install Brave Browser on any other Debian based Linux Distribution (Like Ubuntu 16.04, Linux Mint 18, Elementary OS etc).

    Installing Brave Browser on Kali Linux

    First of all we need to open the Terminal, then we run the following command to install some packages.

    sudo apt install apt-transport-https curl -y

    It may prompt for the root password of our system before installing these packages. In the following screenshot we can see that these packages are installing:

    bravebrowser packages

    In the above screenshot we can see that these packages are installed. Now we need to run following command on our terminal for keyrings:

    sudo curl -fsSLo /usr/share/keyrings/brave-browser-archive-keyring.gpg https://brave-browser-apt-release.s3.brave.com/brave-browser-archive-keyring.gpg

    We can see what happens after applying the above command in the following screenshot:

    brave browser keyring on Kali Linux

    Now we need to add Brave Browser in our repository by using following command:

    echo "deb [signed-by=/usr/share/keyrings/brave-browser-archive-keyring.gpg arch=amd64] https://brave-browser-apt-release.s3.brave.com/ stable main"|sudo tee /etc/apt/sources.list.d/brave-browser-release.list

    We can see the output on the following screenshot:

    brave browser repository on Kali Linux

    Now we are almost ready to install Brave Browser on our Kali Linux system. We need to run a update to update our repository by using following command:

    sudo apt update

    After the update process is complete we can easily install Brave Browser by applying following command:

    sudo apt install brave-browser

    The installation of Brave Browser requires 96 MB to download and will take 300 MB disk space to install at this time (Updates changes the size), so the installation time will depend on our system performance and internet speed. We can see that Brave Browser is installed on our system in the following screenshot:

    brave browser installation sucessful on Kali Linux

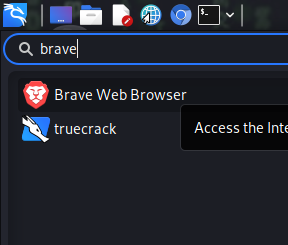
    Now we can see Brave Browser on our application menu.

    Brave Browser on Kali Linux

    We can open the Brave Browser from here. We have opened it as we can see in the following screenshot:

    brave browser opened on our system

    In the above screenshot we can see that Brave Browser is running successfully. This is how we can install Brave Browser on our Kai Linux or any other Debian based Linux distribution.

    Love our articles? Make sure to follow us on Twitter and GitHub, we post article updates there. To join our KaliLinuxIn family, join our Telegram Group. We are trying to build a community for Linux and Cybersecurity. For anything we always happy to help everyone on the comment section. As we know our comment section is always open to everyone. We read each and every comment and we always reply.

  • How To Secure Our Kali Linux System To Ensure Our Protection

    Kali Linux is an open-source Debian based Linux distribution which mostly used for offensive security. Previously known as Backtrack Linux this Linux distribution is a symbol of cybersecurity itself. Kali Linux used by penetration testers around the world. It also used by cybersecurity students to practicing penetration testing and stuff. But to run Kali Linux with the default settings may be a bad idea.

    Why? Because default settings are easy to crack and Kali Linux is not a privacy focused distribution (like Tails OS), Kali is created for attacking not for defending. Security is a huge concept. Most people use Kali to test security, but it’s also very important to secure the Kali itself. Because it is based on Debian we got good security. But what if we need more security?

    How To Secure Our Kali Linux System

    In this article we are going to discuss how we can improve the security of our Kali Linux system. Running Kali Linux with the default settings is not be a good idea.

    Change the Default Password

    If we are using older Kali Linux versions (older then 2020.1) then our default credential is “root” “toor“. If we have newer Kali Linux versions then the default credential is “Kali” “Kali“. We need to change it ASAP. It’s easy. We need to run following command on our Kali Linux terminal:

    passwd

    In the above command we don’t use sudo because we were already super user (root). This simple command will ask us the current user’s password (default if we don’t change it already). Then it will prompt for a new password and again it will verify it. A good password should contain both uppercase and lowercase letters with scrambles of symbols and numbers. After verifying the password our password will be changed. We can see it on the following screenshot:

    password change in Kali

    We need to remember that our typed password will not displayed for security reasons.

    Unprivileged User Account

    Previously root user was Kali’s default user. Now things are changed after Kali Linux 2020.1 update. Now Kali’s default user is non-root user account.

    An unprivileged user stands directly below the main admin user which have all the root permissions. Similarly to family and parental accounts.

    We can even use a root user directly on our system, but it will not good for security reasons. We must not use root user always.

    Updating Kali Linux Frequently

    There are lots of versions of Kali Linux. Kali Developers releases a new version in every quarter. Updated versions of Kali comes with upgraded kernels. For being a rolling distro Kali Linux doesn’t need to be download ISO image and again install it during update. We just need to apply some commands to install the update. Follow us to get notified when the update comes.

    Also we must update and upgrade our Kali Linux after some days by using following command:

    sudo apt update -y && sudo apt upgrade -y

    The conclusion is we need to update & upgrade Kali Linux frequently and update the distribution whenever it release.

    Changing the Default SSH Keys

    Secure Shell or SSH is a network protocol. It uses to communicate computers securely. As we’re on this page via web, we are already using some kind of SSH. There are no way around it but to fix present or upcoming security issues. Even for distros we use, there are SSH keys that let us verify authentic files from a source.

    It may looks everything is fine and cool but the problem is for everyone there are the same keys. Let’s understand it on this way. If we download a software from a website, it is the same distribution copy that everyone downloads it. Later we use our accounts with the software for a personalized way, and the service provider gives adequate power according to the subscription under those accounts. SSH keys have quite same fundamentals but those are used to verify files.

    If a bad guy did a Man-in-the-middle (MITM) attack or a social engineering campaign it may drain our security.

    SSH gives us capability to authenticate without inputting passwords every single time. There are two types of SSH keys. One is public and the other one is private. We need to change the our public SSH keys, because every distro have the same, and generate a private key will make sure only authenticated users can access it.

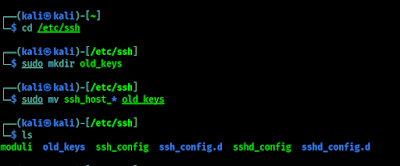
    SSH keys are located in /etc/ssh directory by default. This list view will shows all the keys inside. Instead of deleting them from the database, we are going to store them some secure place. We use following commands to do this:

    cd /etc/ssh
    sudo mkdir old_keys
    sudo mv ssh_host_* old_keys

    Now our all old SSH keys moved to a directory named old_keys.

    backup of ssh keys on old_keys directory

     Now we generate new keys by using following command:

    sudo dpkg-reconfigure openssh-server

    This command will generate new SSH keys for us. As we can see in the following screenshot.

    New SSH keys are generated

    If we faced any problem then we can use our backed up SSH keys.

    Save our Identity

    During surfing the internet with a Kali Linux machine, we can use the “NIPE” or “kalitorify” tools to browse safely and anonymously. Even though “macchanger” is recommended to spoof our Mac address. We also advice to change our hostname from Kali to a nameserver, and add a host similar to 8.8.8.8.

    Monitoring Logs

    Analyzing the logcheck program can be a real life saver. It can send logged messages directly to admin’s email. Log files are locally stored inside “/var/log” by default.

    logs in Kali Linux

    Using top (built right into the system) or htop (sudo apt install htop) tool shows us real-time monitoring activity. Even the xfce4-taskmanager graphical tool can perform similar actions.

    htop on Kali Linux
    Scanning for Malware and Rootkits

    We also need to scan our system frequently for malwares and rootkits. We can run the scan by using “Chkrootkit” or “Rkhunter” tool kits. We have discussed about this topic some days ago in details (Find & remove rootkits from Linux). So we don’t think we have to repeat it. These tools are like anti-malwares for Linux systems.

    Extra Talks

    Although Kali Linux is created for attacking purpose it is quite secure environment itself. But advanced users goes above and beyond for daily tasks and it is necessary to follow proper procedures. New users coming from other operating systems like Windows may think just running Kali Linux inside VMWare or VirtualBox is the safest process. It is quite true but certain steps must be taken.

    Hope this article helps our fellow Kali Linux users. Love our articles? Make sure to follow us on Twitter and GitHub, we post article updates there. To join our KaliLinuxIn family, join our Telegram Group. We are trying to build a community for Linux and Cybersecurity. For anything we always happy to help everyone on the comment section. As we know our comment section is always open to everyone. We read each and every comment and we always reply.

  • Right way to record and share our Terminal sessions

    The Terminal, also known as the command line or a Terminal emulator, is an crusial component of any useful operating system. It is by far one of the most important applications on MacOS and Linux. The Terminal provides an efficient interface to access the true power of a computer better than any graphical user interface.

    Sometimes we need to share our terminal or terminal commands to others to show or solve some issue. In that case we use screenshots which are not so satisfying. If we use a screen recorder apps but recording a screen and send the video file is annoying, here steps in asciinema.

    Asciinema record and share terminal on Linux

    Asciinema is a free and open source solution for recording terminal sessions and sharing them on the web in a easy way. Now this seems very interesting, lets try asciinema on our Kali Linux system. It also can be installed on various systems like MacOS, Linux, BSD even from source and pip.

    To install it on our Kali Linux system we can run following command:

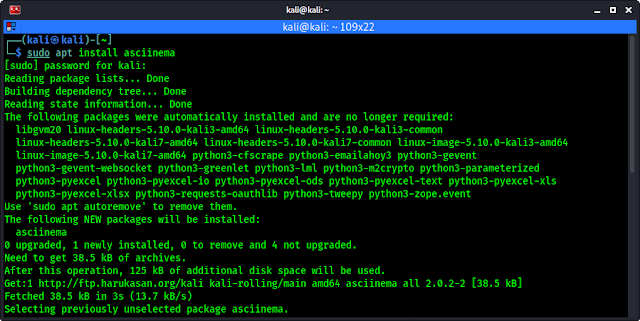
    sudo apt install asciinema

    After giving sudo password the installation process will start. In the following screenshot we can see that asciinema is installing.

    asciinema installing on Kali Linux

    This is very little tool should be installed on some seconds. After the installation process is complete we can run this tool and start record our terminal.

    To start the recording we need to use the following command on our terminal.

    asciinema rec

    In the following screenshot we can see that it is started and we can see in the following screenshot:

    asciinema started

    Now we can type any command and it will be recorded. Now we need to remember one thing that it records only the terminal, not other apps or the whole screen. When we feel that our recording is complete we can press CTRL+D or run exit command, shown in the following screenshot:

    asciinema save options

    Here it is clearly written that if we want to upload it on asciinema.org then we need to just press Enter⤶ and to save it on just our system we need to use CTRL+C.

    We press Enter⤶ to upload it on asciinema.org and in the following screenshot we got the link of the recording.

    asciinema uploaded

    Now we can open this on our browser, here we might need an asciinema.org account. If it requires then we can easily create it by using mail id. Asciinema doesn’t requires any password they verify the mail address (🤫We can use temp-mail for a temporary mail id🤫), and we are ready to rock. We can see various options there as shown in the following screenshot.

    asciinema website options

    We can share it in various way. We can directly send someone the link. Asciinema also supports oEmbed/Open Graph/Twitter Card protocols, displaying a nice thumbnail where possible. We can also easily embedded an asciicast on any HTML page. If we want to put a recording in a blog post, project’s documentation or in a conference talk slides. As we embedded a asciinema terminal record, please check below:

    We also can play our locally saved asciinema records (with *.cast file extension), by using following command:

    asciinema play filename.cast

    This is about record and share our terminal in a very easy way. Forget screen recording apps and blurry video. Enjoy a lightweight, purely text-based approach to terminal recording on our Kali Linus system.

    Love our articles? Make sure to follow us on Twitter and GitHub, we post article updates there. To join our KaliLinuxIn family, join our Telegram Group. We are trying to build a community for Linux and Cybersecurity. For anything we always happy to help everyone on the comment section. As we know our comment section is always open to everyone. We read each and every comment and we always reply.

  • How to Install & Use Ngrok on Kali Linux

    What is Ngrok ?

    Ngrok is a multi-platform application that provides us to forward our local development server to the internet without port forwarding. Ngrok hosts our locally hosted web server in to a subdomain of ngrok.com. That means we can easily show our localhost in the internet without owning domain names/static IP or port forwarding.

    Ngrok is a very good tool for the developers to check and show the projects to the clients before launching the project. But as everything it also be misused by the bad guys. They always trying to host their localhost phishing page on Ngrok to capture victims on the internet. So as a cybersecurity expert we need to look up on this Ngrok.

    How to install ngrok on Kali  Linux

    Warning:- Learning is the most beneficial way to protect everyone in the cybersecurity field, so our this article will focus on educational things. Ngrok is like a knife, knife is created for helping people to cut vegetables, but bad guys misuse it. Same for Ngrok also, it is created to help developers but bad guys misuse it. So don’t try to misuse it against anyone. We will not responsible for that.

    Download & Configure Ngrok on Kali Linux

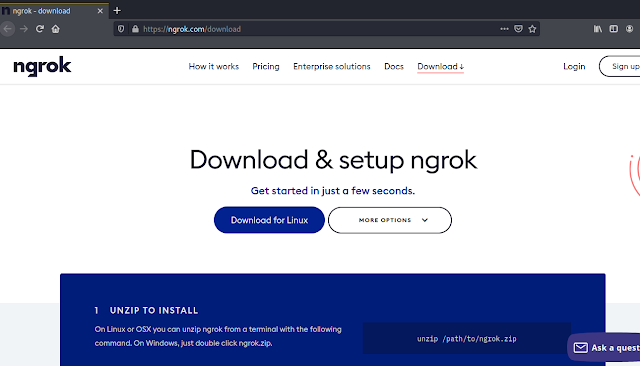
    To install Ngrok on our Kali Linux system we need to open our browser and navigate to the official Ngrok’s download page. Then we can see the webpage like the following screenshot:

    ngrok download page

    Here we need to click on “Download for Linux”, because we are using Linux. For other OS we can go on the “More Options”. After clicking on download we can see that download is started.

    download ngrok

    After download the starting it may not take much time with decent internet. The ZIP file will be downloaded on our “Downloads” directory. We need to go to the “Downloads” directory and decompress the compressed file.

    We open the terminal and use following command to go to our “Downloads” directory.

    cd Downloads

    Then we unzip the downloaded ZIP file by using following command:

    unzip ngrok-stable*zip

    In the following screenshot we can see that our zip compressed file is extracted.

    ngrok zip extracting

    Now our ngrok file is decompressed. Before running it we need to give it executable permission by using following command:

    chmod +x ngrok

    executable permission ngrok

    Now we are all set to run. But wait, we need to setup Ngrok before running. We need to set authentication with Ngrok API token. Where I can get my token? Well for that we need to sign up on Ngrok website. Lets navigate to Ngrok signup page on our browser.

    ngrok signup page

    Here we need to fill up our name and email and choose a password. If we want we can use disposable mail address to login and verify our mail address we don’t need to give our own mail address.

    logged in on ngrok

    After verifying our mail address we can get the API token on the “Your Authentication” area on the sidebar, as we can see in the following screenshot:

    ngrok authentication command

    In the above screenshot we can see our Ngrok authentication API key and the command to set it up. For security we had hided a part of our API keys. So we run the command with API key to set up the Ngrok.

    ./ngrok authtoken 1xyqb*****************25PTTHqMpHqB

    In the above command again we hided our the same API key with *. In the following screenshot we can see the output of the command:

    ngrok authentication command

    Now we are all set to run Ngrok. For an example we forward a locally hosted demo website to the internet.

    Using Ngrok on Kali Linux

    Ngrok’s work is simple it just host our local website to internet. So first we need a local website. Here we have a demo html page on our desktop, and we had opened it on Firefox browser.

    website demo

    But it is just a html page we need to host it locally. For that, we need to run a localhost server on our desktop. We open another terminal and go to the directory where our html page is stored. Then run python localhost server there to host the html page on our localhost by using following command:

    sudo python3 -m http.server 80

    In the following screenshot we can see that our local web server is started:

    python3 http server

    Now we can check it by opening our localhost IP on our browser 127.0.0.1. In the following screenshot we can see that page is now accessible by using our local host IP (127.0.0.1).

    localhost server is started

    Now this is accessible from our computer by using localhost IP (127.0.0.1), and from devices on the same network by using our Local IP (IP assigned by router for our Kali Linux system). But it isn’t available for other network, because this web server isn’t hosted on internet.

    Now we leave our web host terminal as it is, and back to our previous terminal window (where we setup Ngrok), and run the following command to run Ngrok:

    ./ngrok http 80

    Here we run the Ngrok script on http with port number 80, because our localhost server is running on port 80. (If we can’t use the localhost port 80 then we can use other ports like 8080 or 8888, in that case we need to specify our that port on Ngrok).

    After that we can see our Ngrok is started as we can see in the following screenshot:

    ngrok is running

    In the above screenshot we can see our forwarding link. Using that forwarding link (in actual links both http and https) we can see our that page from our browser.

    ngrok forwards our localhost site on the internet

    Not only from our browser we can access it from anywhere on the internet by the link provided by Ngrok.

    Ngrok site on Mobile

    We can see that page on our mobile which is connected to mobile data (not in our WiFi network). This link will be active until we don’t close the Ngrok tunnel, but in real life uses Ngrok can’t run this for a long time in their free plan. It can be a temporary solution.

    This is how we can use Ngrok on Kali Linux, this is the solution for hosting our local website or web server on the internet. Here we don’t need a static IP address neither requires port forwarding.

    Love our article? Make sure to follow us on Twitter and GitHub, we post article updates there. To join our KaliLinuxIn family, join our Telegram Group & Whatsapp Channel. We are striving to build a community for Linux and cybersecurity. For anything we always happy to help everyone on the comment section. As we know our comment section is always open to everyone. We read each and every comment and we always reply.

  • HTTrack — Make any Website Offline

    HTTrack is a free tool that can clone an entire website. HTTrack allows to download any website in local folder. It comes pre-installed in Kali Linux.

    HTTrack copies all the website including HTML pages, images, directories, links, structures from the server to our system’s drive. It make a page by page copy of an website. That we can visit the website offline. This helps penetration testers a lot. When we don’t have to study a a website’s content in short time then we can save it on our local drive for reading in future.

    httrack copy website in kali linux

    HTTrack has two versions one is command line (CLI) another is graphical based (GUI). In our this detailed post we will talk about these both.

    HTTrack

    HTTrack comes with Kali Linux full version or we can install it on Kali or other Debian based distro by using following command:

    sudo apt-get install httrack -y

    After the installation process done we can copy an website to copy a website we use following command:

    httrack https://site_ur -O /home/user/directory

    The above command will clone the example website on our required directory. Then we can browse it’s index page from our local disk.

    Otherwise we can just use httrack command to run it on interactive mode:

    httrack

    Then it will as us the project name as we can see in the following screenshot:

    httrack run and project name

    Here we can enter our project name as we wish. Then we press return or enter key and it will ask for path to save the cloned offline website. We can choose any path on our system or simply press Enter key to use default path i.e /home/kali/websites

    choosing path for httrack

    Here we need to put the URL of websites. We can clone multiple websites by entering their URL’s separated by comma or blank space. For an example we are going to clone the blog of re4son and we put the URL as we can see in the following screenshot:

    making offline copy of a website

    We press return and we get some other options.

    1. Mirror Web Site(s)
    2. Mirror Web Site(s) with Wizard
    3. Just Get Files Indicated
    4. Mirror ALL links in URLs (Multiple Mirror)
    5. Test Links In URLs (Bookmark Test)

    We can choose any number as per our requirements here for an example we just mirror a website so we choose 1 and press Enter .

    Then we need to set a proxy we don’t using any proxy here so we simply hit Enter.

    Now it will ask for define wildcards we also don’t need any special wildcards so we press Enter again for none.

    Then we can choose manual options here we can type help for options but we hit Enter again to skip it.

    Now we are ready to mirror or clone the website. HTTrack asks that we are ready or not to lunch the mirror process here we press y for yes and hit Enter.

    Then our cloning process will started as we can in the following screenshot:

    Mirror a website

    Here it will take some time depending how big website we have chosen and our network speed.

    After completing the process we can see offline copy of our website in our local directory /home/kali/websites

    httrack offline copy

    Then inside of our project directory (Example was our project name) we got the website’s offline copy.

    offline copy of our website

    We can open the index.html file on any browser to access the offline website.

    In the following screenshot we can see the offline website is opened in chromium web browser and check the URL section to be sure that it is offline.

    cloned wesite using httrack

    Now this is not end. HTTrack have a GUI version let’s talk about it.

    WebHTTrack

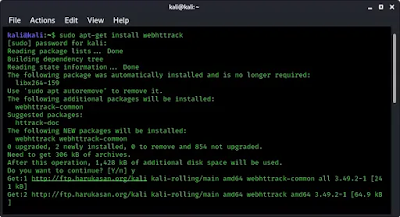
    WebHTTrack is a web-based Graphical User Interface version of HTTrack. We can install it by using following command:

    sudo apt-get install webhttrack -y
    webhttrack installation

    Now we can launch it by simply using webhttrack command on our terminal. Also we can start it from application menu.

    webhttrack in application menu

    After launching it we can see that it opens in our browser. As we told it is a web based tool. We can see it is opened in our browser in the following screenshot:

    Here default language is English or we can change the language. We are alright with English so we click on “Next” Then we got something like following screenshot:

    webhttrack filling details

    Here we can fill the projects name, paths etc and click on next.

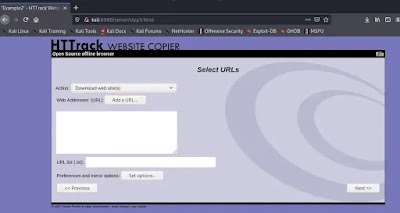
    webhttrack url input

    Here we can fill the inputs like URLs for cloning and other parameters then we click on “Next”.

    Then we will be on the Start Page. Here we got the “Start” button and we press it.

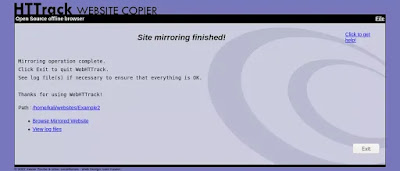
    Then it will start downloading the website on our defined storage location.

    completed mirroring website

    From here we can see the mirrored website. This GUI based tool is very easy to use.

    Love our articles? Make sure to follow us on Twitter and GitHub, we post article updates there. To join our KaliLinuxInfamily, join our Whatsapp Channel & Telegram Group. We are trying to build a community for Linux and Cybersecurity. For anything we always happy to help everyone on the comment section. As we know our comment section is always open to everyone. We read each and every comment and we always reply.

  • Beginners Guide of RTL SDR (Software Defined Radio) on Kali Linux

    SDR stands for Software defined Radio which is a radio communication system where components that have been traditionally implemented in hardware. We can use a SDR device as our super ear like Daredevil.

    What is a RTL SDR?

    In February 2012 the first FM radio signal was received with an RTL2832U chipset (Created for Digital HD TV), and RTL-SDR dongle using custom SDR drivers, After then tons of security researchers, hackers, makers, students and electronics lovers bought the RTL-SDR devices.

    Basically RTL SDR device is a software defined radio signal receiver, wait a minute! Did we just say Radio signal receiver? Isn’t it actually my grandfather’s FM radio does? Not like that actually The FM radios signals used to carry commercial radio signals between 88 and 108 MHz. An RTL SDR can go through a very wide range (22-2200 MHz, depending on tuner model). We had mentioned this device on our Hardware for Hackers article. A RTL SDR device is looks like following:

    RTL SDR Software Defined Radio on Kali Linux

    We can buy this device from Amazon.

    buy rtlsdr on amazon

    What we can do with RTL SDR?

    We can do a lot of things with a RTL-SDR device they are following:

    • Listening to FM radio.
    • Tracking aircraft positions like a radar with ADS-B decoding.
    • Listening to unencrypted Police/Ambulance/Fire/EMS conversations.
    • Listening to aircraft traffic control conversations.
    • Decoding aircraft ACARS short messages.
    • Scanning trunking radio conversations.
    • Decoding unencrypted digital voice transmissions.
    • Tracking maritime boat positions like a radar with AIS decoding.
    • Decoding POCSAG/FLEX pager traffic.
    • Scanning for cordless phones and baby monitors.
    • Tracking & receiving meteorological agency launched weather balloon data.
    • Tracking our own self launched high altitude balloon for payload recovery.
    • Receiving wireless temperature sensors and wireless power meter sensors.
    • Listening to VHF amateur radio.
    • Decoding ham radio APRS packets.
    • Watching analogue broadcast TV.
    • Sniffing GSM signals.
    • Using RTL-SDR on your Android device as a portable radio scanner.
    • Receiving GPS signals and decoding them.
    • Using RTL-SDR as a spectrum analyzer.
    • Receiving NOAA weather satellite images.
    • Listening to satellites and the ISS.
    • Listening to unencrypted military communications.
    • Radio astronomy.
    • Monitoring meteor scatter.
    • Listening to DAB broadcast radio.
    • Use RTL-SDR as a panadapter for your traditional hardware radio.
    • Decoding taxi mobile data terminal signals.
    • Use RTL-SDR as a true random number generator.
    • Listening to amateur radio hams on SSB with LSB/USB modulation.
    • Decoding digital amateur radio ham communications such as CW/PSK/RTTY/SSTV.
    • Receiving HF weatherfax.
    • Receiving digital radio mondiale shortwave radio (DRM).
    • Listening to international shortwave radio.
    • Looking for RADAR signals like over the horizon (OTH) radar, and HAARP signals.

    We can see there are tons of work can be done with the RTL-SDR device.

    Requirements to use RTL-SDR?

    1. First of all we need a RTL-SDR device, We got our RTL-SDR device from NooElec for testing, a special thanks to them. We can buy this model on Amazon. It comes with three type of antennas, a coax cable and obviously a RTL-SDR device with RTL2832U chipset.
    2. We also need a Kali Linux desktop/laptop or a Raspberry Pi, any other OS like other Linux distros, Mac even Windows also works with RTL-SDR. But here we are going to do our stuffs with our most loved Kali Linux.
    3. We need a RTL-SDR software (Most of which is free and open-source).

    Setting up RTL-SDR on Kali Linux

    In this article we are going to set up and RTL-SDR device on our Kali Linux system and test it with it’s a basic use.

    First of all we need to make ready our RTL-SDR device, connect it with the coax cable and attach antenna. Then plug it to our system’s USB port. After plugging it in we need to check if our system is recognizing it by using following command:

    sudo lsusb

    In the following screenshot we can see our RTL2831U chipset, in the highlighted area.

    rtl sdr is connected

    It’s fine, our RTL-SDR device is connected to our system. But here is a problem, as we told this RTL2832U chipset is created for TV so default Debian driver may think it as a TV Tuner. We need to fix it at first. We have to blacklist those drivers to do so.

    We need to go to the /etc/modprob.d directory by using following command:

    cd /etc/modprobe.d

    Here we need to use the following command:

    sudo nano blacklist-dvb.conf

    Then nano will open in front of us as we can see in the following screenshot:

    nano for creating configuration file

    Here we need to type following lines:

    blacklist dvb_usb_rtl28xxu

    We did it, shown in the following screenshot:

    blacklisting default debian drivers

    Then we press CTRL+X then we press Y then we need to press Enter ⤶ to save this file and exit.
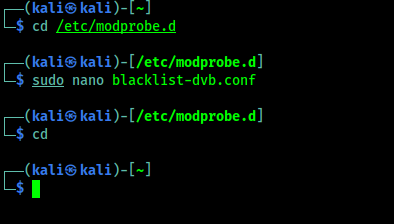
    Debian default drivers and exit
    We had used cd command to get back to our home directory.

    Now we need to test our RTL-SDR device if it is working perfectly. To do that we need to install rtl-sdr package on our system by using following command:

    sudo apt install rtl-sdr -y

    In the following screenshot we can see the output of above command:
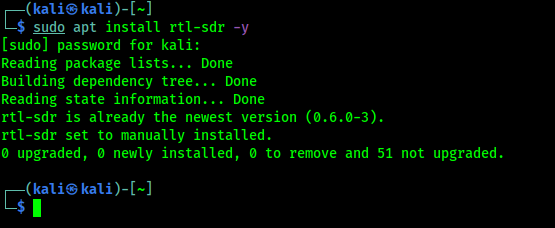
    installing rtlsdr packages on Kali Linux
    It is already installed on our system

    Now to check if our RTL-SDR is working perfectly we need to run following command on our terminal window:

    rtl_test

    After some seconds we can cancel it and check for data losses (after the initial one). If we didn’t see ant packet losses message then it is working fine.

    rtl sdr device testing

    Now we had almost completed our RTL-SDR setup on our Kali Linux we just need to install an RTL-SDR software to tune.

    Installing and Using GQRX on Kali Linux

    We are going to install an open-source software called GQRX.

    GQRX is an open-source software-defined radio (SDR) receiver powered by the GNU radio and the Qt graphical toolkit.

    GQRX has many features such as:

    • Discovering devices connected to a computer.
    • Processing I/Q data.
    • AM, SSB, CW, FM-N and FM-W (mono and stereo) de-modulators.
    • Recording and playing back audio to/from WAV file.
    • Recording and playing back raw baseband data.
    • Streaming audio output over UDP.

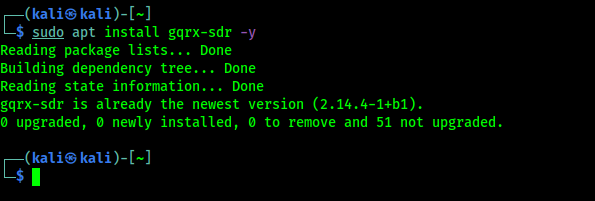
    GQRX comes with Kali Linux repository so we just need to apply following command on our terminal to install it:

    sudo apt install gqrx-sdr -y

    In the following screenshot we can see that gqrx is already installed on our system. The installation process will take some time depending on our system performance and internet speed.

    GQRX installed on Kali Linux

    Now we can just run the gqrx command on our terminal to start the gqrx.

    gqrx

    For the very first time we are running gqrx we got a configuration window. In the following screenshot we shows our working settings (mostly default).

    gqrx first time configuration

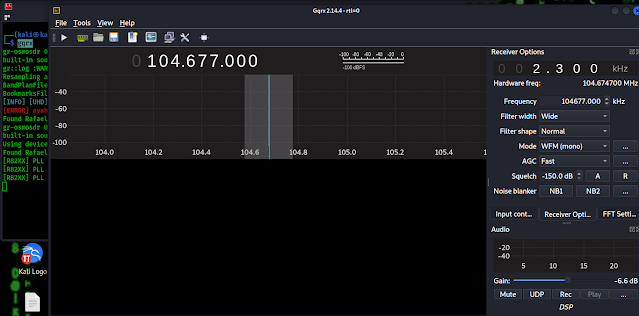
    After clicking on “OK” we will be in the gqrx main screen, In the following screenshot we can see that we had successfully running GQRX on our Kali Linux system.

    running GQRX on Kali Linux

    We can see the interface. On the Top left corner we can see the Play button (▶) which can be used to play and pause. In the left-hand side we can see the Receiver options box, where we can set various type of settings, like Frequency, width, mode etc.

    Tuning FM Stations on Kali Linux

    Let we set the frequency to our local FM Radio station. Here we need to remember one thing as we told previously that commercial radio stations only can use 88 to 108 MHZ. Here we can put the frequencies on KHz.

    That means we need to x100 on our MHz frequencies to make it KHz. A simple math. If our local radio station transmitting frequency on 91.5 that means it;s in MHz we need to make it 91500 KHz, and set it to our Frequency on Receiver Options. Then we need to click on the Play ▶ Button. We also need to set the mode to WFM (mono/stereo which sounds good). Now we can listen our radio as we can see in the following screenshot:
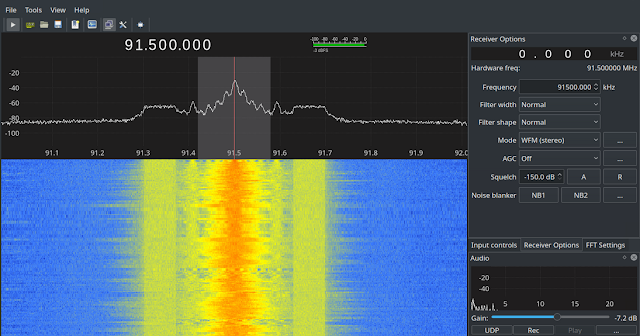
    listing radio on Kali Linux
    Listening can’t be captured on a image but we can see the clear radio signals

    YA. We did it! We can learn more on GQRX on GQRX tips and tricks and Decoding off keying.

    Wait A Minute

    Wait a minute. What just we did? We listen Radio on our computer? Why? We can do it on a little FM/Radio Player. People did the same thing since 40’s era. What is new here?

    OK then, we can say we learnt installations and the basic use of GQRX (very powerful tool), we also had setup RTL-SDR on our system. Not only that, Now we can listen radio (no more commercial radio stations, please) conversation on emergency services like fire services, polices/cops etc.

    Emergency services doesn’t uses commercial radio frequencies (88-108 MHZ), In different countries they use different frequencies. If we want to learn about their frequencies we can Google it. We can get the USA database of frequencies here.

    FAQ

    Can we transmit Radio signals using RTL-SDR?

    No. We can’t. RTL-SDR is just a receiver, it can’t transmit radio signals. Transmitting long range signals without proper permission is illegal in various countries. We can check the laws of our respective country to know more on it.

    Is It Legal to listen Emergency services radio?

    This is totally different in various countries. Listening some emergency is not illegal. There are specific laws in all countries we need to know about them by simple Google search. But using a RTL-SDR device is not illegal, misusing it will be illegal. So we can’t show anything on our this article which is illegal to any country.

    Can we listen GSM (2G) calls using RTL-SDR?

    That’s tricky. We know that GSM calls are not end-to-end encrypted, but they are encrypted at many steps along their path, so we can’t just tune into the GSM frequency and listen phone calls over the air like radio stations. We can capture and analyze GSM signals (not directly phone calls) using RTL-SDR. We will cover these things in our future article.

    Hope this will cover the basics of RTL-SDR and it’s uses on Kali Linux. We are going to publish more articles and cover much more things on Software Defined Radio.

    Love our articles? Make sure to follow us on Twitter and GitHub, we post article updates there. To join our KaliLinuxInfamily, join our Whatsapp Channel & Telegram Group. We are trying to build a community for Linux and Cybersecurity. For anything we always happy to help everyone on the comment section. As we know our comment section is always open to everyone. We read each and every comment and we always reply.

  • How to run C and C++ programs in Kali Linux

    In our today’s article we discuss about how we can run C and C++ programs in Kali Linux system.

    How to run C and C++ Programs in Kali Linux

    Sometimes we counter with C and C++ programs, now we are using Kali Linux as primary installation then how to run them?

    Well this is very easy. This tutorial is also going to be useful for other Debian based distributions like Ubuntu, Mint etc.

    Without wasting valuable time let’s get started.

    Running C Programs in Kali Linux

    First we need to have a C program in our Kali Linux system. Let’s write it.

    To write a C program we choose notepad++ in our Kali Linux system. Oh it’s not comes with Kali Linux (Notepad++ supports Windows only) but we shows how we have installed Windows programs in Kali Linux.

    After opening Notepad++ we wrote a simple ‘hello world’ script on C and save it with hello-world.c name on our desktop, as we can see in the following screenshot:

    writing c programs in Kali Linux

    Now we just need to open our Terminal window in Kali Linux system and navigate to our Desktop directory by using cd command:

    cd Desktop

    To run any C programs we need to have GCC in our Linux system. GCC is a C compiler for Linux or UNIX based system. It’s comes pre-installed with Kali Linux but if we need to install or update gcc we can run following command in our terminal:

    sudo apt-get install gcc

    The screenshot of the command is following:

    Installing GCC in Kali Linux

    Let we are going to run our C program by using following command:

    gcc hello-world.c

    It will run as we can see in the following screenshot:

    gcc running on Kali

    After running this command we can’t see nothing output. No worry, it is not given any output now but created a a.out file in our current directory. We can see it by using ls command:

    ls
    a.out in our directory

    In the above screenshot we can see the a.out file. This is an executable file for Mac or Linux. If we use GCC in Windows system then it will create a exe file.

    Now as we know this a.out file is executable we can execute this by using following command:

    ./a.out

    The screenshot is following. Here we successfully run our C program.

    running C program in Kali Linux

    If we need we can do with another name using -o flag. If we need the output called ‘hello’ in the place of ‘a.out’ then we can use following command:

    gcc -o hello hello-world.c

    Then we got a file called hello and we run it using ./hello command.

    Here we learned how we can run C programs in Kali Linux system.

    Running C++ Programs in Kali Linux

    Running C++ programming in Kali Linux is very similar to run C programs. Here in the place of GCC we need to use G++ compiler. To install/update G++ in our Kali Linux we ca use following command:

    sudo apt-get install g++

    Then we can compile a C++ program. We have a C++ program (“Hello World!” file named hello.cpp for example).

    Using G++ is very similar to GCC we can use -o flag to create another named file instead ‘a.out’.

    g++ -o hello-world hello.cpp

    Then we can use following command to run our compiled file and get the output.

    ./hello-world

    As we can see in the following screenshot:

    running C++ in our Kali Linux system

    This is how we can run C++ program in our Kali Linux system. In this article we learned how we can run C and C++ programs in our Kali Linux or any other Linux distributationHope this article helps our fellow Kali Linux users. Really love our articles? Make sure to follow us to get all our articles directly on notification. We are also available on Twitter and GitHub, we post article updates there. To join our KaliLinuxIn family, join our Whatsapp Channel & Telegram Group. We are trying to build a community for Linux and Cybersecurity. For anything we always happy to help everyone on the comment section. As we know our comment section is always open to everyone. We read each and every comment and we always reply

  • How to Run Windows Application and Games on Kali Linux

    There are so many users recently switched in Kali Linux from Windows, some of them and they want to run Windows programs and games in Kali Linux. So in our today’s tutorial we will describe how to run Windows programs and games in Kali Linux.

    run windows apps in Kali Linux

    We can easily do this via wine. Wine is a program by using it we can run Windows programs in Linux environment (Linux, macOS, & BSD). The full from of wine is Wine Is Not an Emulator. Really it is not an emulator or virtual machine, wine translates Windows API calls into POSIX calls on-the-fly, eliminating the performance and memory penalties of other methods and allowing us to cleanly integrate Windows applications into our desktop.

    How to Install Wine in Kali Linux

    In our Kali Linux system we can install wine by simply using following command:

    sudo apt-get install wine

    The following screenshot shows that we already have wine’s latest version.

    Wine instaling in Kali Linux
    Wine is already installed in our case

    We can’t run it now, we need another tool that is called wine-32. Wine-32 requires for 32 bit packages but it is necessary to run wine tool.

    We can install wine32 by simply using apt-get install command but first we need to add 32 bit architecture in our machine. To do this we use following command:

    sudo dpkg --add-architecture i386

    After this we need to update our system for new architecture’s repository by applying following command:

    sudo apt-get update

    Then we can install wine32 in our system, so we run the apt-get command:

    sudo apt-get install wine32

    It may take some minutes depending on our internet speed and system performance. Then it will ask for restarting some libraries, we click here yes(Tab key might be useful). Then after completing the process we restart/reboot our PC.

    restarting some libraries

    Then we need to configure our wine to run Windows applications. To do that we open wine configuration by applying command:

    winecfg

    It will open the configuration window of wine. As shown in  the following screenshot:

    wine configuration

    Here we can configure wine. We can set Windows version, Libraries, Graphics, Audio, Drivers, Audio etc, but for now we leave these on default configuration. 

    Run Windows Application in Kali Linux

    Now we are all set to run Windows applications and games in Kali Linux. We just need to type wine name-of-installer.exe in terminal.

    For an example we are going to install notepad++ in our Kali Linux.

    We need to open our terminal where the notepad++ setup file or exe file stored (In our case it’s in our /Downloads directory, as we can see the directory in the following screenshot) and type following command:

    wine npp.7.8.8.Installer.x64.exe

    Then it will start it’s installing process and we can complete it as we do in Windows OS, as we can see in the following screenshot.

    notepad ++ installing in Kali Linux using wine

    After complete installation during the funny next next way (Windows installation process LMAO) we check on create desktop icon and we got notepad++ icon on our desktop.

    Notepad++ on Kali Linux Desktop
    Notepad++ on Kali Linux Desktop

    Now we can launch Notepad++ from directly our desktop. Isn’t it really cool ??

    We also can start it from Application Menu>Wine>Programs>Notepad++

    Notepad ++ on Kali Linux

    Now if we want that we don’t wanna use terminal and we need to open every exe file through wine directly. We just skip the terminal then we need to set wine program loader as default for exe files. We need to create a symbolic link of it. To do it we use following command:

    sudo ln -s /usr/share/doc/wine/examples/wine.desktop /usr/share/applications

    Then the link will be created, now we need to set it default for all exe files. To do so we right click on any exe file and choose “open with another application”.

    exe file opening with another application

    Now we scroll down very lower (or we can press wine on our keyboard) to find “Wine Windows Program Loader”. We need to select it and must check ✅ on the box “Use as default for this kind of file” as we did in the following screenshot:

    Choosing Wine Windows Program Loader as a default

    Then we need to click on open. After this point our system will open every exe file via wine as default.

    This is how we can install any application in Kali Linux such as Adobe Photoshop, Microsoft Office. Nowadays we can run latest versions of Windows programs in Linux even we can install Adobe Photoshop CS 2020.

    Wine creates file systems like Windows in our home directory but it is a hidden directory. Anyways we have opened it in the next screenshot.

    wine file system

    Here we can see the file system is just like Windows. Wine creates an entire system like Windows that’s why we can run Windows application in Linux, not like virtual machine or emulator they creates another virtual system inside our system.

    Additional Wine

    Another tool is called “Winetricks”, it helps us to install various Windows games, application, dll libraries, fonts etc.

    Lets install Winetricks by using following command:

    sudo apt-get install winetricks

    This is a very small tool should install in some seconds.

    installing wine tricks

    After installing it we run this tool by using following command:

    winetricks

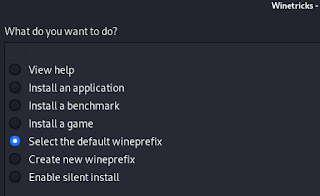
    After this the menu opens like the following screenshot:

    winetricks menu

    From here we can easily install application, games and much more things.

    Some wine tricks applications

    Here is some winetricks applications list. We can see MS Office versions here. The MS Office 2013 is available for direct download via winetricks.

    funny.gif

    Conclusion

    This is how we can install & run Wine in our Kali Linux system and install Windows applications and games in Kali Linux. Found it useful? Need more articles and article updates? Make sure to follow us to get all our articles directly on notification. We are also available on Twitter and GitHub, we post article updates there. To join our KaliLinuxIn family, join our Whatsapp Channel & Telegram Group. We are trying to build a community for Linux and Cybersecurity. For anything we always happy to help everyone on the comment section. As we know our comment section is always open to everyone. We read each and every comment and we always reply.

  • How to Install VSCode on Kali Linux

    There are so many code editors in the market, but now many developers found liking Virtual Studio Code. In this community we have seen many of friends switched on Virtual Studio Code (VSCode) from Atom and Sublime Text.

    how to install vscode on kali linux

    VSCode is an awesome code editor, it’s totally free also. In this brief tutorial we are going to install VSCode on our Kali Linux system.

    Installing VSCode on Kali Linux

    Before June 2021 we need to download the source-code of VSCode but now Kali Linux added VSCode on the repository.

    We need to run one single command “sudo apt install code-oss” to install VSCode on our Kali Linux system. Code-oss is an open-source fork of VSCode without any proprietary code.

    We run the following command on our terminal:

    sudo apt install code-oss -y

    It will start installing Virtual Studio Code on our Kali Linux after providing our root password, as we can see on the following screenshot.

    installing vscode on kali linux

    It will download nearly 75 MB archives and take nearly 270MB disk space. So the installation time will depend on our internet speed and system performance.

    Using VSCode on Kali Linux

    After the process complete we can see code-oss aka VSCode on our application menu.

    vscode on kali linux

    We can click here to open it. Alternatively we can run code-oss command from our terminal to open it.

    code-oss

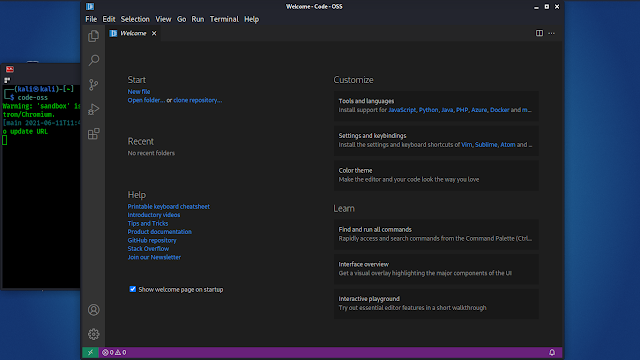
    The welcome screen will be in front of us as we can see in the following screenshot.

    running vscode on kali linux

    Now our coding will be hassle free with our favorite code editor.

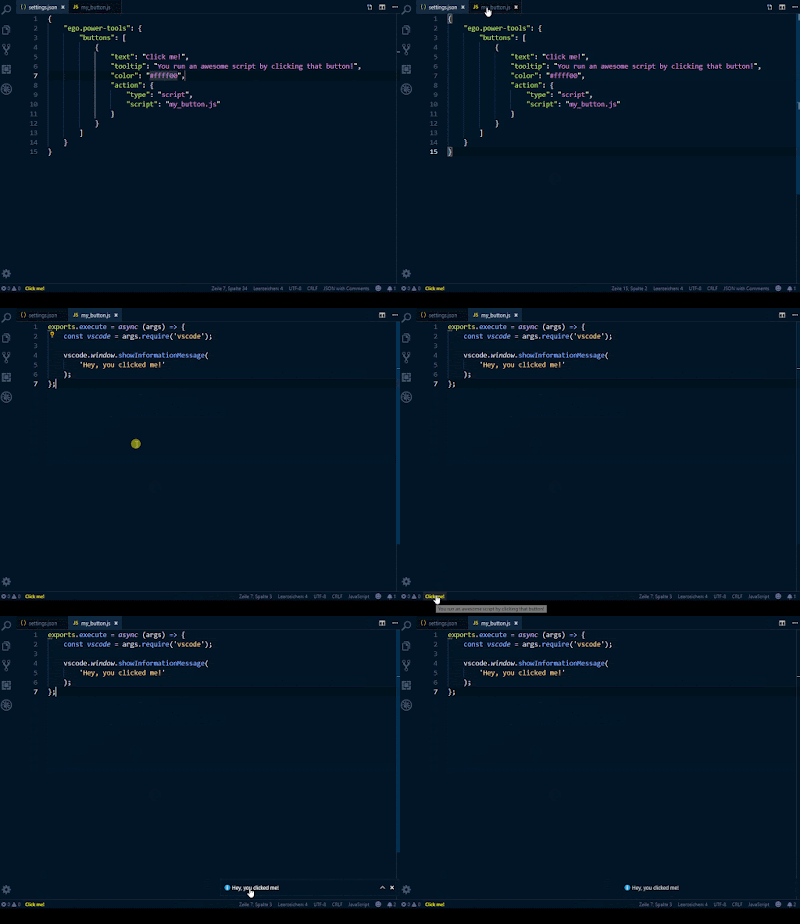
    vscode on kali linux gif

    This is the most easiest way to install Virtual Studio Code aka VSCode aka code-oss on Kali Linux. If enjoyed the article make sure to comment on following comment section, that encourage us.

    Love our articles? Make sure to follow us on Twitter and GitHub, we post article updates there. To join our KaliLinuxIn family, join our Telegram Group. We are trying to build a community for Linux and Cybersecurity. For anything we always happy to help everyone on the comment section. As we know our comment section is always open to everyone. We read each and every comment and we always reply.